

nissan 240sx (S14) with Modded GTO pan (tons of pics)
 07-09-2009, 02:53 PM
#121

Headers:
I'm going back and fourth between three options:
1. I found these guys http://stainless.eclipticcms.com/customheaders
they have a neat idea, they send you mock up kit, you position all the tubes where you want them and mail it back. All said and done in stainless for $1300+s&h with merge collectors. Plus the fact that they purge weld the headers is pretty bad ***.
2. But then I also have an old set of plain steel headers that some guy had for an OLD gm F or B body LS1 swap. They do not fit at all, but I scored them for $100 and figured they'd make a good starting point with the flanges at least. Plain steel headers always seemed like a waste of money to me. I don't care what you coat/paint/wrap them in they will be rusty within a year. Rust isn't the end of the world, but in a car that gets used rain or shine I don't think steel headers last much more than 6-7 years. It would take probably another couple hundred in j bends and collectors to make them.
3. My third option is to just drop the car off at Kooks or American Racing Headers here in Long Island. MINIMUM of $1500, and I'd have the least control over where the collectors end up.
Also, does anybody have any software to help determine tri-y vs 4 into 1, and primary and collector lengths?
 07-09-2009, 08:45 PM
#122

wow! nice build. I love how you over think everything.....smart.
here is a video of my s14 build.
http://www.youtube.com/watch?v=Y4waYWfXiJw
I'm about to roll/pull the fenders for 295's, can you give me directions how?
here is a video of my s14 build.
http://www.youtube.com/watch?v=Y4waYWfXiJw
I'm about to roll/pull the fenders for 295's, can you give me directions how?
07-10-2009, 10:04 AM
#123
wow! nice build. I love how you over think everything.....smart.
here is a video of my s14 build.
http://www.youtube.com/watch?v=Y4waYWfXiJw
I'm about to roll/pull the fenders for 295's, can you give me directions how?
here is a video of my s14 build.
http://www.youtube.com/watch?v=Y4waYWfXiJw
I'm about to roll/pull the fenders for 295's, can you give me directions how?
Turbo power! Nice.
For the roll and pull.
1. Taylor your job specifically to the wheel tire combo. Don't start until you have the them mounted on the car. Put the car on jackstands and put your hydraulic jack under the tire so you can keep double checking . The end product will look a lot better if your clearance is perfected down to < .5"
2. Do all of this in the middle of the day in exposed bright summer sun. And then just to be sure have a heat gun too. Get the paint as hot as possible without screwing it up and then start to roll. Otherwise you'll crack the paint.
3. Get the lip edge rolled first without any pull.
4. Start your pull up high. About 6" above the lip. And go back and forth and inbetween slowly. A lot of guys do all of the pull on the lip of the fender and it ends up looking ghetto, and all curved out. Do it my way and it won't even look pulled. It'll just look stock, and make you seem like a wheel fitment pro.
07-13-2009, 01:12 PM
#126
So it looks like Kooks is way down in NC now. I called the guys at American racing headers, in nearby Amityville Long Island. They were very cool and said that I could come down and try any of their LS headers (they make like 10 different ones) to see what is closest. And if nothing quite came close enough they could do a total custom job in 5 days for around $2500. That is about the going rate these days. While it's a lot of money. Five days of a professionals time costs. This is a bit of a DIY project though and right now I'm leaning in other directions.
I'm going to do a little multi post series on header design, starting today with choice of materials:
You basically have two choices. Stainless or Plain steel. Most people think that the only advantage plain steel has over stainless is cost (almost %50), but they are wrong! Plain steel is also a bit lighter than stainless! Even given these two advantages I�ve always thought that making headers out of plain steel was a waste of time and money, mainly because plain steel headers rust like *************. Some would say, �well then just coat it.�
When I was woking at TTP back in Jersey on all the hi dollar LS1 cars, I was lucky enough to become the header bitch. I swapped out a lot of headers! And I don�t care what coating was used ( I saw at least 4 different kinds), rust was visible through the coatings with in a year! Bogus.
�Ok don�t coat it then, wrap it� you say. While I have to admit that I love the old school hot rod look of fiberglass header wrap, it�s murder on steel headers. It basically acts like a big sponge soaking up whatever oil and water comes its way, and then holding it against the header. Can you say instant rust? While header wrap will reduce under-hood temperatures and improve looks, it also shortens the life of your already �livin on borrowed time� plain steel headers.
Now if you�re building a circle track race car with a short expected life cycle, or you plan on a different set of headers in a couple years, save some bucks and weight and go with plain steel.
In my hopeless attempt a fiscal solvency I thought about going this route, and even picked up a set of steel headers that I thought I would use the tubes from, but obviously I�m having second thoughts. The advantages of stainless include better heat insulating properties, and corrosion resistance. Plus, they look damn nice.
More on header design to come�
07-14-2009, 02:03 AM
#127
What I don't know is: Presuming you know what rpm your top end is tuned for, what rpm do you tune the headers for? The same rpm? A little before or after? How little? Or do you just forget what you know and try to get a bump where you think you'll need it in the powerband?
I thought that it was interesting that in his book on intake manifolds David Vizard seems to pull no punches in stating that an intake is almost secondary/dependent to a good exhaust scavenge.
Here's what I've done so far.
I pulled David's "How to Build Horsepower vol 2., Carburetors and Intake Manifolds" down off the shelf and used his formulas to determine what rpm the stock intake manifold was tuned to.
Based on my measurements:
LS7 stock plastic intake runners (7 of 8, the first runner is shorter)
Outer radius 312
Inner radius 188
Average = 312 +188 = 500mm/2 = 250mm plastic intake runner length
161.5mm tract in head from intake valve to gasket
Total = 250 +162 = 412
412mm = 16.22� total intake tract length
Head ports
Intake: 61x35mm= 2135mm^2 = 3.31 in^2 = same area as a 1.81" square
Then using an effective cam duratio of 260 (a comp XER 238 @ .050 lobe, is 287 advertised - 27 = effective) which is pretty close to what I plan on running I cam up with the following tuned rpms at the respective reflective values:
rpm @1 17459.85401
rpm @2 8729.927007
rpm @3 5819.951338
rpm @4 4364.963504
rpm @5 3491.970803
rpm @6 2909.975669
rpm @7 2494.264859
rpm @8 2182.481752
If I was going to try and match the headers to the intake/cam the 3rd reflected value is the only one that makes sense for me. I'm building this motor for a RWD time attack car that will be limited to street tires. So bottom end isn't too important, and I was actually planning on building the motor to drain a little power down low to pile it on later, towards a 7100 rpm redline.
Just a side note. The stock LS7 comes with a 211 @ .050" intake duration. If you presume an effective cam duration of 237 (211 + 51 should get you pretty close to an advertised duration, then subtract 25 to get effective cam duration, cuz intake valves don't start flowing well the very second they are off the seat) the 3rd reflected value comes out at 6110 rpm. Pretty neat since that's about where most LS7s peak even with bolt ons. I guess David's math works!
LS7 on the Dyno:
rpm----tq---hp
3000--455--260
3500--467--311
4000--504--383
4500--526--451
5000--529--503
5500--512--537
6000--480--548
6100--472--548
6200--463--547
6300--454--544
6400--445--543
Dyno results stolen from here:
http://www.pistonheads.com/gassing/t...=0&i=0&nmt=LS7 on the Dyno&mid=0
Thanx for reading guys, now what rpm do I tune the headers for?!
07-14-2009, 12:21 PM
#128
Stan helped me a bit over at gofastnews.com
The formula I was using:
rpm * rv = [(720 - effective intake duration) * (.25v * 2)] / (L + .5* intake port D)
I did use 1300 for V. Should I be using 1141? It is a plastic intake, and I will be using a good cold air intake isolated from the engine bay's heat. Your clarification for the port diameter makes sense too. I found this speed of sound calculator
Speed of sound in air and the temperature calculator air pressure - table density of air calculation acoustic impedance air density sea level - sengpielaudio Sengpiel Berlin
115 F makes more sense to me for air deep inside a well fed plastic manifold, which comes out to 1175 f/s
Inputs:
speed of sound 1175
.050" 238
advertised in. cam dur. 287
effective in. cam dur. 260
intake length 16.22
port diameter 2.0529
Unfortunately it look even worse now. I don't need no bumb at 7800 rpm!
rpm @1 15669.89148
rpm @2 7834.945742
rpm @3 5223.297162
rpm @4 3917.472871
rpm @5 3133.978297
rpm @6 2611.648581
rpm @7 2238.555926
rpm @8 1958.736436
But the question remains. Do I tune the headers to the rpm of the intake's RV=3 rpm, or something else?
Since you did not list the formula, I can only guess. The one I have uses diameter and 3.31 in^2 has a diameter of 2.0529. I also used 1141 for the speed of sound which is 82 F. it looks like you are using 1300 which is correct for around 244 F.
1 = 15216.46483769124
2 = 7608.232418845618
3 = 5072.154945897079
4 = 3804.116209422809
5 = 3043.292967538247
1 = 15216.46483769124
2 = 7608.232418845618
3 = 5072.154945897079
4 = 3804.116209422809
5 = 3043.292967538247
rpm * rv = [(720 - effective intake duration) * (.25v * 2)] / (L + .5* intake port D)
I did use 1300 for V. Should I be using 1141? It is a plastic intake, and I will be using a good cold air intake isolated from the engine bay's heat. Your clarification for the port diameter makes sense too. I found this speed of sound calculator
Speed of sound in air and the temperature calculator air pressure - table density of air calculation acoustic impedance air density sea level - sengpielaudio Sengpiel Berlin
115 F makes more sense to me for air deep inside a well fed plastic manifold, which comes out to 1175 f/s
Inputs:
speed of sound 1175
.050" 238
advertised in. cam dur. 287
effective in. cam dur. 260
intake length 16.22
port diameter 2.0529
Unfortunately it look even worse now. I don't need no bumb at 7800 rpm!
rpm @1 15669.89148
rpm @2 7834.945742
rpm @3 5223.297162
rpm @4 3917.472871
rpm @5 3133.978297
rpm @6 2611.648581
rpm @7 2238.555926
rpm @8 1958.736436
But the question remains. Do I tune the headers to the rpm of the intake's RV=3 rpm, or something else?
07-16-2009, 03:02 PM
#129
So I broke down and bought it.
http://www.maxracesoftware.com/pipemax36xp2.htm
I think this is the first piece of software that I've paid for in a very long time!
Interestingly enough pipe max doesn't care what your intake runner length is either. Regarding the intake it only wants flows from tb to valve, valve sizes, and cam specs. Luckily I've got that! And then it spits out the lengths where the reflective valves would be optimal, given your flows and cam.
So just like headerdesign.com the intake length is not a consideration in the calculation of the header dimensions.
With my combo it suggests that
RV2=19.5"
RV3=13.6"
Presuming I'm just going to follow pipemax's instructions blindly for the header dimensions, the problem becomes avoiding the old garbage in garbage out. Once all of my inputs were entered I adjusted the VE until the "low horsepower" matched what I expect from the dynos I've seen of similar builds. That came out to about 112% VE (618-670hp). Then I noticed the calculate ve from head flows blurb. And following those instructions was given a VE of 125.8% (735-795hp)! I know these new LS7s are impressive pieces of engineering, but seriously? Which VE do I use?
Also, at 112% VE it reccomends the primaries be 1.75" to 1.88" & 28-31" long
While at 125.8% VE it reccomends 1.69" to 1.82" & 26-29" long
As the engine gets more efficient and moves more air it requires smaller primaries?
07-24-2009, 06:40 AM
#130
I've been hard at work installing replacing the link ecu in my s/c miata with an AEM EMS. I had to tap a bung in IC piping for a GM IAT, install a 3 bar map sensor, and wire in a GM knock sensor. I actually got it fired up yesterday, and played with the start up and idle settings. Purring like a kitten at 1000 rpm. Maybe I'll lower it a bit just so it sounds meaner. Today I'm going to install the smaller pulley for ~16 psi and maybe make a test pipe so I don't melt the cat as I'm figuring all this stuff out. I've bought a ton of tools. And havn't forgotton about the 240 though. It made me sad how little has been done this summer so I bolted on my valve covers and laid the LS7 intake ontop of my broke *** LS1 just for a little inspiration. It's silly I know, but it keeps me goin.
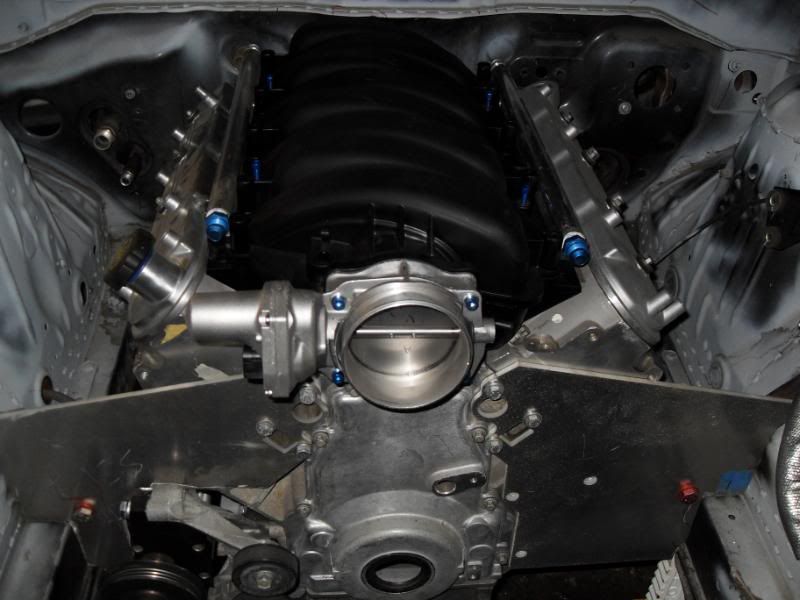
I also cut up some big as PVC to check for header clearances.
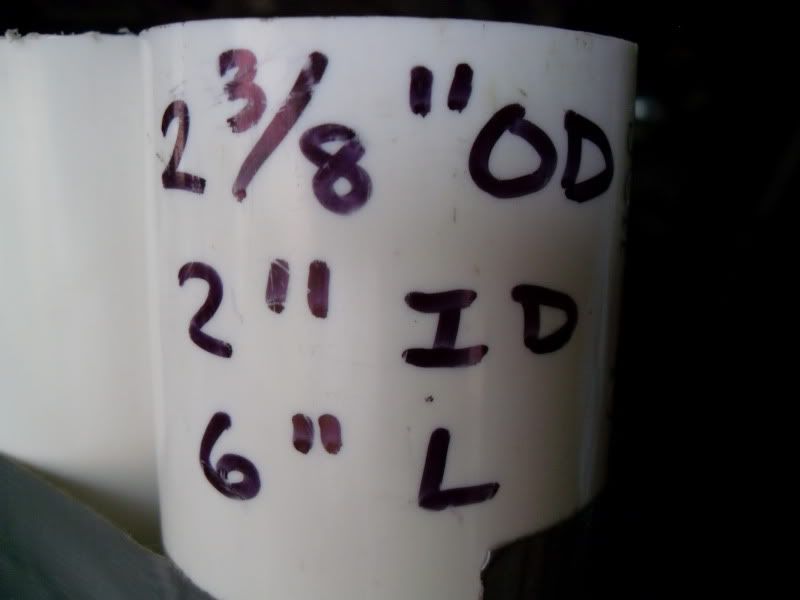
What was I worried about?
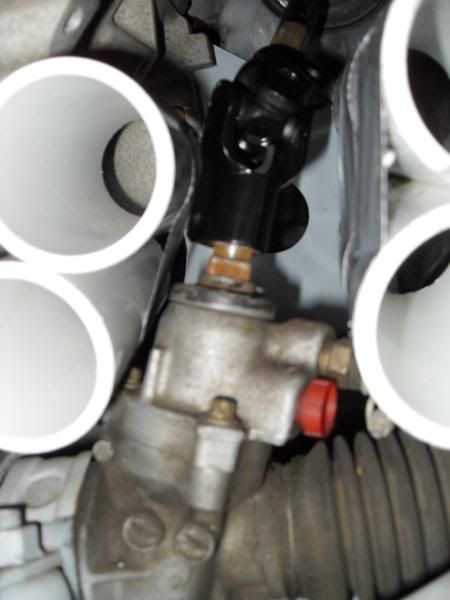
I can go 1 7/8" primaries and still have a full .25" clearance everywhere!


I underestimated how much there is to this tuning thing with the AEM. The base map for the miata kinda sucks. I figured wire up the sensors, slap in the new tables, I understand AFR and timing, I'll be fine!? What about sensor lag time? Coil dwell time? Cam/crank sensor sync offsets and a million other little check boxes that can blow your **** up!? Plus the "instructions/help" merely define the basic pull down terms. No where does it tell you when to change them, why, or in what direction. I thought the link was bad with all of it's windows. There is Soooooo much that you can do with the AEM EMS this is going to be a steep learning curve. I better go buy some 110 octane.
Anyone in Long Island got EMS skills?
I also cut up some big as PVC to check for header clearances.
What was I worried about?
I can go 1 7/8" primaries and still have a full .25" clearance everywhere!
I underestimated how much there is to this tuning thing with the AEM. The base map for the miata kinda sucks. I figured wire up the sensors, slap in the new tables, I understand AFR and timing, I'll be fine!? What about sensor lag time? Coil dwell time? Cam/crank sensor sync offsets and a million other little check boxes that can blow your **** up!? Plus the "instructions/help" merely define the basic pull down terms. No where does it tell you when to change them, why, or in what direction. I thought the link was bad with all of it's windows. There is Soooooo much that you can do with the AEM EMS this is going to be a steep learning curve. I better go buy some 110 octane.
Anyone in Long Island got EMS skills?
08-11-2009, 12:50 PM
#131
I talked to a tech at ATL today. I've been trying to figure out an economical way to roll with a fuel cell rather than trying to source a stock fuel tank. I watched the show “A Thousand Ways to Die” a couple weeks ago, where they showed a real gruesome video and interviewed a Modified racer who survived a fiery crash that set his fuel cell ablaze. He was all scarred in the face. Makes you stop and think about what the hell you’re doing.
Fuel cells are required in very few classes, and are usually only installed at the builders preference. If you are not using a stock tank, the rules get heavy fast. Basically, NASA is spoiling all the cheap fun. They are no longer issuing log books for cars with non FIA, FT3 approved fuel cells (presuming you’re not using the stock tank).
The FIA has three main ratings with FT3, FT3.5, and FT5. Each has increasing tensile strength requirements for the bladder. The stronger bladders are recommended when higher speeds are expected. ATL managed to get a polypropalene (like the RCI, RJS, Jaz tanks) tank approved by the FIA for FT3. A lot of people seem to think that this is a great budget solution. But I think that many are overlooking that fact that in order for that tank (the ATL Saver Cell) to actually meet the letter of the law of FT3 it MUST be enclosed in a metal container; even though ATL will sell one without the metal container (they include directions on how to make your own).
Almost all of the bladders have a five year expiration date. And can be legally re-certified for an additional 2 years. The cost is $175, and ATL must receive the bladder before the end of the 5 years. There is a test strip that is within the bladder that they remove and retest for tensile strength. But, it seems that these rules are very poorly enforced by both NASA and the SCCA.
Ebay always seems to have tons of really cool looking cool looking check-ball valve lids. But it turns out that those shiney ***** weigh 3 lbs each! Oh and in severe accidents the weight of the ball can mangle it’s pretty aluminum cage, and then they don’t seal! So Nascar is getting away from using them, and that’s why you can score them so easily. The tech at ATL said that they have come up with a new paddle valve that works much better, and he recommended p# TF703 $340.40 (Remote-Fill lid, Off-Set Paddle Valve) for my project. Though, the paddle valves can be had separately $76, and I might be better off to just retrofit one to an e-bay, surplus Nascar lid.
I cut out the floor of the trunk. The frame rails pinch in near the rear sub-frame, and at the front of where the trunk floor used to be it’s only ~35” wide. The bottom of the trunk is ~19 front to rear. Because of this I like the dimensions of ATL’s 22 gallon (85L) “C” tank. For reference: the 1995 s14 tank holds 17.17 gal (65L). I would go smaller, just to get the tank further away from the rear corners (crash zones). But I’m still day dreaming of running alcohol someday, and the extra volume would be nice.
I already have a new in-tank Walbro 341 fuel pump, and have decided against an external surge tank. ATL makes an internal sump for $190 with 3 trap doors , that eliminates the need for a second fuel pump, a second tank , and another set of lines and fittings.
Below is a list of current costs of the 22 gallon cells I’ve been looking into. (smaller cells are slightly cheaper)
FUEL SAFE NEW
$284 SC122A SPORTSMAN STEEL CAN 34" x 18" x 9.5"
$424 ac122a-sb race safe al can 34" x 18" x 9.5"
$437 RS122A race safe hard plastic like enduro but with nice fill plate
$555 race safe cell with steel cont
$496 enduro core = assemble req. with top, no can
33.625" x 17.500" x 9.063"
$736 ED122A enduro complete 20Gauge steel (nascar's are 18)
$416 RB322A enduor replacement bladder
$1050 SM122A sportsman soft complete
$686 RB222A sportsman bladder
$1354 PC122A procell complete
$860 procell blader
ATL NEW
$382 aluminum can 15 lbs
$318 STEEL CAN 25 lbs 34.00 x 17.50 x 9.50
$1090 SUPER CELL, soft rubber and FT3+, no alcohol
$790 22g sports cell, 43lbs, hard plastic with steel can FT3+
$501 SAVER CELL, 22G SA122C 22LBS, 33.18 X 17.06 X 9.25
$732 super cell bladder
$452 saver bladder only
$1,100 BANTAM is kevlar and FT5+ bladder (only 3 lbs!)
EBAY
$515 18G NASCAR EXPIRES LATE 2011 - 33" X 17" X 8", no lid
$850 expiration 03/10, 3 DOOR SUMP, 22G, NASCAR, KEVLAR, remote lid
$650 expired, 3 door sump, 22 G nascar, remote lid included 33" wide x 9.25" tall x 17 deep
$500+ mustang 16g Aluminum (not FIA)
“I've been trying to figure out an economical way to roll with a fuel cell rather than trying to source a stock fuel tank.”
…FAIL
08-11-2009, 01:51 PM
#132
You may want to take a look at these guys as an alternative for fuel cells. I've built 2 custom can for my GTM and will have them do the bladders at some point as they are a lot less expensive than SF or ATL.
http://www.harmonracingcells.com/BoxEnd.html
Good luck..
http://www.harmonracingcells.com/BoxEnd.html
Good luck..
08-15-2009, 10:16 AM
#135
It's funny, when ever I google dry sump, or LS1 240sx this thread is always on the first two pages! I also have an extra steel moroso ASA dry sump pan if anybody needs one. With all of the modifications that I've made to my GTO pan I kinda wish that I had just gone with an Armstrong Engineering pan to begin with.
08-17-2009, 11:56 PM
#136
I spent all day running down parts and installing a new fuel pressure regulator in the miata. I started to feel comfortable street tuning the upper rpm ranges of the miata and I was leaning out a tad (11.5 AFR). I kept trying to increase the fuel until I noticed my duty cycle was well over 100%. After a little research it also turns out that the stock miata FPR is only maintains a 1:1 boost reference to about 15 psi. And with my new pulley I've already seen 16.8 psi out of my whipple! That's a supercharger, and that's at the manifold, after the IC!!!
I had to use a SARD adapter and 90 degree fitting to get my VISHNU dual feed fuel rail to dump into a -6 line. The 90 fitting was $34 for -6. Really? **** SARD. Oh and the adapter had the holes drilled a full half inch too close together. I had to notch the **** out of it.
I'll be on my way back to Jersey to hit up my old shop TTP for dyno tuning and a little schooling on my AEM EMS by the owner/tuner Matt Sorian. Check 'em out they're always building something bitchin.
http://www.ttperformance.net/
I'll post the miata dyno sheet tomarrow, presuming I don't blow it up!
I've been trying to sign up for the Oct 9th Watkins Glen Last Chance Drivers School hosted by the NE SCCA. But none of the links are up for signing up. Is it normal for the sign ups to only be available near the events?
Last edited by GIGAPUNK; 08-18-2009 at 12:03 AM.
08-31-2009, 02:32 PM
#137
Dyno Session for the miata at TTP didn't work out. I got bumped by a paying costumer's, problem child, twin turbo, mustang. It was cool watching Matt tune in another 200+ hp though. It was making well over 700hp by the time I left. While I was there though I installed a new walbro 255 to replace the 190hp. FYI a 190hp is NOT ok at 300 crank hp in a supercharged application. Now I'm debating even using a walbro at all for the LS7. Corky Bell told me to stay away from the walbro and go bosch or pierburg. I don't think you can score the bosch for less than 200, and I'm still hunting for a good place/price to get a pierburg.
I also just scored a nice used ATL fuel cell on ebay. Should be here in a week or two. It's p# SU122E which is a soft rubber bladder 22g tank 33"x17"x9". I'm thinking about using 1" square tubing to mount it. Anybody know anything about mounting fuel cells? Any circle track regulations that might be a good guidline etc? Can it be mounted leaning forward, or would it be much smatter to mount it flat with the pick ups in the back. I think it has a pick up in both back corners, right now, but I havn't ruled out putting a sump in the front middle.
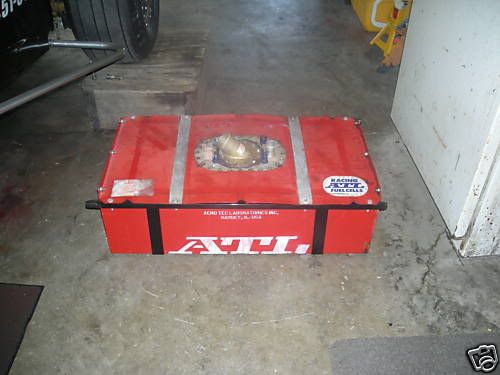
The Fuel cell has an expiration date of March 2013. I'm going to feel like a jack *** if this car isn't running by then.
I also just scored a nice used ATL fuel cell on ebay. Should be here in a week or two. It's p# SU122E which is a soft rubber bladder 22g tank 33"x17"x9". I'm thinking about using 1" square tubing to mount it. Anybody know anything about mounting fuel cells? Any circle track regulations that might be a good guidline etc? Can it be mounted leaning forward, or would it be much smatter to mount it flat with the pick ups in the back. I think it has a pick up in both back corners, right now, but I havn't ruled out putting a sump in the front middle.
The Fuel cell has an expiration date of March 2013. I'm going to feel like a jack *** if this car isn't running by then.
09-19-2009, 11:53 AM
#138
OMG I F*ing hate UPS. My tank never showed up. The shipper says he won't have the tracking number till after the weekend. And UPS can't look it up without the tracking number! My name, the shippers name, my address... no dice. And this is after they threw my first C&R Radiator over a 7' tall fence onto a concrete walkway destroying it. AVOID UPS AT ALL COSTS.
10-07-2009, 10:56 AM
#140
I just got a refund from ebay for my fuel cell. And I had to get my credit card to refund me for a largus front sway bar after I tried to buy one from
streamlineparts.net
That never showed up either. I also ordered an air nibbler, to make an aluminum radiator shroud, from harbor frieght. It took them 5 days before they even processed my order and another 6 to show up. It sticks about every 12 inches, but it got the job done. Now I'm on the hunt for a rivnut tool to attach the fans and shroud them selves. If you don't know what a rivnut is you should google it, pretty cool.
http://www.youtube.com/watch?v=SN7w_d3j4R0
A little nonsense: I think I'm going to need a license plate that reads "RB70SE"