


1SC stripper build
Thread Starter
Joined: Sep 2008
Posts: 473
Likes: 12
From: Woodinville, WA.
Going to the track in a couple of weeks. Did another gear change, 4.30. Setting the car up to run 11.50, I do not have a rollbar in it. 11.60@116 is my best so far. With this gear change, I am hoping to cross the line at 6100 rpm. Have not put on scales, but from calculations, around the 3200lb range.
Thread Starter
Joined: Sep 2008
Posts: 473
Likes: 12
From: Woodinville, WA.
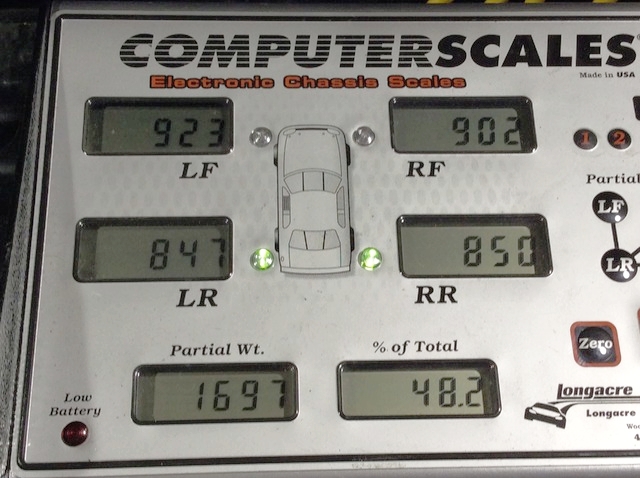
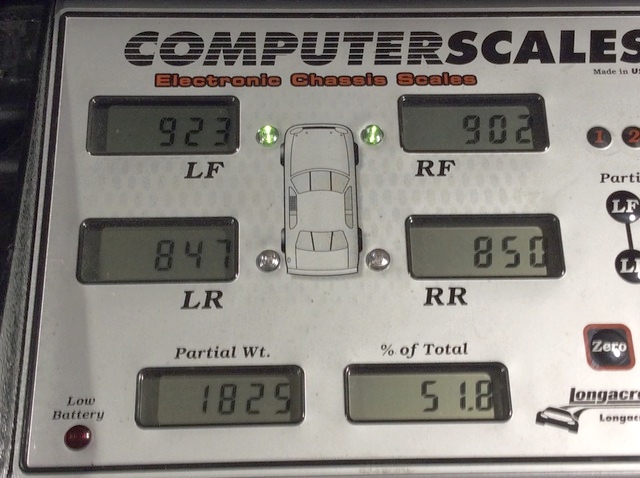
Scaled the car .
200lbs setting in the drivers seat to represent the driver. Going to have to get some more lead if I want get the balance closer.
Note: The right front is light with the battery in the stock location.
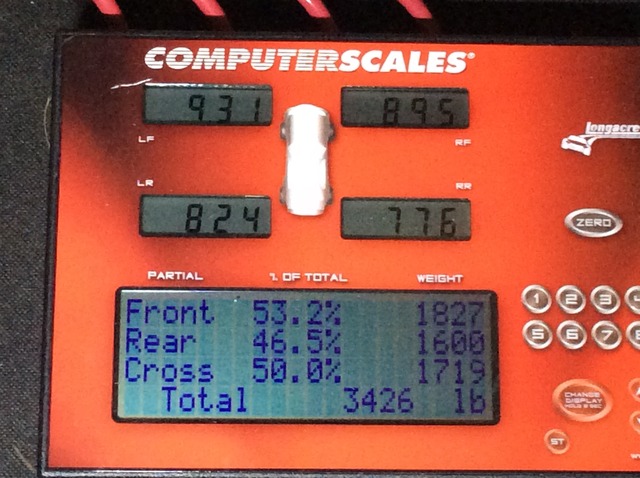
Added 30lbs to the right rear.
200lbs setting in the drivers seat to represent the driver. Going to have to get some more lead if I want get the balance closer.
Note: The right front is light with the battery in the stock location.

Added 30lbs to the right rear.
Last edited by Heyfred; Mar 24, 2017 at 10:56 AM.
Thread Starter
Joined: Sep 2008
Posts: 473
Likes: 12
From: Woodinville, WA.
Some time since I have been able to stay focused on the car. Being with and taking care of family. As of last two years, we now have two proud Marines, my grandsons.


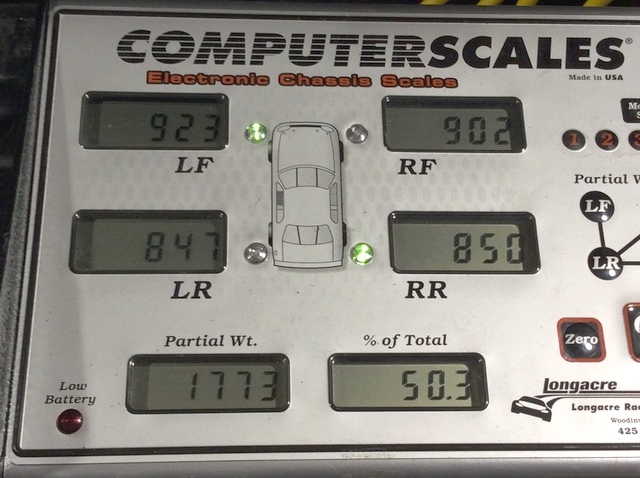
My main focus was chassis tuning. A friend loaned me his scales and I spent many hours with the car on them. Getting to understand weight distribution.
Shooting for 53/47 front to rear weight bias. Note: All adjustments were done with 200lbs sitting in the drivers seat to simulate drivers weight
Right front is light and moving the battery to the rear would have made it worse. Note: I did not take pictures of the corner weights prior to balancing and I wish I would have. Also, prior to balancing, spring length was different when adjusted to get set for ride height. Front springs, 3/8" difference, rear, 7/8" difference in length.
Once the car was balanced, I was able to change the front and rear spring rates. I did the spring rates for sprung weight. What I did, was remove the front coilover shock from the car, put the wheel back on and measured the free weight by lowering front suspension on the scales. (80lbs). For the rearend, I disconnected the rear swaybar and shocks and lowered the assembly onto the scales. (290lbs, divided by 2. 145lbs per side.) To get the numbers to come in, I ended up having to have a full tank of fuel and add 90lbs of lead to the right rear.
Now, the front springs are within an 1/8" of overall length and the rear are .040" of each other of overall length. I did not measure till the car was balanced. I let the scales tell me where to adjust.
Have not been to the track, but on the street the frontend rise is not as violet and the car has more of a forward motion. Have the shocks set at 50/50 so I could see what affect scaling has. Big difference. will tighten the car for the track.
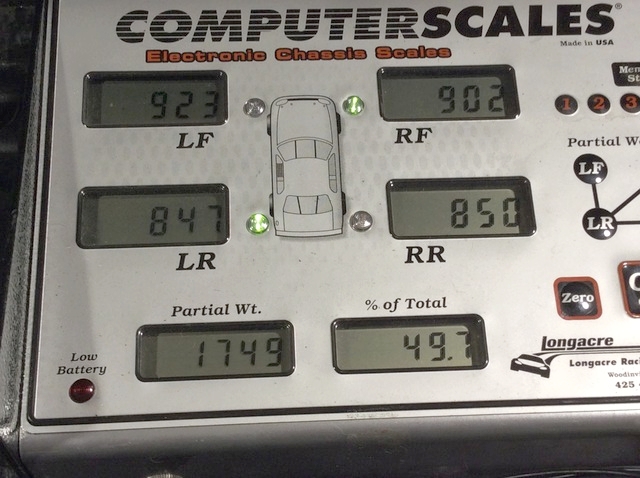


Thread Starter
Joined: Sep 2008
Posts: 473
Likes: 12
From: Woodinville, WA.
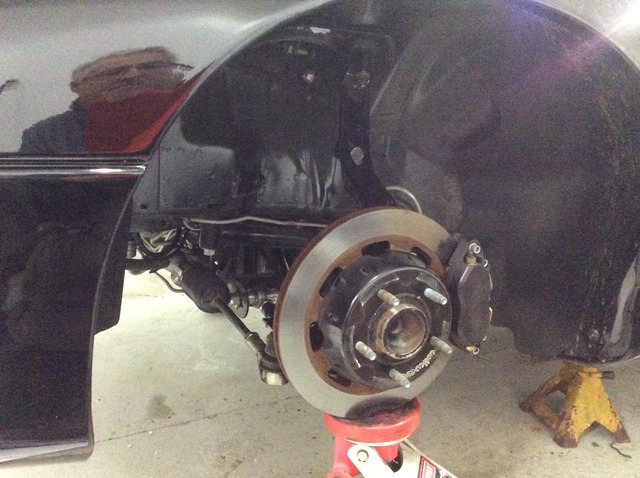
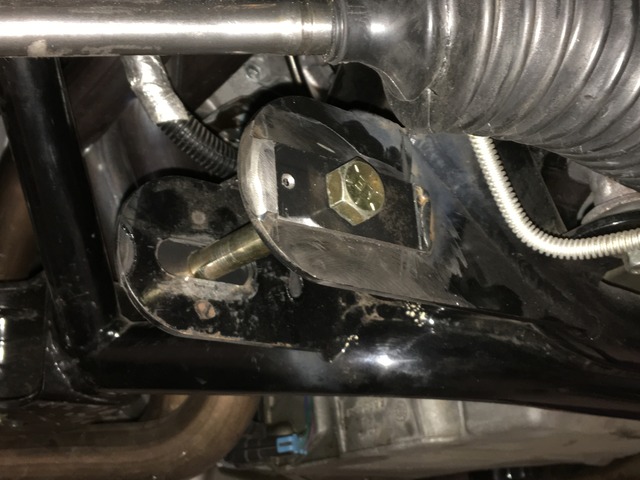
The next upgrade, was making the sure the front end alignment would stay. All the adjustments are done with the lower control. Being I do my own alignments, I wanted make sure the alignment would not moved over a period of time.
When building the car, I welded washers to make sure the alignment stayed in place.
Having some down time, I modified the K member in a way that the adjustment can be altered easily, removable inserts.
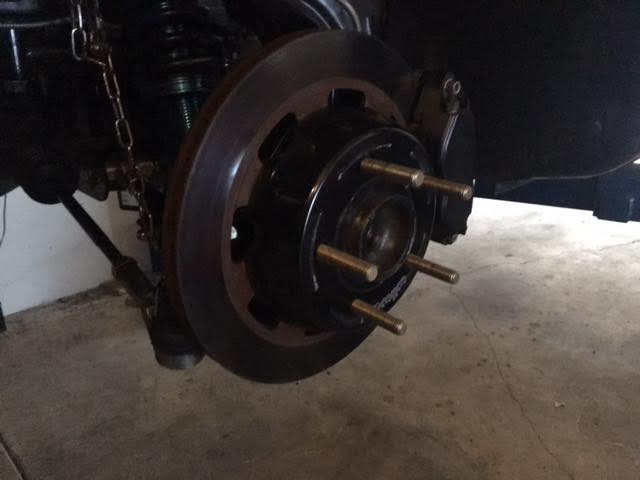
Upgraded the front wheel studs to longer ARP ones and Champion aluminum lugnuts.
Champion lugnuts with stock studs.
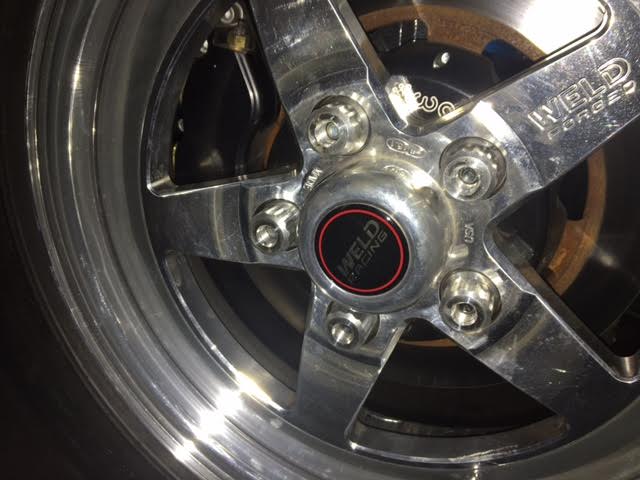
ARP studs.
When building the car, I welded washers to make sure the alignment stayed in place.

Having some down time, I modified the K member in a way that the adjustment can be altered easily, removable inserts.

Upgraded the front wheel studs to longer ARP ones and Champion aluminum lugnuts.
Champion lugnuts with stock studs.

ARP studs.

Last edited by Heyfred; Jun 6, 2017 at 07:40 AM.
LS1 Tech Stories
The Best V8 Stories One Small Block at Time

6 Common C5 Corvette Failures and What's Involved In Repairing Them
Pouria Savadkouei
Retro Modern Bandit Pontiac Trans AM Comes With Burt Reynolds' Autograph
Verdad Gallardo
Top 10 Greatest Cadillac V Series Performance Models Ever, Ranked
Pouria Savadkouei
Top 10 Most Powerful Chevy Trucks Ever Made!

Hennessey's New Supercharged Silverado ZR2 Has 700 HP
Verdad Gallardo
Coachbuilt N2A Anteros Is an LS2-Powered C6 Corvette In Italian Clothes
Verdad Gallardo
Awesome K5 Blazer Restomod Comes With C7 Corvette Power
Verdad Gallardo
10 Camaros You Should Never Buy

10 LS Engine Myths That Refuse to Die
Verdad Gallardo
Thread Starter
Joined: Sep 2008
Posts: 473
Likes: 12
From: Woodinville, WA.
Stops are welded on the K member and the plate fits between them. If you zoom in on the picture, you may see them. When I get the car back on the lift, I will take a picture without the plate installed.

Thread Starter
Joined: Sep 2008
Posts: 473
Likes: 12
From: Woodinville, WA.
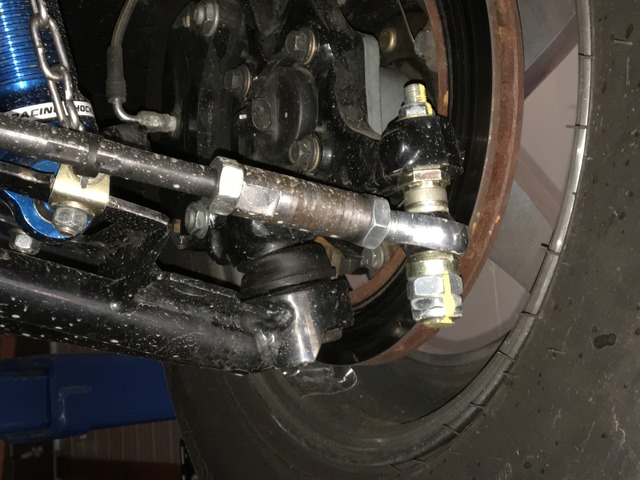
Made a Bumpsteer kit after getting the car suspension set at ride height. The bumpsteer is terrible with 3" of travel, over .125". After correction, less than .020". All the upgrades paid off, car drives and rides much better.


Really wish I was more knowledgeable in the suspension side of things like some of you guys. I would literally rather rebuild my motor than mess with the suspension just because I don't know enough to make sure it's right.
I've seen lots of good ideas for a poor mans turn table.
Do a little searching and you'll probably rather set up a suspension rather than build an engine. lol
Thread Starter
Joined: Sep 2008
Posts: 473
Likes: 12
From: Woodinville, WA.
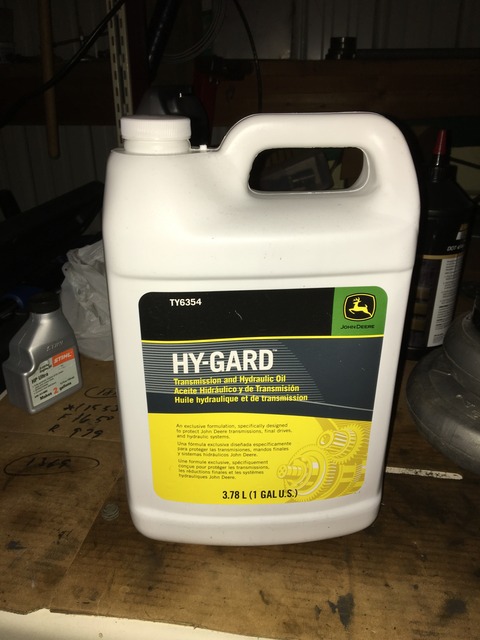
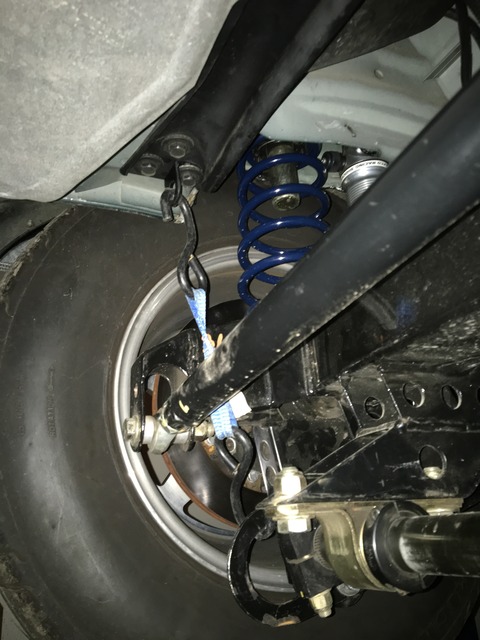
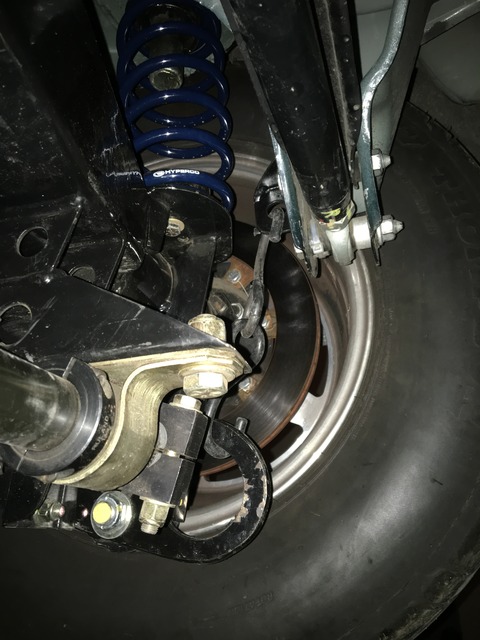
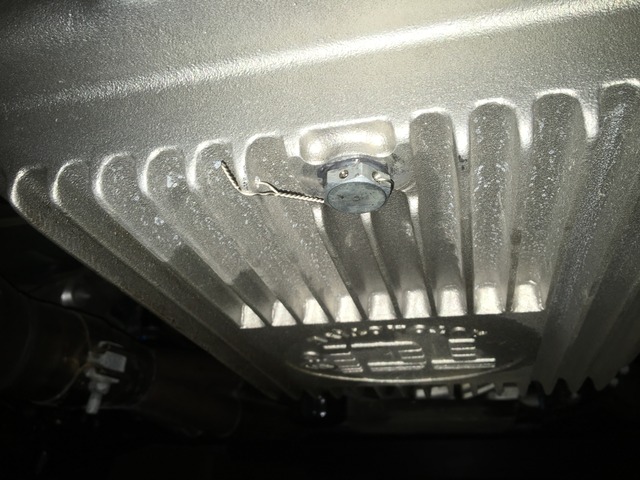
Rain just won't stop, just keep getting things done and off the list. Changed trans fluid to HY-Guard, drilled,safety wired drain plug and made some straps to support the rearend as I raise the car on the lift. Only thing left, is a some paint work on the suspension work I did. Need warmer weather. Buy smaller 275/60/15 MT drag radials. Currently using 295/55/15 which is over killer at my HP level.


Last edited by Heyfred; Mar 29, 2017 at 07:52 AM.
Thread Starter
Joined: Sep 2008
Posts: 473
Likes: 12
From: Woodinville, WA.
It has been a longtime coming, new engine being built. With the engine builder today going over and getting the parts for the build lined out. The first thing to show up, will be MMS 220 heads with Yella Terra Pro rockers on 1-19.
I have my current engine listed in the for sale section.
https://ls1tech.com/forums/parts-cla...low-miles.html
Here is some info on the heads:
https://ls1tech.com/forums/generatio...on-inside.html
I have my current engine listed in the for sale section.
https://ls1tech.com/forums/parts-cla...low-miles.html
Here is some info on the heads:
https://ls1tech.com/forums/generatio...on-inside.html
Last edited by Heyfred; Jan 16, 2018 at 10:31 PM.

