
70 Chevelle Restomod 5.3 w/S475 and 4L80E, Videos start on page 10
 02-07-2013, 08:15 PM
#81
Staging Lane

Join Date: Oct 2008
Posts: 62
Likes: 0
Received 0 Likes
on
0 Posts
Great inspirational build. He does nice work.
You will have a little more room to work with on the 70 and might be able to put the intercooler completely in the engine compartment on a stock core support.
You will have a little more room to work with on the 70 and might be able to put the intercooler completely in the engine compartment on a stock core support.
 08-28-2013, 02:37 PM
#82
11 Second Club
Thread Starter
iTrader: (8)
Join Date: Jan 2010
Location: Southern Idaho
Posts: 502
Likes: 0
Received 0 Likes
on
0 Posts
Time for a long overdue update to this thread, let's get everyone caught up.
Here is my poor excuse for my lack of updates, pic below.

Shortly after fixing my wife's sled, I lost a coolant hose on mine and got it hot to the point it needed rebuilt so I did the reasonable thing by buying a newer one to replace it lol. But this put a hold on the car as it completely drained my turbo fund.
I got back on track a little in March when I took the car to the welder's shop to get started on everything.
Before engine bay pic.

I initially thought I would be able to run the intercooler behind the hood latch assembly but after hanging it off the upper mounts I discovered the core size that I went with was too deep to allow it. It's not really a big deal as I like the look of the hood pins and planned on installing them anyways, but I would like to eventually come up with a smaller latch setup to secure it as well as the hood pins.

Holes in the radiator support for charge piping

I decided to run truck manifolds inverted on both sides with 2.5" vbands. Here is a pic of the driverside with the crossover part way done, I went with 2.5" on the crossover largely due to local availability.

Here is my poor excuse for my lack of updates, pic below.
Shortly after fixing my wife's sled, I lost a coolant hose on mine and got it hot to the point it needed rebuilt so I did the reasonable thing by buying a newer one to replace it lol. But this put a hold on the car as it completely drained my turbo fund.
I got back on track a little in March when I took the car to the welder's shop to get started on everything.
Before engine bay pic.
I initially thought I would be able to run the intercooler behind the hood latch assembly but after hanging it off the upper mounts I discovered the core size that I went with was too deep to allow it. It's not really a big deal as I like the look of the hood pins and planned on installing them anyways, but I would like to eventually come up with a smaller latch setup to secure it as well as the hood pins.
Holes in the radiator support for charge piping
I decided to run truck manifolds inverted on both sides with 2.5" vbands. Here is a pic of the driverside with the crossover part way done, I went with 2.5" on the crossover largely due to local availability.
08-28-2013, 03:02 PM
#83
11 Second Club
Thread Starter
iTrader: (8)
Join Date: Jan 2010
Location: Southern Idaho
Posts: 502
Likes: 0
Received 0 Likes
on
0 Posts
Sorting out where I want the turbo to sit and how I am going to route remaining piping.

To get a better idea of how it was all going to come together we fabbed up a merge to hang on the turbo to help with hotside routing.

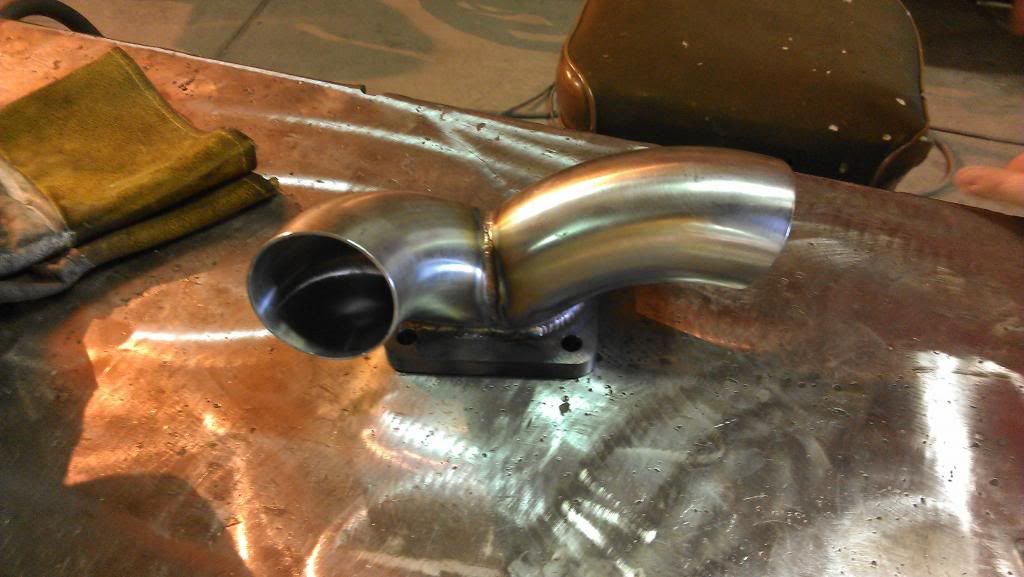
After hanging the turbo with the merge we completed the passenger side hotside to give us our final turbo location.

Then we added a piece of flex to the crossover and joined it with the merge inlet.


To get a better idea of how it was all going to come together we fabbed up a merge to hang on the turbo to help with hotside routing.

After hanging the turbo with the merge we completed the passenger side hotside to give us our final turbo location.
Then we added a piece of flex to the crossover and joined it with the merge inlet.
Last edited by Agent_Orange_Shuvel; 01-30-2014 at 04:32 PM. Reason: fix pics
08-28-2013, 03:06 PM
#84
11 Second Club
Thread Starter
iTrader: (8)
Join Date: Jan 2010
Location: Southern Idaho
Posts: 502
Likes: 0
Received 0 Likes
on
0 Posts
As you may notice we ended up very close to my E-fans with the crossover so I removed them and trimmed them down to get a tighter fit to the radiator. Sorry no pics of that process.
 08-29-2013, 03:45 AM
#86

Very nice looking fab work!!!
08-29-2013, 09:39 AM
#87
11 Second Club
Thread Starter
iTrader: (8)
Join Date: Jan 2010
Location: Southern Idaho
Posts: 502
Likes: 0
Received 0 Likes
on
0 Posts
I bought the flange off Ebay, it's just a stainless T4. All of the piping is from our local metal supplier, my welding buddy does a lot of business with them so that has helped with the cost.
Jimbo,
Thanks, but I owe all the credit on the fab work to my buddy Steve he has done pretty much everything, I'm helping with what I can and learning as we go but all the stainless work was done by him. It really inspires me to clean the rest of the engine compartment up so it looks as good as the turbo kit! That's the plan for this winter as I am more concerned with just getting it on the road before all the nice weather is gone right now. lol
 09-03-2013, 03:47 PM
#90
11 Second Club
Thread Starter
iTrader: (8)
Join Date: Jan 2010
Location: Southern Idaho
Posts: 502
Likes: 0
Received 0 Likes
on
0 Posts
I had it made, it's just two pieces of aluminum pipe welded together with a brass barb fitting threaded into the bottom side. My buddy that did all the hotside work made it for me last fall when I did the N/A LS swap. I got the idea from the Jags that run hose splices.
09-04-2013, 08:51 PM
#92
Registered User

Join Date: Sep 2013
Posts: 6
Likes: 0
Received 0 Likes
on
0 Posts


 09-06-2013, 09:35 AM
#98
11 Second Club
Thread Starter
iTrader: (8)
Join Date: Jan 2010
Location: Southern Idaho
Posts: 502
Likes: 0
Received 0 Likes
on
0 Posts
couple more progress pics
downpipe

wastegate and downpipe mounted

wastegate dump tied in

I decided after seeing a couple others do it, it might be wise to build a brace for the turbo since it is so far away from the engine. I am running poly mounts so I decided to have the brace mount to the passenger head and tie into the bottom of the merge flange. Still working on that as I write this, but here is a pic of the tab added to the merge flange cause I wanted to be able to un-bolt the brace seperate of the merge piece.

downpipe
wastegate and downpipe mounted
wastegate dump tied in
I decided after seeing a couple others do it, it might be wise to build a brace for the turbo since it is so far away from the engine. I am running poly mounts so I decided to have the brace mount to the passenger head and tie into the bottom of the merge flange. Still working on that as I write this, but here is a pic of the tab added to the merge flange cause I wanted to be able to un-bolt the brace seperate of the merge piece.
09-06-2013, 09:44 AM
#99
11 Second Club
Thread Starter
iTrader: (8)
Join Date: Jan 2010
Location: Southern Idaho
Posts: 502
Likes: 0
Received 0 Likes
on
0 Posts
cold side pics
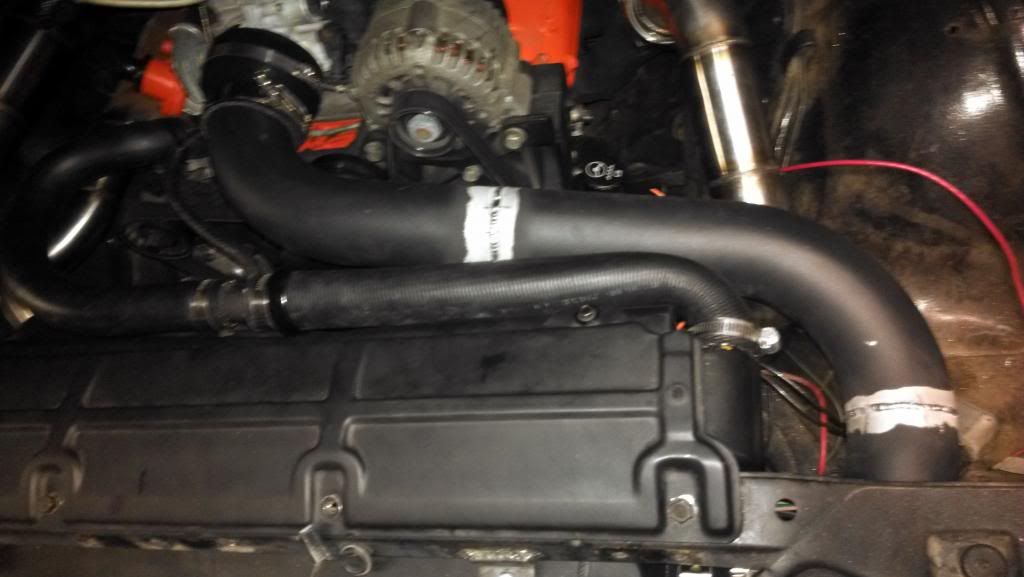


That's all I have for now, should make some more progress on the brace this weekend. After that's complete I need to get the car out of my buddie's shop and back to the house so I can finish up everything else.

That's all I have for now, should make some more progress on the brace this weekend. After that's complete I need to get the car out of my buddie's shop and back to the house so I can finish up everything else.
Last edited by Agent_Orange_Shuvel; 01-30-2014 at 04:33 PM.