


 Apr 29, 2016, 04:23 PM
Last edit by: IB Advertising
See related guides and technical advice from our community experts:
--
See related guides and technical advice from our community experts:
Browse all: Electrical Guides
- Camaro and Firebird Why Won't Interior Lights Turn On Off<br>Guide to diagnose trouble and recommended solutions.
--
See related guides and technical advice from our community experts:
- Camaro and Firebird: How to Repair and Replace Body Control Module
Step by step instructions for do-it-yourself repairs
Browse all: Electrical Guides

LS1 Body Control Module Problems - The Fix
Joined: Nov 2003
Posts: 11,329
Likes: 346
From: Jacksonville, FL (originally from Toronto Canada)
AM loop antennas are commonly used in stationary receivers but almost never with mobile equipment. The reason is that loop antennas are directional. It is easy to turn your clock radio to get better reception but that doesn't work in a car (unless you always drive the same direction).
For example, CB radio is AM and uses mast antennas almost exclusively.
For example, CB radio is AM and uses mast antennas almost exclusively.
Well, I was about to tear apart that entire section of under-dash wiring. I just happened to push on a bundle of wires and the reception started to fluctuate. I guess I'll have to tear into that bundle and see what goes where and what does what and how that all ties into my AM radio... 

Staging Lane
Joined: Oct 2008
Posts: 59
Likes: 5
Hey everyone,
Been a long time since I've been on this site but recieved a PM about my post no longer containing the pics. With the OP being a @$## and deleting his original most of the shots in this thread are gone.
Stupid photolocker.net which I used to use apparently decided to get hokey and no longer is showing up the links of the uploaded pics (I have used them for years for hosting ALL of my images for posting in threads on a lot of different boards). I have NO IDEA where another set of these pics would be (I likely deleted them after posting years ago).
I'll try my best to find them again but in the meantime use my first post's written directions to access the BCM (think it's on page 3-4).
Cheers.
EDIT: Maybe someone with some HTML knowledge could help me out here. This is the error I get when trying to see my pics (I can see the thumbnails fine but the actual picture .jpg gives me this):
Notice: Object of class stdClass could not be converted to int in /home/photoloc/public_html/includes/config.inc.php on line 35
Notice: Object of class stdClass could not be converted to int in /home/photoloc/public_html/includes/login.inc.php on line 57
Notice: Object of class stdClass could not be converted to int in /home/photoloc/public_html/includes/config.inc.php on line 93
Warning: Cannot modify header information - headers already sent by (output started at /home/photoloc/public_html/includes/config.inc.php:35) in /home/photoloc/public_html/bandwidth.php on line 40
Warning: Cannot modify header information - headers already sent by (output started at /home/photoloc/public_html/includes/config.inc.php:35) in /home/photoloc/public_html/bandwidth.php on line 41
Then it goes on and on with a huge amount of junk.
Last edited by 7Enigma; Aug 17, 2010 at 07:14 AM.
Joined: Nov 2003
Posts: 11,329
Likes: 346
From: Jacksonville, FL (originally from Toronto Canada)
Hey everyone,
Been a long time since I've been on this site but recieved a PM about my post no longer containing the pics. With the OP being a @$## and deleting his original most of the shots in this thread are gone.
Stupid photolocker.net which I used to use apparently decided to get hokey and no longer is showing up the links of the uploaded pics (I have used them for years for hosting ALL of my images for posting in threads on a lot of different boards). I have NO IDEA where another set of these pics would be (I likely deleted them after posting years ago).
I'll try my best to find them again but in the meantime use my first post's written directions to access the BCM (think it's on page 3-4).
Cheers.

BCM solder points
I have also included it as an attachment so that it will always be on the LS1Tech server:
Last edited by WhiteBird00; Nov 16, 2020 at 11:07 AM.
Staging Lane
Joined: Oct 2008
Posts: 59
Likes: 5
Not at all! I'm just glad it was saved somewhere. Unfortunately all the pics before that one are helpful for people like me that needed some advice on how to GET to the BCM board itself. I have the thumbnails but doubt they are very usable.
You guys rule! I just invested an hours worth of time reading all 10 pages (& then some) Having read all that ,I'm pretty confident that I'm gonna save several hundred dollars tonight or tomorrow doing this..... all because some of you took the time to help out others.
I'm going to try & get some good pics while doing it.
This will be on my 98' SS.
Thanks Ya'll !
I'm going to try & get some good pics while doing it.
This will be on my 98' SS.
Thanks Ya'll !
Last edited by WKF; Aug 18, 2010 at 01:46 AM.
Staging Lane
Joined: Oct 2008
Posts: 59
Likes: 5
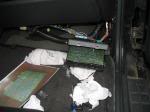
OK, so I went back and painstakingly put the thumbnails in my original post. While not near as nice as the actual pictures you should be able to get a better idea during the removal. You can safely blow these up to 200% (just right-click on the picture and "save as" to your desktop then open and enlarge), and if need be 400% is slightly usable but the resolution gets pretty bad once above 200%:
00000000000000000000000000000000000000000000000000 00000000000
So this post is for anyone like me that had no clue HOW to get to the BCM. All the posts I've read on this site and others either don't mention accessing the BCM or are vague about what needs to be removed to get to it. I finally was able to do it today and took some pictures to help those that want a little picture advice.
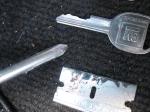
Here's the tools I used for the job (not counting the 25w soldering iron I picked up at Home depot):
The easiest way to know what the BCM looks like (plastic holder that encases the BCM that is) is to look at it through the glove compartment. Open the glove box and push on either side near the top of the hinge to let the tabs push inward so the box swings all the way down. You can now easily see the black plastic housing that contains the BCM. I had originally thought I could access it through here but no dice.
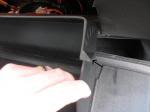
Shot of the BCM housing as seen through the glove compartment. MAKE A MENTAL NOTE OR BETTER YET MARK THE POSITION OF THE BCM WHEN INSTALLED AS IT WILL HELP YOU BE SURE IT IS REINSTALLED TO THE PROPER HEIGHT You CANNOT get to it this way so don't even bother (unless you happen to not have a dash or airbag). It's really frustrating since almost the whole damn thing is staring right at you...

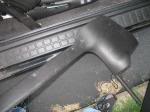
You need to remove this piece that goes along the right side of the base of the door on the inside. Surprising there is nothing holding it to the car where your feet would go, it's simply held in place with 5 screws along the floor that are easy to remove. 4 of the 5 are very easy, the last one required me to move the passenger seat all the way forward so I could get a screwdriver on the screw. If you had a really short (1") 90 degree angle hand phillips head you could also do it this way.
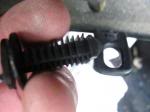
This was the bane of my first 2 attempts at accessing the BCM. This plastic push holder is a bitch to remove. There are 2 of them directly below the glove compartment and they are all that is holding up the plastic cover hiding all the wires and the BCM housing. It wasn't until after I had it out I realized it is simply a friction holder and not a plastic rivet or something that had to be released from above. The easiest way I found was to use the t-top key or some other thick strong piece of metal to use as a wedge while my fingers pulled down. I'm sure now you could just get a pair of pliers or something and just pull. If you look at the push holder there is nothing that can break, so just pull down hard and it will come out.
After lowering the plastic cover you still have one thing to remove to get the BCM out. This thick black plastic tubing holds a bunch of wiring and is blocking the BCM from being pulled out. There are 2 clips that need to be released so you can pull the wiring down and out of the way. The easiest way I found was to use a razor blade to pull up on the tab. It takes a little work but once you figure out how to release it the second one goes very easily.
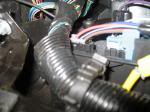
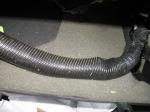
Here's the tubing pulled down and out of the way.
Finally you have access to the BCM housing. This picture was taking looking straight on from the bottom of the car. There are 2 clips on either side of the housing towards the front of the car. They pry off the back with a bit of force. The left one is easy to get too but the right one is a PITA since part of the dash is somewhat blocking it. The problem is when you pry one side off, then go to do the other, if you don't keep the 1st clip away from the housing it snaps back on when you go to do the 2nd side. What I had to do was pry off the left side, slide my hand in the gap created between the BCM housing and the clips holding it in place, and then pry off the right side. It is not easy, and you'll have to try a couple positions to get that right clip off.
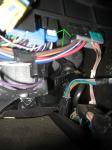
Once the clips are off, you pull the BCM straight down. Again this takes quite a bit of force but don't worry. There are no wires or things to be damaged that you *cannot see*. Only the wires seen in the last picture which were at the bottom. Now that you have the BCM out you have 2 choices. You can remove the 3 connectors and solder somewhere else, or like me (since I could not find out how the hell to get the 3 connectors off) just pry open the BCM housing (again I used the razor blade on the 2 little tabs, then it simply opens up like a clam to expose the circuit board).
So that's it. Now you can use the picture of the actual board that WhiteBird00 reposted in the post above (#185) to finish the job. I looked closely at my board and like the others the bottom solder joint of the ones circled was spidered (there are 5 of them that seem to be the typical culprits but you should check quickly all of the solder joints on the board since it's so fun to pull the BCM out). Now, I have not soldered since 9th grade electronics class and so was a bit worried but if you work cautiously, it should be easy enough to reheat the joints. I did put a little solder on each joint to help the reheat as the contacts coming up are pretty tall and it's tough to reheat the existing solder without having some liquid solder on the tip of the gun to help the melting.
Once done soldering, turn the car on and make sure it starts. If so, consider it a possible success. It's getting colder now and so I won't really know until it's spring or we get a sudden hot weather spell (as that's when my radio/window issues occur). Then just go in reverse putting the parts back together. First the BCM (this took a long time because it takes a lot of force and the tabs are a PITA, for reference look through the glove compartment to make sure you have it pushed up high enough, I thought I was until I saw there was still another 1/2" or so) you did mark the position right? , then the black tube holding the wires, then the bottom piece with the push screws, and finally the plastic piece along the door.
Hope this helps someone!
00000000000000000000000000000000000000000000000000 00000000000
So this post is for anyone like me that had no clue HOW to get to the BCM. All the posts I've read on this site and others either don't mention accessing the BCM or are vague about what needs to be removed to get to it. I finally was able to do it today and took some pictures to help those that want a little picture advice.
Here's the tools I used for the job (not counting the 25w soldering iron I picked up at Home depot):
The easiest way to know what the BCM looks like (plastic holder that encases the BCM that is) is to look at it through the glove compartment. Open the glove box and push on either side near the top of the hinge to let the tabs push inward so the box swings all the way down. You can now easily see the black plastic housing that contains the BCM. I had originally thought I could access it through here but no dice.
Shot of the BCM housing as seen through the glove compartment. MAKE A MENTAL NOTE OR BETTER YET MARK THE POSITION OF THE BCM WHEN INSTALLED AS IT WILL HELP YOU BE SURE IT IS REINSTALLED TO THE PROPER HEIGHT You CANNOT get to it this way so don't even bother (unless you happen to not have a dash or airbag). It's really frustrating since almost the whole damn thing is staring right at you...
You need to remove this piece that goes along the right side of the base of the door on the inside. Surprising there is nothing holding it to the car where your feet would go, it's simply held in place with 5 screws along the floor that are easy to remove. 4 of the 5 are very easy, the last one required me to move the passenger seat all the way forward so I could get a screwdriver on the screw. If you had a really short (1") 90 degree angle hand phillips head you could also do it this way.
This was the bane of my first 2 attempts at accessing the BCM. This plastic push holder is a bitch to remove. There are 2 of them directly below the glove compartment and they are all that is holding up the plastic cover hiding all the wires and the BCM housing. It wasn't until after I had it out I realized it is simply a friction holder and not a plastic rivet or something that had to be released from above. The easiest way I found was to use the t-top key or some other thick strong piece of metal to use as a wedge while my fingers pulled down. I'm sure now you could just get a pair of pliers or something and just pull. If you look at the push holder there is nothing that can break, so just pull down hard and it will come out.
After lowering the plastic cover you still have one thing to remove to get the BCM out. This thick black plastic tubing holds a bunch of wiring and is blocking the BCM from being pulled out. There are 2 clips that need to be released so you can pull the wiring down and out of the way. The easiest way I found was to use a razor blade to pull up on the tab. It takes a little work but once you figure out how to release it the second one goes very easily.
Here's the tubing pulled down and out of the way.
Finally you have access to the BCM housing. This picture was taking looking straight on from the bottom of the car. There are 2 clips on either side of the housing towards the front of the car. They pry off the back with a bit of force. The left one is easy to get too but the right one is a PITA since part of the dash is somewhat blocking it. The problem is when you pry one side off, then go to do the other, if you don't keep the 1st clip away from the housing it snaps back on when you go to do the 2nd side. What I had to do was pry off the left side, slide my hand in the gap created between the BCM housing and the clips holding it in place, and then pry off the right side. It is not easy, and you'll have to try a couple positions to get that right clip off.
Once the clips are off, you pull the BCM straight down. Again this takes quite a bit of force but don't worry. There are no wires or things to be damaged that you *cannot see*. Only the wires seen in the last picture which were at the bottom. Now that you have the BCM out you have 2 choices. You can remove the 3 connectors and solder somewhere else, or like me (since I could not find out how the hell to get the 3 connectors off) just pry open the BCM housing (again I used the razor blade on the 2 little tabs, then it simply opens up like a clam to expose the circuit board).
So that's it. Now you can use the picture of the actual board that WhiteBird00 reposted in the post above (#185) to finish the job. I looked closely at my board and like the others the bottom solder joint of the ones circled was spidered (there are 5 of them that seem to be the typical culprits but you should check quickly all of the solder joints on the board since it's so fun to pull the BCM out). Now, I have not soldered since 9th grade electronics class and so was a bit worried but if you work cautiously, it should be easy enough to reheat the joints. I did put a little solder on each joint to help the reheat as the contacts coming up are pretty tall and it's tough to reheat the existing solder without having some liquid solder on the tip of the gun to help the melting.
Once done soldering, turn the car on and make sure it starts. If so, consider it a possible success. It's getting colder now and so I won't really know until it's spring or we get a sudden hot weather spell (as that's when my radio/window issues occur). Then just go in reverse putting the parts back together. First the BCM (this took a long time because it takes a lot of force and the tabs are a PITA, for reference look through the glove compartment to make sure you have it pushed up high enough, I thought I was until I saw there was still another 1/2" or so) you did mark the position right?
, then the black tube holding the wires, then the bottom piece with the push screws, and finally the plastic piece along the door.Hope this helps someone!
Last edited by 7Enigma; Aug 18, 2010 at 06:31 AM.
LS1 Tech Stories
The Best V8 Stories One Small Block at Time

6 Common C5 Corvette Failures and What's Involved In Repairing Them
Pouria Savadkouei
Retro Modern Bandit Pontiac Trans AM Comes With Burt Reynolds' Autograph
Verdad Gallardo
Top 10 Greatest Cadillac V Series Performance Models Ever, Ranked
Pouria Savadkouei
Top 10 Most Powerful Chevy Trucks Ever Made!

Hennessey's New Supercharged Silverado ZR2 Has 700 HP
Verdad Gallardo
Coachbuilt N2A Anteros Is an LS2-Powered C6 Corvette In Italian Clothes
Verdad Gallardo
Awesome K5 Blazer Restomod Comes With C7 Corvette Power
Verdad Gallardo
10 Camaros You Should Never Buy

10 LS Engine Myths That Refuse to Die
Verdad Gallardo Great write up!
I did mine last night & put over 100 miles on the SS today with NOT ONE hickup with the radio / windows. I even drove it down Dairy Ashford here in Houston just to be sure. (bumpy nasty road)
I'll just add a few pics that may be a little more or less detailed I took that may help out.
I did mine last night & put over 100 miles on the SS today with NOT ONE hickup with the radio / windows. I even drove it down Dairy Ashford here in Houston just to be sure. (bumpy nasty road)
I'll just add a few pics that may be a little more or less detailed I took that may help out.

Joined: Nov 2003
Posts: 11,329
Likes: 346
From: Jacksonville, FL (originally from Toronto Canada)
It is unlikely that the BCM is the problem and even if it is, this fix won't help. This fix is specifically for the RAP circuit cutting out intermittently.
When you say you "fixed" a resistor bypass, what do you mean? Did you install a new bypass, repair an existing bypass, or remove an existing bypass?
If the VATS is bypassed then any broken or damaged wires in the steering column are meaningless because they are no longer part of the circuit. In that case, you need to double check your resistor setup in the VATS bypass.
If the VATS is not bypassed then the broken wires in the column will prevent the car from starting.
Rockstar
iTrader: (15)
Joined: Feb 2009
Posts: 1,582
Likes: 0
From: I'm on a boat! in Shreveport, La
This thread shouldn't be moved, because it's not a PCM issue.
In fact, it was originally in the Stereo and electronics section, a much more fitting place.
Why it got moved to this section is beyond me.
In fact, it was originally in the Stereo and electronics section, a much more fitting place.
Why it got moved to this section is beyond me.
Joined: Nov 2003
Posts: 11,329
Likes: 346
From: Jacksonville, FL (originally from Toronto Canada)
VATS has nothing to do with the alarm system. As mentioned earlier, your problem may or may not be related to VATS (and therefore the BCM) but it certainly isn't related to the particular fix being discussed in this thread. You will get better results starting a new thread describing your problem in detail.
Teching In
Joined: May 2006
Posts: 15
Likes: 0
I am having the problem with my power windows but I am also having issues with the trouble lights for the traction control, ABS, and brake light indicators on the dash.
These lights come on with no reason and may stay on or may go back out. Sometimes I can start the car and the lights come on immediately, before the car is put into gear Other times I may drive 1,000 miles before the lights come on.
Could the BCM be my problem for both issues, windows and dash indicator lights??

Teching In
Joined: Nov 2006
Posts: 3
Likes: 0
From: Warrenton, VA
Same problem on my 99 Vette. But I'm stranded because of it right now. The battery was drained. I plug the module in and there's a massive amount of clicking from the fuse panel next to it. I unplug it and the clicking stops. I think it's left something on in the car that drained the battery. Hasn't been the first time. The battery is past it's date, but it shouldn't have gone from starting the car fine to not even turning it over after just sitting for three hours. I hope I can start the car with a new battery.