


 Nice copy and paste then


Secondary Air: Diagnosing and Removal
Thread Starter
On The Tree


Joined: Dec 2010
Posts: 117
Likes: 0
From: NW OR.
First let me say if I've broken any rules here by copying from another site it was unintentional, and I apologize. Credit for this write up goes to pajeff02 on another LS1 site.
My question is on the last half of the first paragraph
"The sole purpose of the system is to inject fresh air into the exhaust manifolds on cold start up. This is accomplished by activating an electric air pump that pulls air from the filter box and routes it through a vacuum controlled diverter valve, through a check valve on each side of the engine, and finally into the manifolds. The system only operates for 1-2 minutes after start up and serves to assist the catalytic converters into coming up to operating temperature faster."
Does that mean that someone in a emissions testing area can warm up his car and then have it tested for emissions and pass?
Secondary Air: Diagnosing and Removal
The secondary air system on our cars seems to be a common problem area. For those of us that have deleted it, the problem is no more. However, many cars have to maintain it for emissions reasons. The sole purpose of the system is to inject fresh air into the exhaust manifolds on cold start up. This is accomplished by activating an electric air pump that pulls air from the filter box and routes it through a vacuum controlled diverter valve, through a check valve on each side of the engine, and finally into the manifolds. The system only operates for 1-2 minutes after start up and serves to assist the catalytic converters into coming up to operating temperature faster.
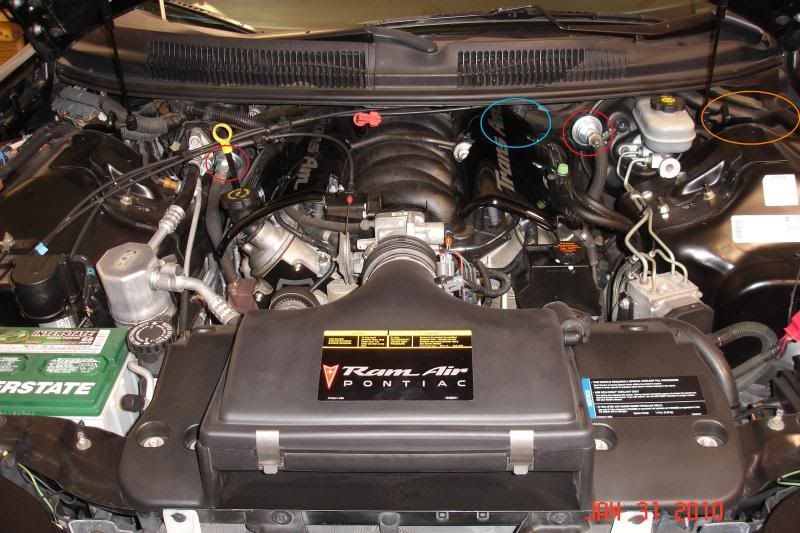
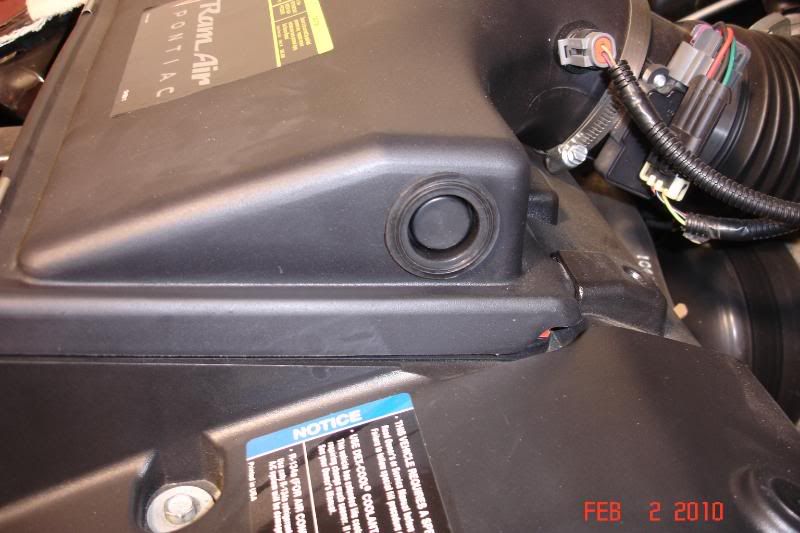
Here are the basic components of the system as viewed from under the hood. The check valves are circled in RED, at the rear of the FRC in BLUE are the diverter valve and vacuum solenoid, and to the right in YELLOW is the air hose from the pump.
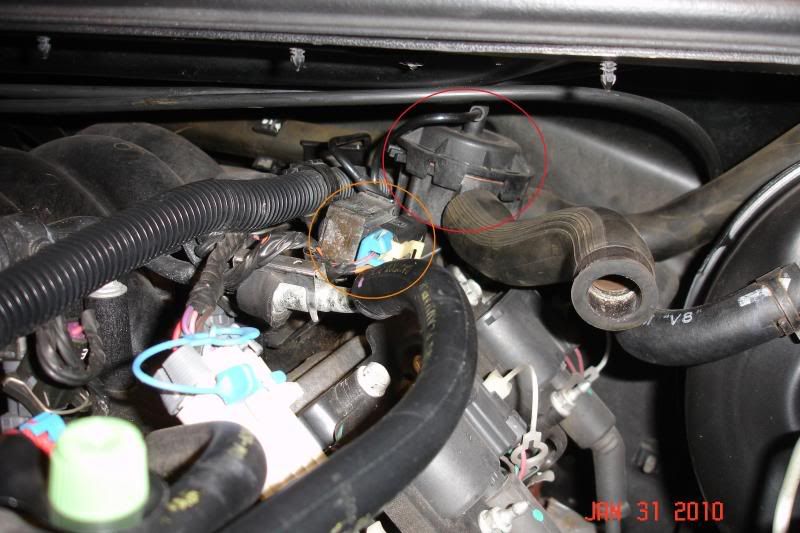
Removing the FRC, you can see the vacuum solenoid circled in YELLOW and the diverter valve circled in RED.
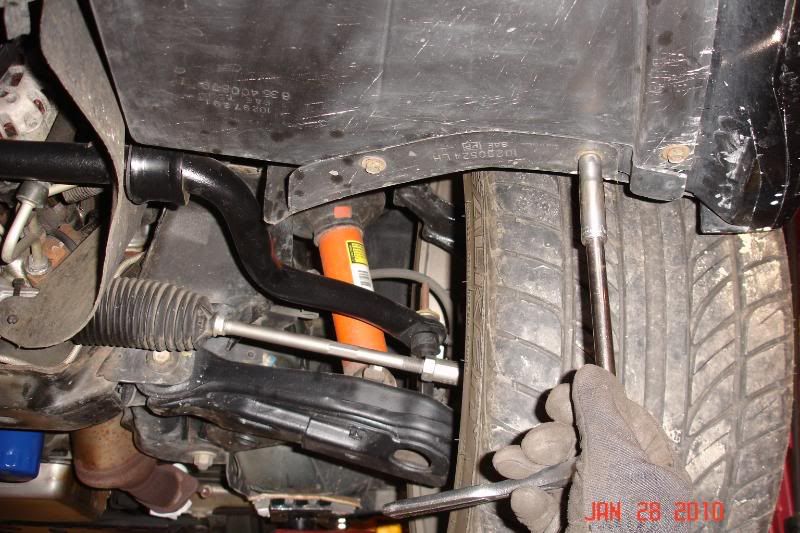
The other primary component is the air pump. This is located in front of the left wheel and is accessed by removing the splash guard from beneath the vehicle.
In the event the secondary air system ceases to operate correctly the SES light will be lit and a code can be retrieved with a scanner. The procedure for diagnosing the system is as follows:
1. First thing to check is if the pump runs after cold start up. On the left side of the engine compartment (right side from the front of the vehicle), over the top of your driver side wheel well, is a hose. Disconnect the hose at the union and start your car. There should be air blowing from the hose which runs up from the front end.
2. If there is no air blowing, you will need to check the fuse and relay to ensure that there is power to the pump. These are located in the electrical boxes on the right side of the engine compartment. The relay is in the left box and the fuse is in the right box. Both are labeled "AIR PUMP". You can also probe the connection at the pump to check for power.

3. If power checks out, but the pump is still not pushing air, you will need to inspect the pump. It is possible that it has simply failed, a hose has become disconnected, or there may be a blockage in one of the hoses. Remember -- the pump only runs on cold start up for a short period of time.
4. If the pump is running correctly and you have air at the driver side hose over the wheel well, then you need to check if the air is flowing to the exhaust manifolds. On each side of the engine there is a tube bolted to the manifold. This runs up to the check valve onto which is clamped a rubber hose. Disconnect each clamp and pull the hose. Again, on cold start up you should have air blowing from the hoses.
5. If air does not blow from the hoses you need to check the solenoid and diverter valve that are located on top of the engine. The electric solenoid allows a vacuum signal to open the diverter valve such that air flows to the manifolds through the check valves. The diverter valve has three (3) hoses atatched to it, one being the hose from the pump and two going to the manifolds on each side of the engine.
6. Begin by checking for vacuum by removing the hose at the top of the diverter valve. If there is no vacuum present, either the solenoid is bad, a fuse is blown, or the circuit is open. It is also possible that the vacuum source line may be a problem so this should also be checked. If there is vacuum then it is likely that the diverter valve has failed. It should be removed from the vehicle and inspected with a handheld vacuum pump before replacement.
7. If all of these components are working correctly, then the most likely culprit is that the check valves or manifold tubes are bad, or simply plugged up. The check valves can be purchased from a dealership or most auto parts stores. The tubes can be cleaned of carbon buildup should this be the problem.
REMOVAL:
In the event you wish to remove the secondary air system in its entirety, it is quite simple to do. Please note that you will need to have your PCM re-programmed to delete the system or you will be driving around with your SES light on all the time.
The air pump is pulled by disconnecting the electrical connector and two hoses. Access is again from beneath the vehicle. It is tight working quarters and a hose pick was quite useful for both the electrical harness and hoses.
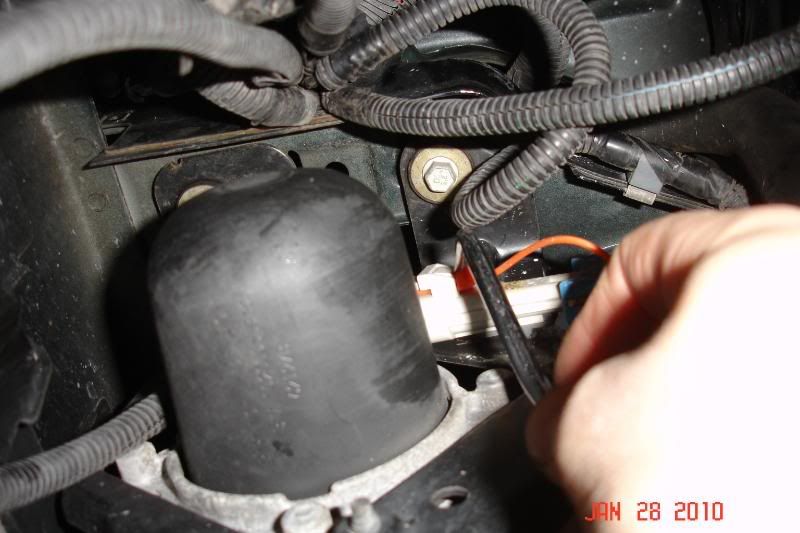
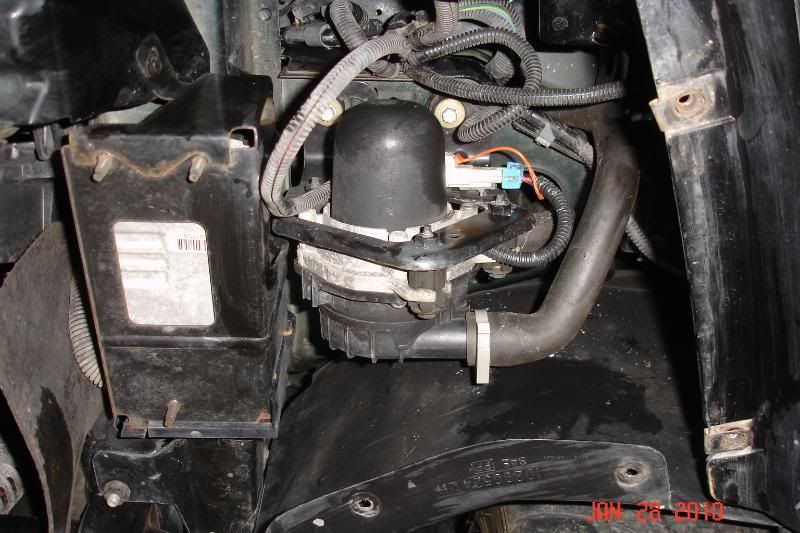
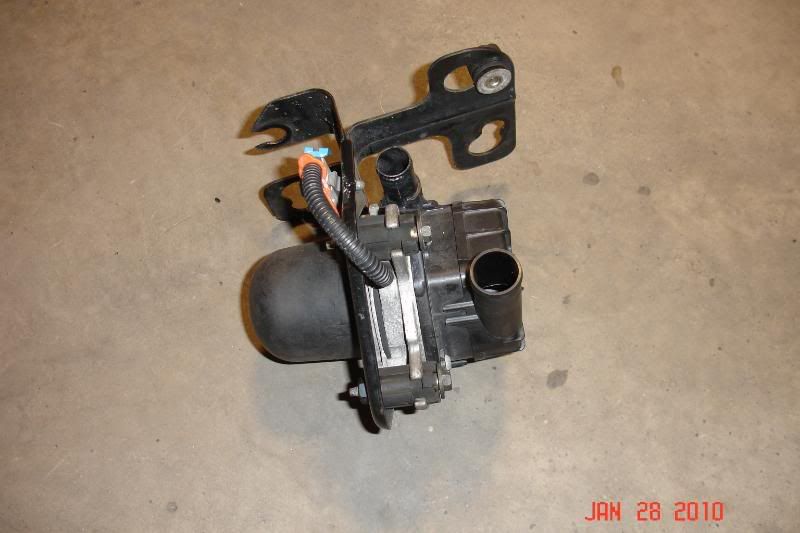
I found that it is easiest to simply snap off the rubber biscuits from the clips as there was not room to slide the pump off of them. I then removed the clips as well to avoid any potential for a rattle. The clips have a tower on the top side to protect the wire harness which runs directly above the pump cavity. Here is a view of the pump once it is out of the car.
Back up top, the fuse and relay were removed from the electrical boxes.
The hoses to and from the air pump and diverter valve can then be removed. It is advisable to use a flat blade screw driver to press out the clips on the cowl seal before you work in this area -- they are sharp and will make you bleed. Once the hoses are removed, this leaves a hole in the side of the airbox from the fresh air feed. I found a Chrysler "Master Cylinder Gasket" in the HELP! section at our local Autozone that fits the hole perfectly. It is P/N 42081 and actually does not look too bad installed in the side of the SLP lid.
After the hoses are removed, both the solenoid and diverter valve can be unplugged and unbolted and also removed. Note that there is a 15 mm bolt on the back side of the head that has to be loosened (not removed) to pull the bracket for the diverter valve. This should then be snugged back down as it may have a ground wire attached to it as well. Access is tight, but you can get to it with a wrench.
After the components are all removed, you should tape up any open electrical connections and also plug off the vacuum source line that attached to the solenoid. The bracket for the solenoid can also be unclipped from its holder on the intake manifold. Again, you will need to delete the secondary air system via tuning to complete the process.


My question is on the last half of the first paragraph
"The sole purpose of the system is to inject fresh air into the exhaust manifolds on cold start up. This is accomplished by activating an electric air pump that pulls air from the filter box and routes it through a vacuum controlled diverter valve, through a check valve on each side of the engine, and finally into the manifolds. The system only operates for 1-2 minutes after start up and serves to assist the catalytic converters into coming up to operating temperature faster."
Does that mean that someone in a emissions testing area can warm up his car and then have it tested for emissions and pass?
Secondary Air: Diagnosing and Removal
The secondary air system on our cars seems to be a common problem area. For those of us that have deleted it, the problem is no more. However, many cars have to maintain it for emissions reasons. The sole purpose of the system is to inject fresh air into the exhaust manifolds on cold start up. This is accomplished by activating an electric air pump that pulls air from the filter box and routes it through a vacuum controlled diverter valve, through a check valve on each side of the engine, and finally into the manifolds. The system only operates for 1-2 minutes after start up and serves to assist the catalytic converters into coming up to operating temperature faster.
Here are the basic components of the system as viewed from under the hood. The check valves are circled in RED, at the rear of the FRC in BLUE are the diverter valve and vacuum solenoid, and to the right in YELLOW is the air hose from the pump.
Removing the FRC, you can see the vacuum solenoid circled in YELLOW and the diverter valve circled in RED.
The other primary component is the air pump. This is located in front of the left wheel and is accessed by removing the splash guard from beneath the vehicle.
In the event the secondary air system ceases to operate correctly the SES light will be lit and a code can be retrieved with a scanner. The procedure for diagnosing the system is as follows:
1. First thing to check is if the pump runs after cold start up. On the left side of the engine compartment (right side from the front of the vehicle), over the top of your driver side wheel well, is a hose. Disconnect the hose at the union and start your car. There should be air blowing from the hose which runs up from the front end.
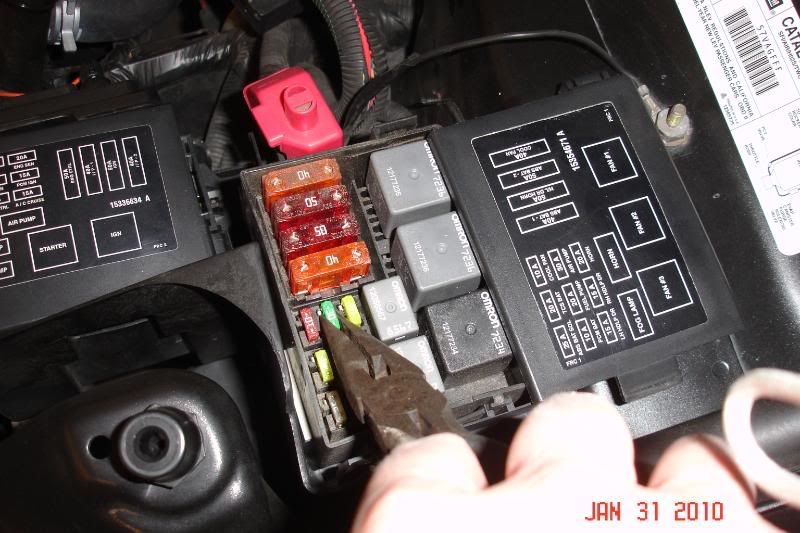
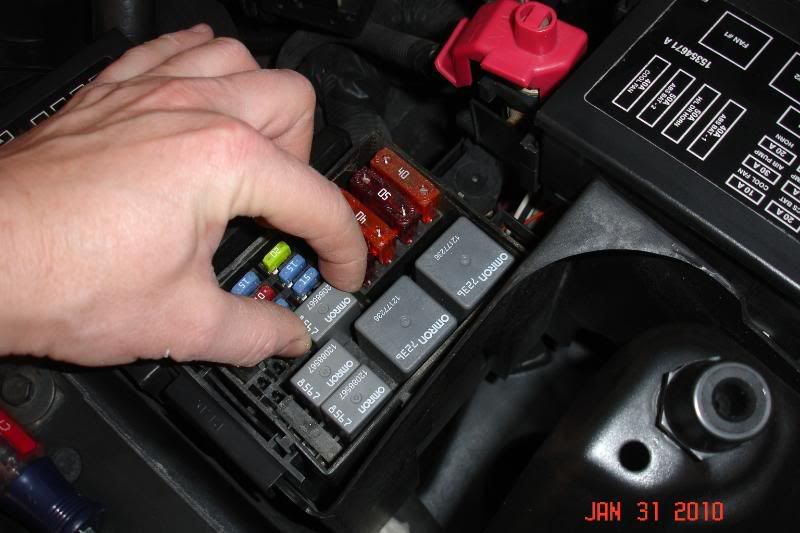
2. If there is no air blowing, you will need to check the fuse and relay to ensure that there is power to the pump. These are located in the electrical boxes on the right side of the engine compartment. The relay is in the left box and the fuse is in the right box. Both are labeled "AIR PUMP". You can also probe the connection at the pump to check for power.
3. If power checks out, but the pump is still not pushing air, you will need to inspect the pump. It is possible that it has simply failed, a hose has become disconnected, or there may be a blockage in one of the hoses. Remember -- the pump only runs on cold start up for a short period of time.
4. If the pump is running correctly and you have air at the driver side hose over the wheel well, then you need to check if the air is flowing to the exhaust manifolds. On each side of the engine there is a tube bolted to the manifold. This runs up to the check valve onto which is clamped a rubber hose. Disconnect each clamp and pull the hose. Again, on cold start up you should have air blowing from the hoses.
5. If air does not blow from the hoses you need to check the solenoid and diverter valve that are located on top of the engine. The electric solenoid allows a vacuum signal to open the diverter valve such that air flows to the manifolds through the check valves. The diverter valve has three (3) hoses atatched to it, one being the hose from the pump and two going to the manifolds on each side of the engine.
6. Begin by checking for vacuum by removing the hose at the top of the diverter valve. If there is no vacuum present, either the solenoid is bad, a fuse is blown, or the circuit is open. It is also possible that the vacuum source line may be a problem so this should also be checked. If there is vacuum then it is likely that the diverter valve has failed. It should be removed from the vehicle and inspected with a handheld vacuum pump before replacement.
7. If all of these components are working correctly, then the most likely culprit is that the check valves or manifold tubes are bad, or simply plugged up. The check valves can be purchased from a dealership or most auto parts stores. The tubes can be cleaned of carbon buildup should this be the problem.
REMOVAL:
In the event you wish to remove the secondary air system in its entirety, it is quite simple to do. Please note that you will need to have your PCM re-programmed to delete the system or you will be driving around with your SES light on all the time.
The air pump is pulled by disconnecting the electrical connector and two hoses. Access is again from beneath the vehicle. It is tight working quarters and a hose pick was quite useful for both the electrical harness and hoses.
I found that it is easiest to simply snap off the rubber biscuits from the clips as there was not room to slide the pump off of them. I then removed the clips as well to avoid any potential for a rattle. The clips have a tower on the top side to protect the wire harness which runs directly above the pump cavity. Here is a view of the pump once it is out of the car.
Back up top, the fuse and relay were removed from the electrical boxes.
The hoses to and from the air pump and diverter valve can then be removed. It is advisable to use a flat blade screw driver to press out the clips on the cowl seal before you work in this area -- they are sharp and will make you bleed. Once the hoses are removed, this leaves a hole in the side of the airbox from the fresh air feed. I found a Chrysler "Master Cylinder Gasket" in the HELP! section at our local Autozone that fits the hole perfectly. It is P/N 42081 and actually does not look too bad installed in the side of the SLP lid.
After the hoses are removed, both the solenoid and diverter valve can be unplugged and unbolted and also removed. Note that there is a 15 mm bolt on the back side of the head that has to be loosened (not removed) to pull the bracket for the diverter valve. This should then be snugged back down as it may have a ground wire attached to it as well. Access is tight, but you can get to it with a wrench.
After the components are all removed, you should tape up any open electrical connections and also plug off the vacuum source line that attached to the solenoid. The bracket for the solenoid can also be unclipped from its holder on the intake manifold. Again, you will need to delete the secondary air system via tuning to complete the process.
Last edited by jg rider; Apr 1, 2011 at 06:17 PM.
I know its been beaten to death but this is a nice write up. I about to do mine and found out my 01 is a little different than my 98 was. Are you sure we can unplug and remove the vacuum solenoid?
Thread Starter
On The Tree
Joined: Dec 2010
Posts: 117
Likes: 0
From: NW OR.
I haven't done this. I copied and pasted this from someone else. Read the first paragraph at the top
It's easier to leave the silenoid and just plug the vacuum intake you disconnected from the AIR hose. Otherwise, you have to try and reach around the intake to plug up the hole in the back where the hose that goes from the silenoid to the intake. Just my 2 cents....
I just got done taking EVERYTHING out. Pheonix...You dont have to get the bolt on back of the block to get the diverter valve out. It will come right off the bracket.
I left the hose on back of intake and just put a screw in it with a little calk on the threads. Everything else is gone no problem.
I left the hose on back of intake and just put a screw in it with a little calk on the threads. Everything else is gone no problem.
Trending Topics
LS1 Tech Stories
The Best V8 Stories One Small Block at Time

Gas Monkey Built a 6-Wheel Ferrari Testarossa With a Corvette LT4 Engine
Verdad Gallardo
7 Most Reliable High-Performance Engines GM Has Ever Built
Verdad Gallardo
Amazing '71 Camaro Restomod Is Modern Muscle Car Under the Skin
Verdad Gallardo
6 Common C5 Corvette Failures and What's Involved In Repairing Them
Pouria Savadkouei
Retro Modern Bandit Pontiac Trans AM Comes With Burt Reynolds' Autograph
Verdad Gallardo
Top 10 Greatest Cadillac V Series Performance Models Ever, Ranked
Pouria Savadkouei
Top 10 Most Powerful Chevy Trucks Ever Made!

Hennessey's New Supercharged Silverado ZR2 Has 700 HP
Verdad Gallardo
Coachbuilt N2A Anteros Is an LS2-Powered C6 Corvette In Italian Clothes
Verdad Gallardo I've seen some recommend a plate inserted at the
place where the "spider" hits the manifolds, with a
smaller diameter hole, to cut down on exhaust
pulsation hitting the check valve. But no idea if
this is effective, consistently effective or just
another "free mod" that does nothing.
place where the "spider" hits the manifolds, with a
smaller diameter hole, to cut down on exhaust
pulsation hitting the check valve. But no idea if
this is effective, consistently effective or just
another "free mod" that does nothing.