Finally pulling the trigger on parts!
I had so much residual coolant spill into the oil pan I ended up having to change the oil again after a trip around the block. It came out almost looking like water and the whole engine was filled with smoke from burning off the coolant.
Thread Starter
Joined: Aug 2004
Posts: 11,258
Likes: 146
From: Pace, FL
I've heard of the gasket remover.
I got a carbon scraper at AutoZone today. It actually seems to work - designed to remove gaskets from the block. Doesn't scuff either.
I'm going to try some PB Blaster and soak the buildup and scrape it off.
I also got some Gunk Gel to get the carbon off the block so I can get it clean for the Cometic gaskets. I'll let you know how it works.
And Phase 8 will be lots of videos.
And sure thing, Dave. I'll be in Lafayette for Christmas this year too.
Thread Starter
Joined: Aug 2004
Posts: 11,258
Likes: 146
From: Pace, FL
So, how do I spend my Friday nights? Destroying carbon and hopefully not my engine.
I took a carbon scraper I found at AutoZone and decided to see how it would work. I used the foamy spray SeaFoam and let it sit for a while, then took the carbon scraper and worked on the passenger side piston bank. What it did was take the carbon right off (where a wire brush had 0 luck). I then sprayed it with B-12 Chemtool treatment and simply wiped off the residual. It took around 2 pases with SeaFoam and the scraper and 1 with the B-12 to get them clean. I'll spray out with compressed air to grab any of the little particulates that ended up on the cylinder walls to avoid any scrapes there.

One thing the scraper did was make shallow surface irregularities in the piston. Because the pistons have concentric circles, anything that goes against the grain of those is likely to "shine" up the ridges. I couldn't catch anything with my fingernail. It just seems to have polished the piston more than anything. But, I took more care and had less of these as I continued on and got the hang of how much pressure and the angle needed to pull the carbon buildup off.

But the end result is pretty good.


I took a carbon scraper I found at AutoZone and decided to see how it would work. I used the foamy spray SeaFoam and let it sit for a while, then took the carbon scraper and worked on the passenger side piston bank. What it did was take the carbon right off (where a wire brush had 0 luck). I then sprayed it with B-12 Chemtool treatment and simply wiped off the residual. It took around 2 pases with SeaFoam and the scraper and 1 with the B-12 to get them clean. I'll spray out with compressed air to grab any of the little particulates that ended up on the cylinder walls to avoid any scrapes there.
One thing the scraper did was make shallow surface irregularities in the piston. Because the pistons have concentric circles, anything that goes against the grain of those is likely to "shine" up the ridges. I couldn't catch anything with my fingernail. It just seems to have polished the piston more than anything. But, I took more care and had less of these as I continued on and got the hang of how much pressure and the angle needed to pull the carbon buildup off.
But the end result is pretty good.
LS1 Tech Stories
The Best V8 Stories One Small Block at Time

6 Common C5 Corvette Failures and What's Involved In Repairing Them
Pouria Savadkouei
Retro Modern Bandit Pontiac Trans AM Comes With Burt Reynolds' Autograph
Verdad Gallardo
Top 10 Greatest Cadillac V Series Performance Models Ever, Ranked
Pouria Savadkouei
Top 10 Most Powerful Chevy Trucks Ever Made!

Hennessey's New Supercharged Silverado ZR2 Has 700 HP
Verdad Gallardo
Coachbuilt N2A Anteros Is an LS2-Powered C6 Corvette In Italian Clothes
Verdad Gallardo
Awesome K5 Blazer Restomod Comes With C7 Corvette Power
Verdad Gallardo
10 Camaros You Should Never Buy

10 LS Engine Myths That Refuse to Die
Verdad Gallardo Thread Starter
Joined: Aug 2004
Posts: 11,258
Likes: 146
From: Pace, FL
That damn scraper tool makes me nervous on the block to get the gasket off. I'll probably just use a razor blade there. I don't want issues with the Cometic sealing. I looked for Permatex gasket remover, but couldn't find it at O'Reillys or AutoZone. So I might order that if I can't find at NAPA tomorrow.
I think that would be a big help.
I think that would be a big help.


Thread Starter
Joined: Aug 2004
Posts: 11,258
Likes: 146
From: Pace, FL
So, I am going to go buy an impact wrench tomorrow to break free the balancer bolt. I can't get any leverage on the engine stand. So, without being able to get to the front cover, I decided to start disassembly of the TEA heads so I could get them milled further this week and be ready for mock-up and PtV clearance checks and pushrod/preload checks.
The TFS tool works. But it doesn't have enough travel. A few of the locks wouldn't pop out and if one did and the other didn't in the pair, I couldn't actually remove the tool. So, I'm going to play with that during the week and see if I can find a thinner lock nut or another way to lock the base of the tool to the top plate.
I did this on my dining room table with thick place mats down to avoid scuffing the table. I also rolled up a mat and set it under the end of the head to give me clearance as the valve pushed open as I tightened down the tool.

PAC-1904 dual spring. Beefy.

Installed the checker spring. A comparison shot to the 1904s.


The turned-down LS3 valve is lighter than the Ferrea stainless exhaust valve.

The TFS tool works. But it doesn't have enough travel. A few of the locks wouldn't pop out and if one did and the other didn't in the pair, I couldn't actually remove the tool. So, I'm going to play with that during the week and see if I can find a thinner lock nut or another way to lock the base of the tool to the top plate.
I did this on my dining room table with thick place mats down to avoid scuffing the table. I also rolled up a mat and set it under the end of the head to give me clearance as the valve pushed open as I tightened down the tool.
PAC-1904 dual spring. Beefy.
Installed the checker spring. A comparison shot to the 1904s.
The turned-down LS3 valve is lighter than the Ferrea stainless exhaust valve.
Thread Starter
Joined: Aug 2004
Posts: 11,258
Likes: 146
From: Pace, FL
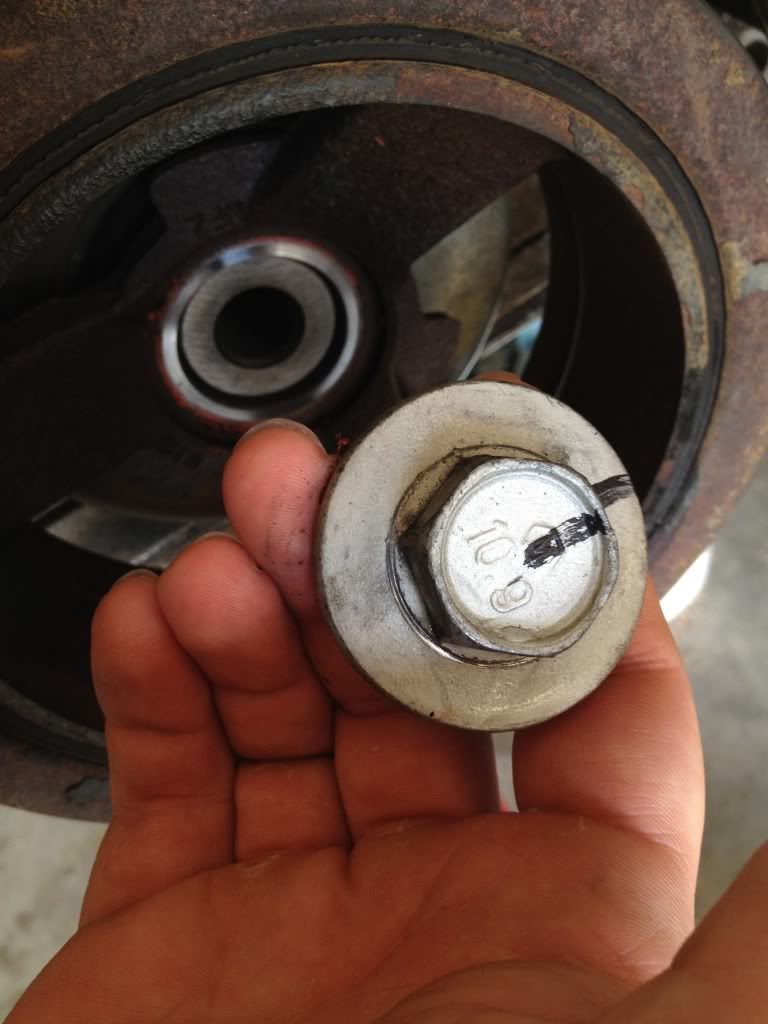
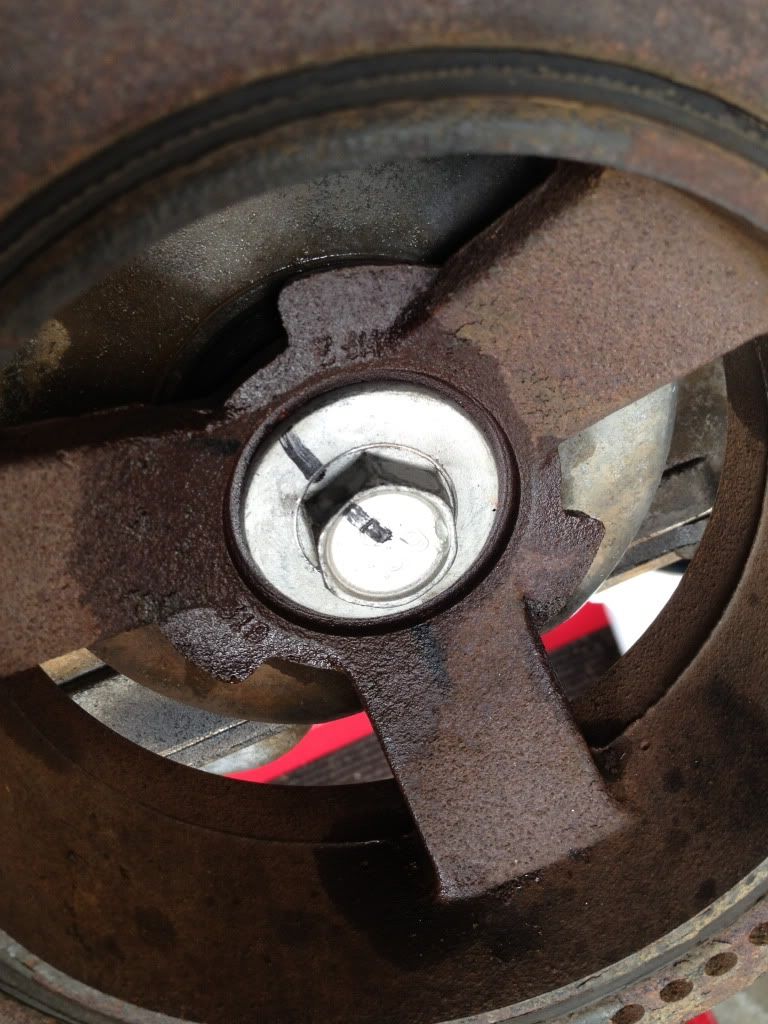
Okay, so I have an 8-gal air compressor and a 700ft-lbs Harbor Freight Earthquake gun. The son of a bitch crankshaft bolt will not come off. I have it on the engine stand, so torqueing on it with a breaker bar is not working.
I do have the flywheel locked into place (not that it matters with the impact), and I've sprayed PB Blaster best I can in there (though I doubt it gets down in there) and wailed on it until I've developed a headache. I had a Husky 300ft-lbs gun that wouldn't move it. So I went and got the Earthquake this morning. And I'm going CCW (which is correct, RIGHT?!)
Nothing.
Here are some pics/vids (does GM mark the bolts like this?) Is it possible the balancer was removed and a new crank bolt was added (with GOD KNOWS WHAT LOCTITE)?!
I need to get the balancer off so I can get the front cover removed. I am ready to start my rebuilt, but I can't even get the engine opened up all the way. WHAT THE ****.
My next idea is to heat the SOB up and hope I don't pop the damn bolt. Sigh.