Started the install of my LS2 402 from SLP (w/ Pics)
 01-07-2006, 06:36 PM
#1
Alright guys, here we go.
First I would like to thank all of the people who post on here and that have been so kind to help me with many of my questions. Having people post their pitfalls and f++k ups helps others greatly so that we don't make the same mistakes. Don't worry though, I will likely make new ones. So lets start with what I am putting together.
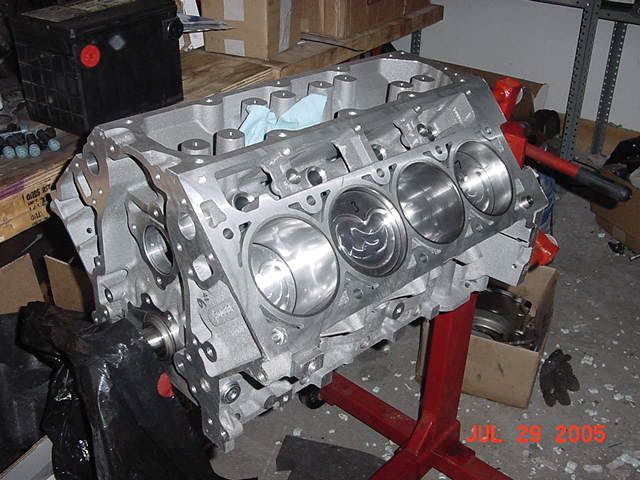
First we have the SLP ZL-402 High Compression Shortblock as the platform

Next we have the AFR 225 CNC'd Head and Cam Package for said short block. They have 2.08 Int and 1.60 Ext Valves and are "supposed to flow" 320 CFM @ 600 lift on the intake side and 250 CFM on the exhaust side. The cam is "supposedly" matched .596�/250� int. .596�/246� exh. camshaft w/ 114 lobe sep.

I am going to use an LS6 Intake also from SLP which looks just like all of the other LS6 intakes and therefore no picture. I am aware that the FAST intake would work better but the "Honey, I already spent $10K on this project what is the difference if I spend another $1K" argument didnt hold any water. Also using the stock TB and stock MAF for the same reason. Plus, it leaves me with something to look forward too.
It is pulling air in thru an SLP Lid and cold air induction kit.
On the exhaust side, I am running JETHOT 1 3/4 headers into an ORY and then to SLP Loudmouth 2 catback (no cats though). No pics of the headers as they are still in the box but here is the catback on the car.

I am also using the bolt on subframes from SLP pictured here.

This photo bucket thing is great.
Next I have the Spec 3 clutch w/ the upgraded hydraulics which I have not even started to think about yet. And a Pro 5.0 shifter on a stock tranny (another upgrade for the future).
All of this will be going thru the stock rear w/ 3.42's until it breaks, which from what I hear, shouldn't be that long from now.
And now on to the disassembly process. Thanks alot to the guys out there that have posted pic's of how they got the motor and tranny out without a lift. I would have never thought of such a creative use for a cherry picker.

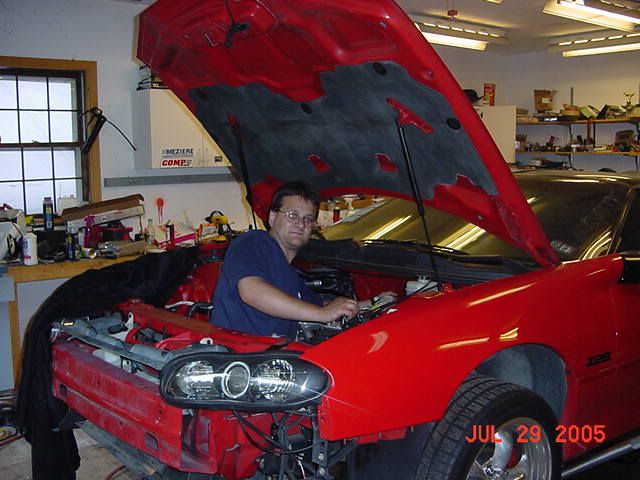
Here is the engine cavity.

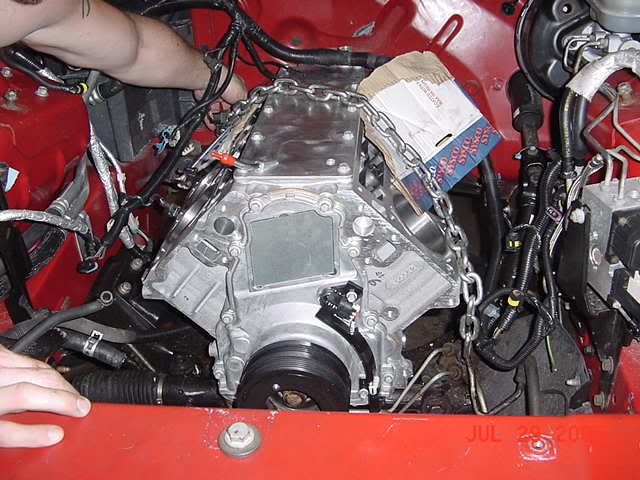
This is a closer look at the motor coming out.

And then it is out and mostly stripped.

Now, I would like it if someone could tell me what this little ring goes to that you can see pictured hanging on one if the clutch ribs in the bottom center. I found this guy floating around between the ribs and the clutch pads.

You would think that w/ all of the SLP **** that I bought that they would kick in some kind of sponsorship. Oh well, all I know is that it had better make some real power because I will only have one place to point the finger.
I hope to start assembling the longblock tomorrow and will give pictures as they become available.
One note: To anyone ordering ARP head studs, apparently, they aren't the same on the newer LS1's and LS2's as they are for the older LS1. The first set of studs that I received were way too long and I had to wait for a replacement set.
I would like some ARP stud installation advice if someone out there could provide it. Such as, how much torque, if any goes on the stud itself. How much torque on the nuts.
First I would like to thank all of the people who post on here and that have been so kind to help me with many of my questions. Having people post their pitfalls and f++k ups helps others greatly so that we don't make the same mistakes. Don't worry though, I will likely make new ones. So lets start with what I am putting together.
First we have the SLP ZL-402 High Compression Shortblock as the platform
Next we have the AFR 225 CNC'd Head and Cam Package for said short block. They have 2.08 Int and 1.60 Ext Valves and are "supposed to flow" 320 CFM @ 600 lift on the intake side and 250 CFM on the exhaust side. The cam is "supposedly" matched .596�/250� int. .596�/246� exh. camshaft w/ 114 lobe sep.
I am going to use an LS6 Intake also from SLP which looks just like all of the other LS6 intakes and therefore no picture. I am aware that the FAST intake would work better but the "Honey, I already spent $10K on this project what is the difference if I spend another $1K" argument didnt hold any water. Also using the stock TB and stock MAF for the same reason. Plus, it leaves me with something to look forward too.
It is pulling air in thru an SLP Lid and cold air induction kit.
On the exhaust side, I am running JETHOT 1 3/4 headers into an ORY and then to SLP Loudmouth 2 catback (no cats though). No pics of the headers as they are still in the box but here is the catback on the car.
I am also using the bolt on subframes from SLP pictured here.
This photo bucket thing is great.
Next I have the Spec 3 clutch w/ the upgraded hydraulics which I have not even started to think about yet. And a Pro 5.0 shifter on a stock tranny (another upgrade for the future).
All of this will be going thru the stock rear w/ 3.42's until it breaks, which from what I hear, shouldn't be that long from now.
And now on to the disassembly process. Thanks alot to the guys out there that have posted pic's of how they got the motor and tranny out without a lift. I would have never thought of such a creative use for a cherry picker.
Here is the engine cavity.
This is a closer look at the motor coming out.
And then it is out and mostly stripped.
Now, I would like it if someone could tell me what this little ring goes to that you can see pictured hanging on one if the clutch ribs in the bottom center. I found this guy floating around between the ribs and the clutch pads.
You would think that w/ all of the SLP **** that I bought that they would kick in some kind of sponsorship. Oh well, all I know is that it had better make some real power because I will only have one place to point the finger.
I hope to start assembling the longblock tomorrow and will give pictures as they become available.
One note: To anyone ordering ARP head studs, apparently, they aren't the same on the newer LS1's and LS2's as they are for the older LS1. The first set of studs that I received were way too long and I had to wait for a replacement set.
I would like some ARP stud installation advice if someone out there could provide it. Such as, how much torque, if any goes on the stud itself. How much torque on the nuts.


 01-07-2006, 08:48 PM
#3
Launching!
iTrader: (25)
Join Date: Jan 2006
Location: Hamilton Twp, NJ
Posts: 233
Likes: 0
Received 0 Likes
on
0 Posts

how involved was getting the motor out the bottom? I just had a factory rocker arm fail and have to pull the motor to fish out the caranage and assess the the damage if any?
and good luck with all the new goodies
Thanks
Chris
and good luck with all the new goodies
Thanks
Chris
Last edited by 1QWIKBIRD; 01-07-2006 at 08:57 PM.
 01-08-2006, 07:18 AM
#6
Originally Posted by 1QWIKBIRD
how involved was getting the motor out the bottom? I just had a factory rocker arm fail and have to pull the motor to fish out the caranage and assess the the damage if any?
https://ls1tech.com/forums/showthread.php?t=354351
The thread above is basically something that was copied verbatim out of a book called "How to Build an LS1" or something like that. It would be of great benefit to actually buy the book as many of the instructions make references to pictures and don't make any sense without having the picture to look at.
I really am more concerned about putting it all back together because I am switching out alot of stuff. For example, I am deleting the EGR and the AIR and I have to move sensors due to the new locations required by the LS2 motor. I either broke a vacuum line or it was already split but I think that it is associated w/ emissions so I have to find out before I go buying a replacement. I did buy alot of tools to do this even though not that many are required. I would suggest gettting a jack that will lift the car atleast 30" (large shop 2 ton) and you will need the cherry picker. I only had 2 jack stands and they are not the ones that go really high so I had to also use a couple of smaller jacks in order to juggle my 2 little jack stands around. I need to get a set of those 6 ton jack stands that go up 34". Harbour Freight sells all of this stuff for alot cheaper than anyone else and is where I bought most of my stuff. A set of ratcheting metric wrenches are also very usefull and if you can get them with the swivel on the ratcheting side (i didn't) they would probably come in even handier. I found that almost everything is either 10mm, 13mm or 15mm. You will need to go to the store and buy a #50 torques bit 1/2 in drive socket to get the driver's side strut tower bolts lose (only the 2 back ones).
That's all I can think of. I hope to start assembling the longblock today and will provide pictures.
I am not a mechanic by trade (I work on computers) but I have spent alot of time working on my own and my friends cars. I am still a bit intimidated about getting it all back in. I think that w/ the support of this forum, I will be able to "git-r-dun".
01-08-2006, 07:28 AM
#7
Originally Posted by platinum
pull it from the top. it is easier
I looked into this and there is a great deal of debate about it. I chose to drop it as I am changing the struts also. Which brings me to my first problem that I started a new thread as it is not engine specific.
https://ls1tech.com/forums/showthrea...12#post4048312
Trending Topics
01-08-2006, 08:12 AM
#9
Moderator
iTrader: (4)
Join Date: Nov 2003
Location: Plainfield, CT
Posts: 10,520
Likes: 0
Received 0 Likes
on
0 Posts
Great post. I did an LS2 402 swap with a friend on his 98 Z after the stock block blew. We took it out through the top no problem. I knew about the ARP studs, but cannot remember what to torque them to.
The cam position sensor also needs to be moved to the front of the block and 2 wires swapped . It is not a direct match the colors change for the wiring.
That car is going to make great power. Will be loud as hell with your set up. My friend is running Kooks 1 3/4 w/ Carsound cats & a GMMG cat-back and his car is loud as hell. I can not hear my engine (mods in sig) over his while following him. As for the clutch, I would suggest a SPEC stage 5. I do not think the 3 will last long at that power level.
The Z has the 402.
01-08-2006, 08:46 AM
#12
Hey Dave. You are the one that posted one of the first step by steps that I saw and I did partake in your thread. Thanks for sharing that info. I have a question. It appears that you are putting in the new motor without the heads. Refresh my memory, can you not pull it and put it in with the heads if you go from the top? If not, this is a huge reason to go out the bottom as there is a whole lot more room to work on outside of the car. I like sitting my fat *** in a chair and working on it rather than bending over and scrapping knuckles. JMHO.
01-08-2006, 01:16 PM
#14

I've done both methods of removal. If swapping motors, out the bottom is by far the easiest way to go. The reason is for just what you stated. You can put on and remove every single thing from right in front of you. It saves unbelievable amounts of time, and once the body is back on the K-member, just hook up a few odds and ends and your finished.
01-08-2006, 01:32 PM
#15
Moderator
iTrader: (4)
Join Date: Nov 2003
Location: Plainfield, CT
Posts: 10,520
Likes: 0
Received 0 Likes
on
0 Posts
Heads were out for milling & replacing a bent vavle when we put the Engine in. Heads were on the old ls1 when she blew. We took the LS1 out with the heads on. We would have put the heads on to put it back in, but we were in a hurry. Car had been down for too long. My friend got involved in the APE engine deal. luckily he did not lose any money.
He did not plan on going 402 when he got the H/C set up. So they are AFR 205's w/ Texas Speed Magic stick cam & fast 78mm intake.
I have plenty of room to work in there too.
He did not plan on going 402 when he got the H/C set up. So they are AFR 205's w/ Texas Speed Magic stick cam & fast 78mm intake.
I have plenty of room to work in there too.
01-08-2006, 08:27 PM
#17
Originally Posted by SRfastZ
can i ask how much have you spent on the motor and all the parts ????????
I think all of the other stuff cost me in the neighborhood of $10K. I have wanted to do something like this all of my post pubescent life and have never had the financial resources to do it. I sold a house that I bought as an investment right before the market started booming and I made a killing on it so I allocated $15K to my project. Unfortunately, I couldn't get everything that I needed and pay labor and be under my cap so now I am in great back pain due to the work so far.
01-08-2006, 08:49 PM
#18
So onto what I did today.
Today I spent most of the time putting together the new shortblock. I figured out how to get around using some specific tools if you are replacing certain key items.
My first order of business was to get the bottom timing chain sprocket of the old motor so that I could get the key for the key way off of the crank. Once I had the key, I put it on the new crank so that I could get the new sprocket onto the new block. I found that by using the old sprocket to pound in the new sprocket, I didn't need to by an install tool and since they are the same material (aluminum) I didn't have to worry about the new one getting damaged. Here it is on. No it isn't bleeding, just some assembly lube. Obviously, the cam hold down plate and the cam are intalled at this point as well. I didn't degree it so I hope the cam card is right and that the DOTs are in the right spot on the sprockets.

Next, I slipped on the ported oil pump. Just eyeballed it no feelers or special install tool. It came assembled from SLP so I didn't take it apart or anything. Just bolted it in.

Next was the rear cover. I had to use my old LS1 rear cover as a new one is not supplied because the old one fits. Of course the old rear seal was not very pliable so I decided to replace it. I banged the old one out with a hammer and screw driver and used the old seal to install the new seal. Again, just beat it with a hammer. I bought a new gasket and used that.
Note, when installing the front and rear cover, you have to make sure that the covers end up making a flush surface with the bottom of the block so that you get a good seal on the oil pan. I also pushed down on the gaskets for the front and rear covers so that a little tiny bit of the rubber stuck out past the mated surfaces.
Next came the windage tray which must be spaced for the stroker. You can see the spacers if you look closely.

Next came the front cover which came with the sensor and seal so no addition stuff required from me. I also put the ARP studs in and the oil pan. Don't forget to put one little spot of gasket sealer in each of the 4 corners where the front and rear covers meet the bottom deck of the block.

And finally today I put in the lifters and the plastic trays for the lifters seen here.

That's all for today. Probably wont be able to do anything else for a couple of days but I will post pics as I get them and the work gets completed.
Today I spent most of the time putting together the new shortblock. I figured out how to get around using some specific tools if you are replacing certain key items.
My first order of business was to get the bottom timing chain sprocket of the old motor so that I could get the key for the key way off of the crank. Once I had the key, I put it on the new crank so that I could get the new sprocket onto the new block. I found that by using the old sprocket to pound in the new sprocket, I didn't need to by an install tool and since they are the same material (aluminum) I didn't have to worry about the new one getting damaged. Here it is on. No it isn't bleeding, just some assembly lube. Obviously, the cam hold down plate and the cam are intalled at this point as well. I didn't degree it so I hope the cam card is right and that the DOTs are in the right spot on the sprockets.
Next, I slipped on the ported oil pump. Just eyeballed it no feelers or special install tool. It came assembled from SLP so I didn't take it apart or anything. Just bolted it in.
Next was the rear cover. I had to use my old LS1 rear cover as a new one is not supplied because the old one fits. Of course the old rear seal was not very pliable so I decided to replace it. I banged the old one out with a hammer and screw driver and used the old seal to install the new seal. Again, just beat it with a hammer. I bought a new gasket and used that.
Note, when installing the front and rear cover, you have to make sure that the covers end up making a flush surface with the bottom of the block so that you get a good seal on the oil pan. I also pushed down on the gaskets for the front and rear covers so that a little tiny bit of the rubber stuck out past the mated surfaces.
Next came the windage tray which must be spaced for the stroker. You can see the spacers if you look closely.
Next came the front cover which came with the sensor and seal so no addition stuff required from me. I also put the ARP studs in and the oil pan. Don't forget to put one little spot of gasket sealer in each of the 4 corners where the front and rear covers meet the bottom deck of the block.
And finally today I put in the lifters and the plastic trays for the lifters seen here.
That's all for today. Probably wont be able to do anything else for a couple of days but I will post pics as I get them and the work gets completed.