
Beehive springs Strikes again.(edit) Now called : Engine rebuilt 2013 .
 01-20-2013 | 08:59 AM
#101

TECH Fanatic
iTrader: (26)
Joined: Mar 2010
Posts: 1,909
Likes: 0
Received 0 Likes
on
0 Posts
From: Milledgeville, GA
I Called Lloyd and he said hes been running a DIY kit on his heads since the extremes were not available. He made me a kit using SBC Crane Dual 99893 springs and lt1 retainers, locks, and valve seals. Installed them and my float at 6k was gone and pulls hard all the way to 6500 now. BTW the PAC 1518s were basically new and wouldnt handle LEs 223/230 .565/.565 112lsa cam. You need 155lb seat pressure with probubly all of LEs cams which the PACs did not running 135.
01-20-2013 | 09:46 AM
#102

TECH Fanatic
iTrader: (4)
Im not sure which retainers he is using... could be stock but im not sure he just said he makes his own diy kits using those Crane springs and "lt1" specific retainers,locks, valve seals as the SBC stuff does not interchange with LT1s hence its diy kit he puts together. If thats what hes running now i have no idea that was last June i was talking to him over the phone.
02-15-2013 | 08:04 PM
#104
Thread Starter
TECH Apprentice
iTrader: (1)
Joined: Dec 2009
Posts: 301
Likes: 0
Received 0 Likes
on
0 Posts
From: Montreal,Canada
Feb. 15 2013 .
Let's the fun begin .


The new home for the next................few days....


My buddy who gave me a hand on moving it in.


I will elaborate on what has been done to it later .
One sad thing that I'm very disappointed of , is the whole set of heads had to be redone .
Absolutely nothing was right , I'm very unhappy right now so I will not talk about it yet.
The builder ( Machinist ) took zillion of detailed pictures of everything including the heads showing why they had to be completely redone including the $200 milling job I paid for was not even close to be right and this is just the tip of the Iceberg.
Anyway I'm happy right now about having the Longblock here and ready to start working on it to put this together.
The fun stuff is coming.
Let's the fun begin .
The new home for the next................few days....
My buddy who gave me a hand on moving it in.
I will elaborate on what has been done to it later .
One sad thing that I'm very disappointed of , is the whole set of heads had to be redone .
Absolutely nothing was right , I'm very unhappy right now so I will not talk about it yet.
The builder ( Machinist ) took zillion of detailed pictures of everything including the heads showing why they had to be completely redone including the $200 milling job I paid for was not even close to be right and this is just the tip of the Iceberg.
Anyway I'm happy right now about having the Longblock here and ready to start working on it to put this together.
The fun stuff is coming.
 02-16-2013 | 11:48 AM
#107
Thread Starter
TECH Apprentice
iTrader: (1)
Joined: Dec 2009
Posts: 301
Likes: 0
Received 0 Likes
on
0 Posts
From: Montreal,Canada
More info coming in slowly .
Feb. 16 2013 4.49 PM. ( some polite editing ) .
Copy from a email I got from The guy who did the refreshed and fix on my heads back in Dec. 2012: ( Edit Feb 16 2013 ) to Mr. No name.
$200 for valve job, mill, clean and assembling heads with new seals
When I got the heads back one seat was offset

After been fixed

Here's my actual milling job when they came back from : ( still no fukend name not to point anyone ) .
Had to shave 0.006" to make them straight .

Also all valve seals had to be replaced ( again ) because the guide were not cut right or something the machinist told me.
I'm not too technical but he said there were 0.531" and I needed 0.550" or something like that.
edit Feb 17 2013 . This is my new springs specifications : Lunati 74777-16. It is a 1.460" dbl spring that will have 155 lbs of seat pressure and 380 lbs open.
So Mr. No name did install them with shims and obviously to keep the same direction in his awesome work the shims were too thick so to open the springs the seat pressure was set at 195 lbs and fully open was a 480 lbs so the machinist who has redone the work told me that 2000KM and my motor would have been worn out ( camshaft , lifters , etc. ) .
I'm so happy the machine shop took the heads apart for inspection even if I told him he didn't have to because Mr. No Name is well known person and his work it "top notch" .
I think I deserve this $200.00 back + I gave him tips $$$ ( twice ) for his excellent service ( before having the heads back from him ) without knowing what I know now.
Not his problem but I paid $200.00 in shipping back and forth + I had the heads completely redone here locally 15 minutes from my home and I also had to pay ( again ) but at least it was done right this time.
*****The whole thread has been edited so no name will be mentioned about who did that very professional job.*****

Feb. 16 2013 4.49 PM. ( some polite editing ) .
Copy from a email I got from The guy who did the refreshed and fix on my heads back in Dec. 2012: ( Edit Feb 16 2013 ) to Mr. No name.
$200 for valve job, mill, clean and assembling heads with new seals
When I got the heads back one seat was offset
After been fixed
Here's my actual milling job when they came back from : ( still no fukend name not to point anyone ) .
Had to shave 0.006" to make them straight .
Also all valve seals had to be replaced ( again ) because the guide were not cut right or something the machinist told me.
I'm not too technical but he said there were 0.531" and I needed 0.550" or something like that.
edit Feb 17 2013 . This is my new springs specifications : Lunati 74777-16. It is a 1.460" dbl spring that will have 155 lbs of seat pressure and 380 lbs open.
So Mr. No name did install them with shims and obviously to keep the same direction in his awesome work the shims were too thick so to open the springs the seat pressure was set at 195 lbs and fully open was a 480 lbs so the machinist who has redone the work told me that 2000KM and my motor would have been worn out ( camshaft , lifters , etc. ) .
I'm so happy the machine shop took the heads apart for inspection even if I told him he didn't have to because Mr. No Name is well known person and his work it "top notch" .
I think I deserve this $200.00 back + I gave him tips $$$ ( twice ) for his excellent service ( before having the heads back from him ) without knowing what I know now.
Not his problem but I paid $200.00 in shipping back and forth + I had the heads completely redone here locally 15 minutes from my home and I also had to pay ( again ) but at least it was done right this time.
*****The whole thread has been edited so no name will be mentioned about who did that very professional job.*****
Last edited by mpcv2000; 02-17-2013 at 09:44 AM.
02-16-2013 | 08:51 PM
#108
Thread Starter
TECH Apprentice
iTrader: (1)
Joined: Dec 2009
Posts: 301
Likes: 0
Received 0 Likes
on
0 Posts
From: Montreal,Canada
So back to fun stuff .
Slight progress this evening .

One day I'll let it exhaust into something different but for now let say I have extra Horses waiting to get out.
They will have to be custom made + I want to redo the whole exhaust set up one day so I'll live with this setup for a while .


Most pictures are for personal reference and easy access ( online ) .


Slight progress this evening .
One day I'll let it exhaust into something different but for now let say I have extra Horses waiting to get out.
They will have to be custom made + I want to redo the whole exhaust set up one day so I'll live with this setup for a while .
Most pictures are for personal reference and easy access ( online ) .
02-17-2013 | 12:11 AM
#109


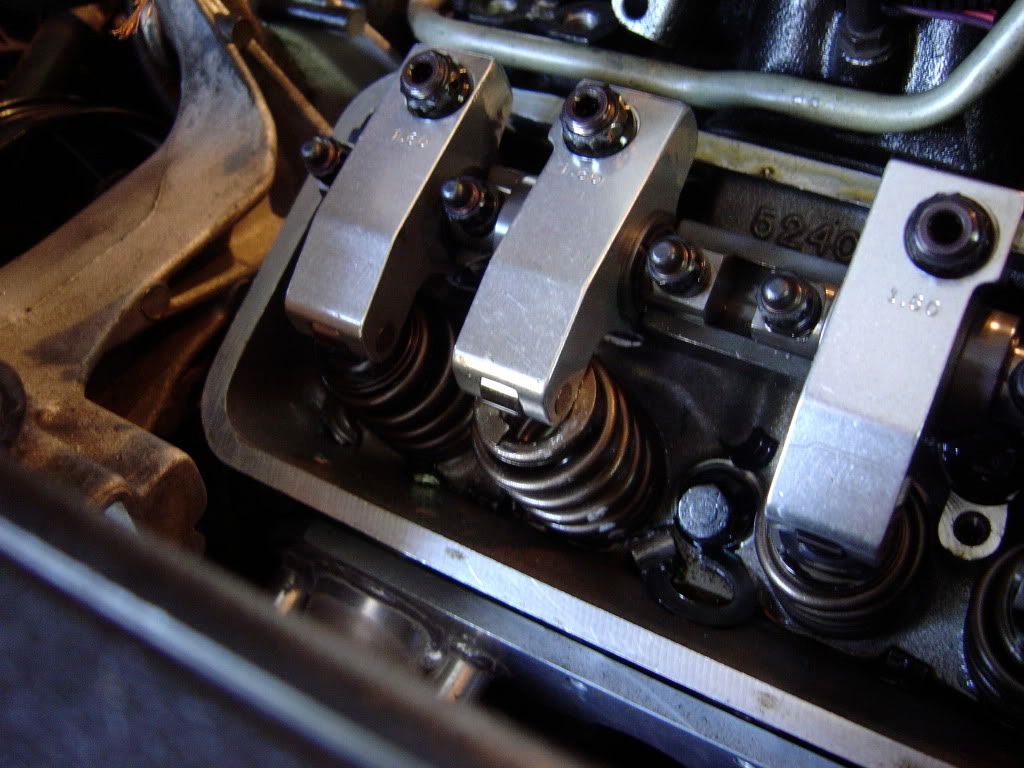
Very cool to hear you have it up and almost running. Sorry to hear about your issues. My previous shoppe left the adjusting nut loose and I dropped a valve at about 7k rpm. I was able to salvage... nothing lol. I was actually happy with the motor going. I decided to go a different route. I learned from my mistakes and it sure as hell feels better than trying to convince yourself everything is ok with a motor that has so many of them. Love the pics keep em coming !
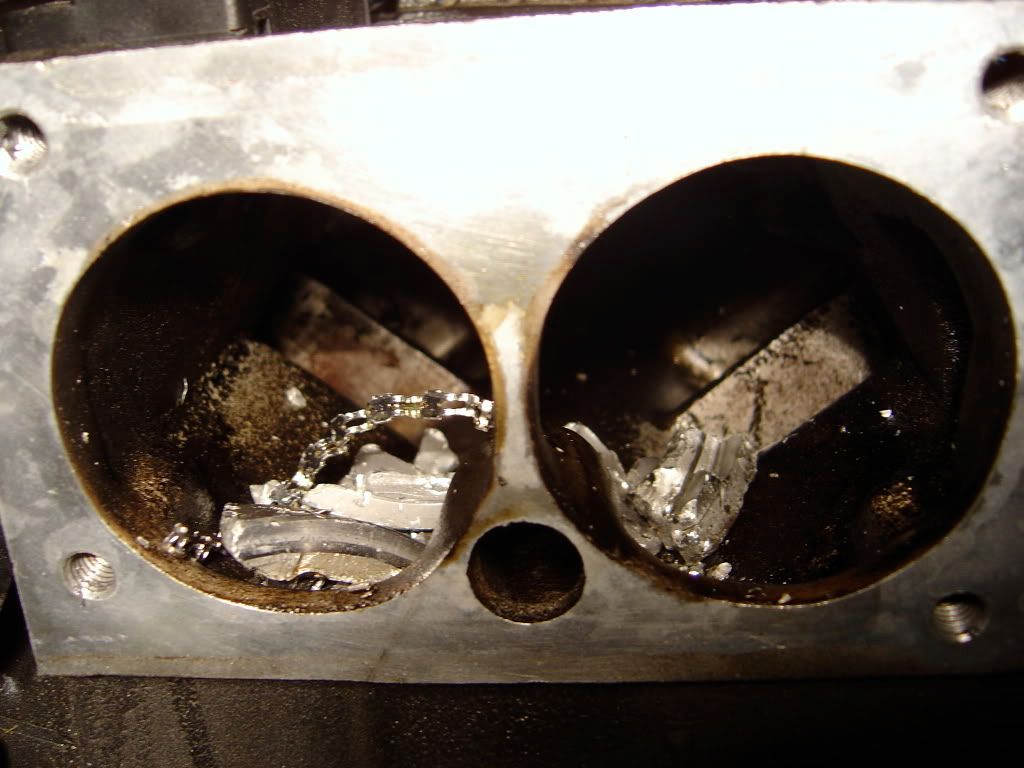
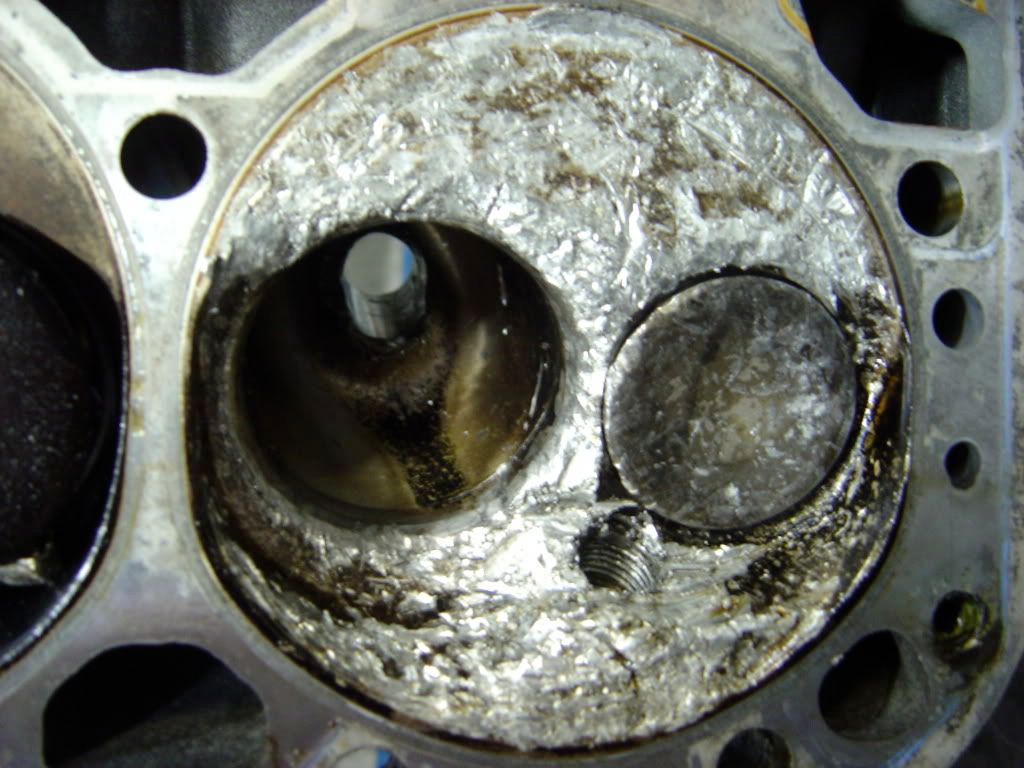
Maybe it will make you feel better....
big block beehives..
Maybe it will make you feel better....
big block beehives..
02-17-2013 | 09:31 AM
#112
Was just trying to make you feel better. Odd that it was the same intake valve on #1 though? Parts of my piston went into the intake and drawn in by all the cyls. Block destroyed.. 3 caps broken. Crank warped (Callie's dragonslayer), forged rods bent 5/8, pistons obviously trashed. Even 2 injectors got nicked by piston debris I couldn't even sell those as a set. Most valves bent, even the shaft rockers were all messed up and required a full rebuild. I was able to salvage only the intake manifold and my new builder just said WTF at the work done by my previous. Required heavy epoxy Etc to fix it up.
Anyhow after being parked for the last 6 years it should be on the road this year again and its exciting to see engines getting completed . Wish you the best!
Anyhow after being parked for the last 6 years it should be on the road this year again and its exciting to see engines getting completed
. Wish you the best!  02-17-2013 | 08:57 PM
#115
Thread Starter
TECH Apprentice
iTrader: (1)
Joined: Dec 2009
Posts: 301
Likes: 0
Received 0 Likes
on
0 Posts
From: Montreal,Canada
Early this morning and after work today I had some time to spend on the motor .

LE2 intake port .


Now with the crossmember on .


This is where I'm at right now .
I may have some down time again because the bolts ( studs ) for the pressure plate won't work.
Hopefully tomorrow I can find a solution.
My plan was for tomorrow been able to reattached the sub frame to the car so we'll see.
LE2 intake port .
Now with the crossmember on .
This is where I'm at right now .
I may have some down time again because the bolts ( studs ) for the pressure plate won't work.
Hopefully tomorrow I can find a solution.
My plan was for tomorrow been able to reattached the sub frame to the car so we'll see.
02-17-2013 | 09:03 PM
#116
TECH Fanatic
iTrader: (26)
Joined: Mar 2010
Posts: 1,909
Likes: 0
Received 0 Likes
on
0 Posts
From: Milledgeville, GA
Looks great. I like the way you turned the coil with the little custom mounts, but if I were you I would space your ICM off the head some. I've seen more trouble with them than optis.
02-17-2013 | 09:07 PM
#117
Thread Starter
TECH Apprentice
iTrader: (1)
Joined: Dec 2009
Posts: 301
Likes: 0
Received 0 Likes
on
0 Posts
From: Montreal,Canada
Good point I'll space it a little , I had to do that to clear my Air intake setup but it has been like that for 3 years and over 22,000 KM trouble free ( if I can say that )
 02-17-2013 | 09:18 PM
#118
TECH Fanatic
iTrader: (26)
Joined: Mar 2010
Posts: 1,909
Likes: 0
Received 0 Likes
on
0 Posts
From: Milledgeville, GA
The factory mounts it straight to the head too....so GM didn't find spacing it necessary, but it does allow for it to run cooler and last longer. Most people just use a couple studs and stand it off with a nut behind it on each stud. You should be able to keep the coil turned like that and still clear your intake. One day maybe I'll get around to turning my coil like yours. Simple and trick looking.
