

How to wire neatly and professionally

Thread Starter
11 Second Club
iTrader: (14)
Joined: Nov 2004
Posts: 1,653
Likes: 1
From: Michigan (Macomb or Lansing)
I drew out a wiring diagram for my nitrous setup. There are like 50 wires and 5 relays in all. It is a progressive 150 wet setup w/ Trick Performance black series gauge as well as heater, purge, iat tricker (when armed).
I have a habit of doing wiring poorly, i route my wires wherever and often use all the same color wire. I would like to have everything neat, hidden, organized, labelled, etc. I don't want stuff failing just because i wired it poorly. Where should I hide all my relays and everything? My center console has an lc-1 installed taking up all the free space there. I haven't ever installed my own relays so i was wondering how to keep them safe and all.
I have a habit of doing wiring poorly, i route my wires wherever and often use all the same color wire. I would like to have everything neat, hidden, organized, labelled, etc. I don't want stuff failing just because i wired it poorly. Where should I hide all my relays and everything? My center console has an lc-1 installed taking up all the free space there. I haven't ever installed my own relays so i was wondering how to keep them safe and all.
I solder/heatshrink everything(usually no crimp connections), use lots of zip-ties/wire loom, and label it if need be. I know exactly which wire is whichin my car, so I don't need to label anything.
As far as relarys, mount them with the spade terminals facing downward...It prevents water from collecting on them and causing corrosion.
As far as relarys, mount them with the spade terminals facing downward...It prevents water from collecting on them and causing corrosion.

Launching!
Joined: Oct 2006
Posts: 202
Likes: 0
after i wired mine and verified all was well i gave and left it alone...true it looks like spaghetti but works fine...i did make a half assed try at keeping most things right where i can get to them fast,(not hidden) and short wires to the solenoids,grounds and relay,but maybe i should get busy and clean up the install some...
it could use a serious attempt at cleaning it up some but i am lazy now...
good post,maybe some others will chime in as i could use some ideas...
it could use a serious attempt at cleaning it up some but i am lazy now...
good post,maybe some others will chime in as i could use some ideas...
I've rewired my nitrous setup 2 times, going on my third time...and I still haven't tried it out. Mainly due to lack of time.
I would run all the wires before you start to cut any of the wires. I just went out and bought a 100ft spool
I would run all the wires before you start to cut any of the wires. I just went out and bought a 100ft spool
This is what I do. First I lay out the whole wiring system on the car. Put all the items in place (Lock out switch etc) Once I have everthing in place I measure all my wires and cut then one by one. Then I bundle them and use static tape to keep them together. I use soder and heat shrink anywhere I can. Other than that just use wire loom and take your time. Taking your time and laying it out makes for a clean install. My goal when installing spray for my customers is to make it look like it came with the car. Most of the time most persons wont pay for that and they want the cheap route.
Trending Topics
great topic. Wiring neatly takes practice and patience. If I am attampting to wire neatly I will usually draw it out so I know how many wires will be run and where...then pull all the wires through, not attached to anything. Then I cut to length and put on terminals. That way they are all the same langth and taking to same path. IMO if you wire up stuff with detail and tie them with wax string or small zip ties...the wire looks better open than hidden in wire loom. But wire loom will make even a messy wire job look ok.
Lets hear more tips on this.....we can all benifit in this area for sure!
Lets hear more tips on this.....we can all benifit in this area for sure!
LS1 Tech Stories
The Best V8 Stories One Small Block at Time

Topdon ONE vs. Artidiag 800 BT2: Which is the Diagnostic Tablet For You?
Pouria Savadkouei
Gas Monkey Built a 6-Wheel Ferrari Testarossa With a Corvette LT4 Engine
Verdad Gallardo
7 Most Reliable High-Performance Engines GM Has Ever Built
Verdad Gallardo
Amazing '71 Camaro Restomod Is Modern Muscle Car Under the Skin
Verdad Gallardo
6 Common C5 Corvette Failures and What's Involved In Repairing Them
Pouria Savadkouei
Retro Modern Bandit Pontiac Trans AM Comes With Burt Reynolds' Autograph
Verdad Gallardo
Top 10 Greatest Cadillac V Series Performance Models Ever, Ranked
Pouria Savadkouei
Top 10 Most Powerful Chevy Trucks Ever Made!

Hennessey's New Supercharged Silverado ZR2 Has 700 HP
Verdad Gallardo


I am getting ready to install the following:
HSW Plate Kit (waiting on replacement plate from HSW)
HSW Purge
HSW Fuel Pressure Switch
HSW Bottle Heater
HSW Bottle Opener
HSW Filter.
I was also just thinking where do I place all the wiring and relays. Should I bolt down the relays or what about velco. My bottle is in the trunk and was also wondering should I have the heater and opener relays near the bottle or run wires from the front to the back.
----FUN---FUN---FUN-----
Bill
Vinny showed me how to do the panel wiring neater, here is an example.

Y connect the + side (Red)
Y connect the grounds (Black)
What is pictured is one power source (25 Amp) that powers: An Opener, A LC-1 cal and status light, Two "Arm" switches for a dry and and a wet, a purge, and a Line Lock.
Everything heat shrinked. Wires as short as possible.
Y connect the + side (Red)
Y connect the grounds (Black)
What is pictured is one power source (25 Amp) that powers: An Opener, A LC-1 cal and status light, Two "Arm" switches for a dry and and a wet, a purge, and a Line Lock.
Everything heat shrinked. Wires as short as possible.
I got Ricky to draw me up a diagram then I just lay and route all the wires where they need to go then solder and heat shrink my connections and use zipties to keep all the wires neatly bundled. I don't like the wire loom kinda makes it look cheap IMO. I have a new diagram for the second stage which looks like it is going to be alot of fun 
6 & 8 Second Club
Joined: Aug 2006
Posts: 2,284
Likes: 0
From: Illinois, RT 66 dragway area
.
Big fan of solder & heatshrink myself. If you have the proper prep, should last forever.
Double shrink can't hurt & will help if in a high vibration area. Something I do on all my cars & push my friends to use.
The electrician labels from the home centers. The small numbered & lettered ones that wrap around the wire.
Work great & don't look that bad. Even if you use multi-colored wires. A small card or list is easier to read than following wires.
Good luck.
.

also interested in this, gonna be doing some wiring soon. it'd be nice to see some close up pics of how some wires are run together and how you guys have your relays mounted


For many years while in school I used to work in a panel shop wiring panels so I think I have a good idea.
I like to use heat shrink on all connections. Double heat shrink and or convoluted tubing on all wires that may encounter possible wire chaffing.
If I have to use a but splice I like to but solder all connections and then heat shrink it.
I like to use black tie wraps.
I like to use convoluted tubing.
I like to fuse every thing with proper spec'ed fuses.
I like to use weather pack connectors.
I like to keep my control wires separate from my power wire's.
(Like using switches to control relays and relays to control larger amp draw components like heaters, fuel pumps, solenoids etc).
and make sure your wires can handle the ampacity loads comfortably.
I would think that People that work places like Boeing would be possibly good people to ask too.

First things first, you need the proper tools and material!!!!! Wire cutters, wire strippers, soldiering iron, heat gun, crimping pliers (if you want to go that route, I recommend soldiering them after crimping and using heat shrink tube), heat shrink tube of various sizes, wire loom of varioue sizes, zip ties, electrical tape and white masking tape. I'm sure I missed something but you'll figure it out. Now when your wiring everything up make sure you leave yourself extra wire for mess ups. Make sure you label everything with the white masking tape so you know where everything comes from and goes to ( example - from nitrous noid to progressor - ). There other stuff but I think you get the idea. Just take your time and do it right the first time!
take your time and wire loom ftw. Easyiest way i found was mount the window switch in the glove box keep the relay under the dash and wire loom everything into the car. This is what i came up with


as you can see i still have a little cleaning up to do. Blow down tube doesnt go the way it show in that pic anymore goes to the side of the bottle near the outside of the car down to the tube make it look a little better. That pic was before i drilled the hole for the 8an bulkhead fitting
as you can see i still have a little cleaning up to do. Blow down tube doesnt go the way it show in that pic anymore goes to the side of the bottle near the outside of the car down to the tube make it look a little better. That pic was before i drilled the hole for the 8an bulkhead fitting

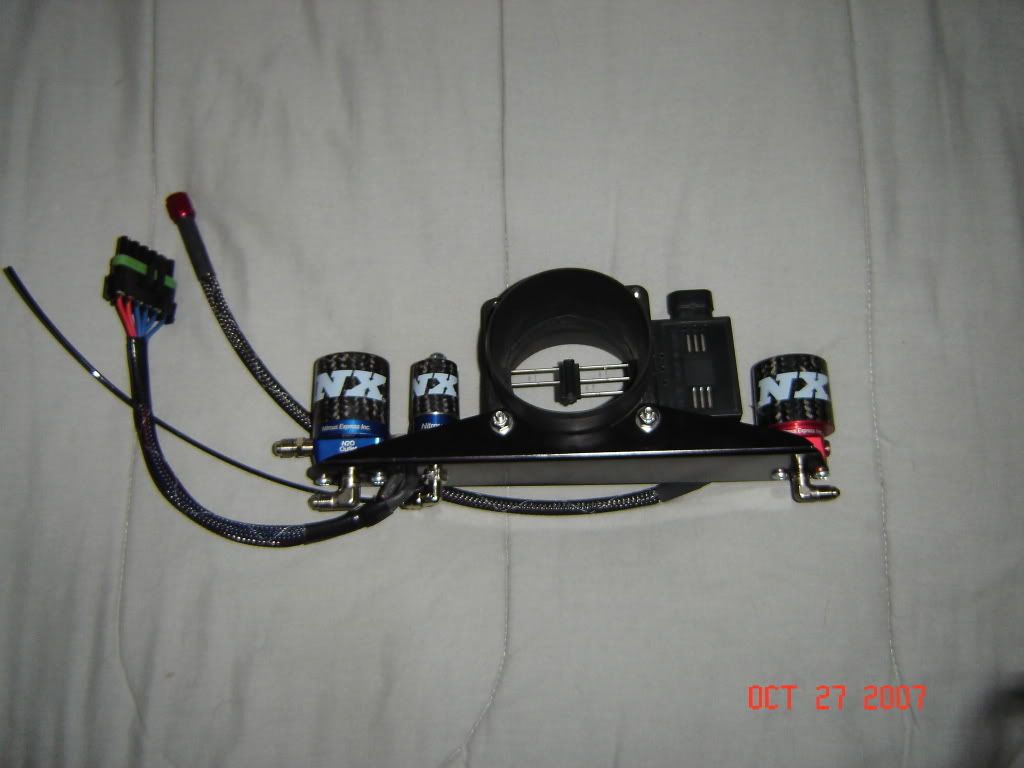
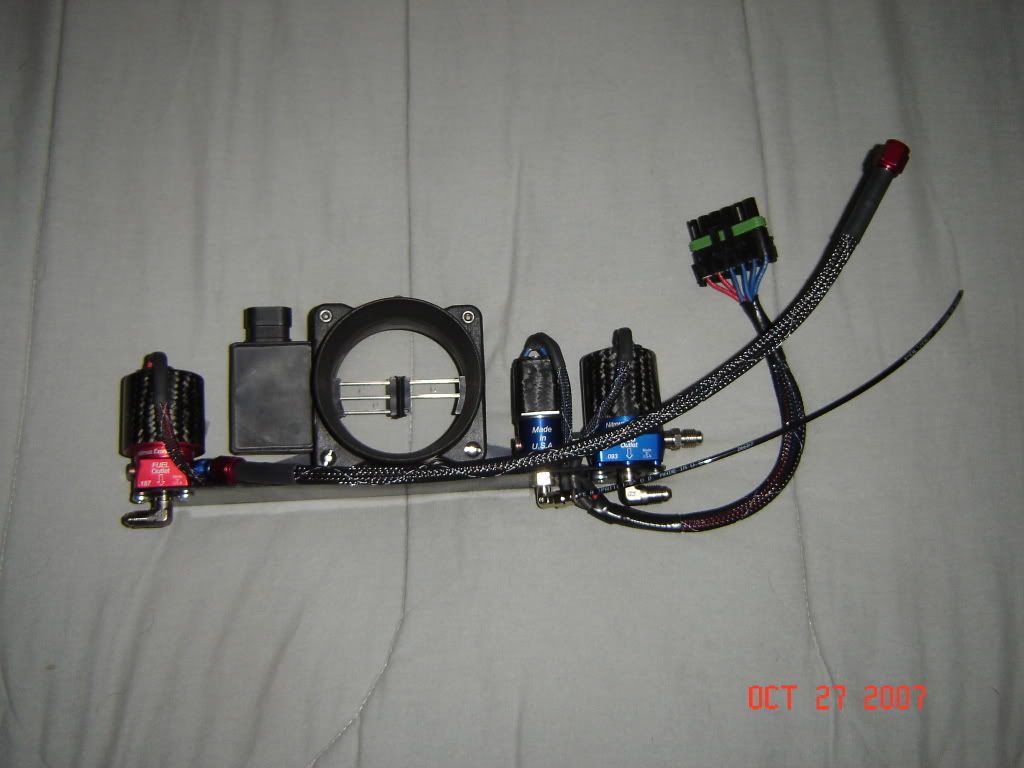
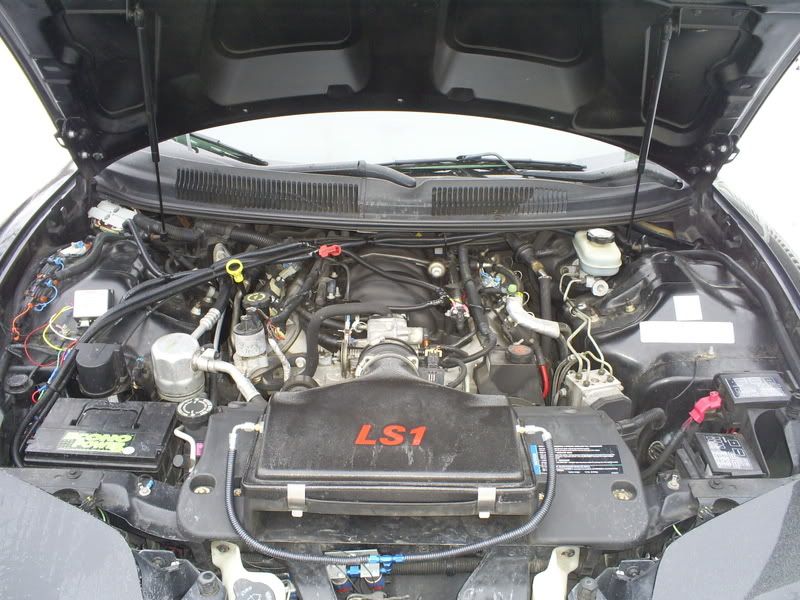
I used weatherpack connectors wherever possible and still soldered all of the crimped connections. I also put a Nylon sleeving (flame retardant) over all of my wires and nitrous lines with heat-shrink on the ends. I think it looks a lot neater and better than the standard convoluted tubing. I also purchased sealed relay's that are waterproof. I got the Nylon sleeve and heatshrink from McMaster Carr as they've got an awesome selection and good prices. The cheapest place I found for the weather pack stuff is a seller on Ebay called MJM National You probably won't find anyone else cheaper. I got the crimpers for the connectors at Napa before I know about this guy. You can see in the bottom pic in the lower left corner my two fuse holders for the entire system. One is for the heater and misc items and the other is for the solenoids. Here's a few pics of my install: