Rearwheel Steering Eliminated!
 06-14-2004, 01:05 PM
#1
Just installed a set of home-made LCA relocation brakets. Wheel hop off the line is eliminated as expected, but was surprised that cornering under heavy throttle is greatly improved also. On one particular curve in my daily route, I got a lot of oversteer when accelertating through the turn; this is completely gone now! Car is lowered 2.5" in the rear. The home-made brackets correct the LCA's by same amount, and are similar to comercial weld-in brackets. Took about $10 worth of materials, but 10 hours time making and installing them.

 06-15-2004, 11:11 AM
#5
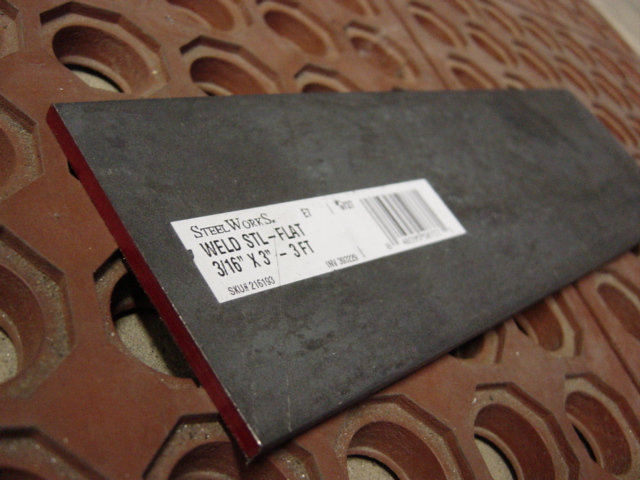
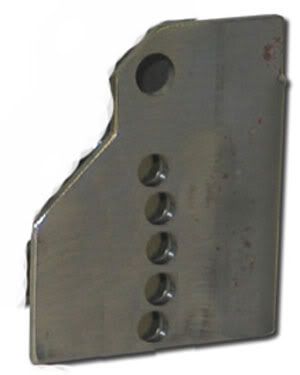
No, I just bought the widest 3/16 steel that Lowe's hardware has (it was 3/16"x3"x36",) and cut four pieces off 5 inches in length. I then drilled two holes in each piece 2.5" appart. The lower holes are centered, but the upper holes needed to be offset to one side. I also cut off one corner at an angle on the top end for a better fit. With some of the remaining material, I MIG welded a back side on to each bracket. Also MIG welded the brackets themselves to the existing mounts. I used one short bolt on each side to hold the brake line brackets on, then recycled the stock long bolt to hold the LCA's in the lower holes. To ensure proper alignment, I didn't do any welding until the whole thing was bolted back together. Painted them with POR 15 and called it a day. I had already painted the axle with POR 15, so I had to spend some time grinding it back off so I could weld to the bare metal.
Last edited by Cal; 06-15-2004 at 01:22 PM.


 06-19-2004, 01:00 AM
#7
Launching!

Join Date: May 2002
Location: Texas
Posts: 226
Likes: 0
Received 0 Likes
on
0 Posts

Originally Posted by Cal
The lower holes are centered, but the upper holes needed to be offset to one side.
Looks good.
Trending Topics
06-19-2004, 10:54 AM
#8
Originally Posted by SSixspeed
In order to maintain suspension geometry? How did you figure the required offset?
09-19-2005, 08:41 AM
#10
Jason, you brought this one back from the dead, LOL. I think I have some updated pics of these now; I since trimmed some extra steel off to reduce weight. There's really nothing to them; I don't know why people pay up to $100 for them.
09-19-2005, 09:26 AM
#11
I did a search pretty far back and this was the only thread I found that mentioned making them yourself. I don't know why there is such a price premium for the premade ones either.
I don't normally bring up old threads, but I figured this one was worth it.
Here's how I'm thinking of making mine. Get the 3/16" steel like you mentioned. Cut 4 identical pieces as well as some to brace the back and any other bracing I deem suitable. Drill one hole in the top of all 4 pieces which will match up to the stock hole. Calculate exactly how much I lowered the car or else measure how much of a drop I need in the bolt holes so that the arms are perfectly level at ride height. Then drill those 4 holes exactly the same on all 4 pieces.
As an option I could drill a hole right above and right below with only maybe 1/4" seperating them to give me some room to fine tune it. Good idea, bad idea? More space in between needed for strength or can I have several holes touching?
Then square them up and tack the rear cross brace to connect the two sides and keep them square with each other. Put the car on a drive on lift. Take out the rear bolt on one side and drop the left arm down. Add the bracket with a bolt in the stock hole and then add a bolt in the lower middle hole. I will make sure the rear tire is centered in the wheel well and then tack the bracket in place.
I'll then do the right side exactly the same but instead of getting the rear tire centered, I'll measure the left side distance from the front rim edge to the rear rim edge and match that distance on the right side and then tack that in place.
After taking some more measurements and eyballing everything just to make sure, I'll fully weld them in place and weld in any cross bracing I want to add. That should get everything installed straight and true. I'll add adjustable LCA's at about the same time so I will have that adjustabilty should I need it, but hopefully I won't need it.
How does that sound? Did I forget anything?
09-19-2005, 11:48 AM
#12
Yeah that sounds pretty much like how I did it. Just remember the LCA hole will be forward of the axle mount hole, off the bracket centerline, since the LCA scribes an arc. That's another reason to make the brackets wide to start with. I acutally drilled the upper holes for mounting to the axle and bolted them on. Once I was sure everything was right, I welded the brackets to the axle and took out the big bolts to save a little weight. I welded backs on mine too, although that may be overkill.
09-19-2005, 12:49 PM
#14
You'll see when you start working on it. since you are making the LCA attachment point lower, the hole must be on the arc made by the LCA. If you put the hole directly below the stock hole, the axle would have to be farther forward than before. I'll try and find you some pics.
09-19-2005, 01:19 PM
#15
What I think your forgetting is that when you lower the rear, the axle moves forward some. Since the axle was centered at stock height with the LCA arm flat, why would you want to move the new hole forward or backward? If you put the new lower hole directly under the stock hole, the axle should be back in the factory location, right?
I know everybody makes their relacation brackets with the holes moved around and at an arc, but I think they are all wrong. Asumming you want the arms level (I do), you would make the new lower hole directly under the stock hole. THEN, you can make the other adjustment holes around that arc. Meaning the hole right above AND below the new home for the LCA bolt would be slightly forward and I mean slightly. I'm basing my arc on the new lowered ride height, not the stock height as most of the aftermarket companies do.
Here's a quick PS I did to show you what I mean. Notice the arc is centered on the new ride height, not the stock one. The middle of the 5 holes will make the arms prefectly level, the 2 holes above and below are to fine tune it if need be.
09-19-2005, 03:32 PM
#16
I see what you mean. But then it becomes of question of do you want the axle on a new arc that you define based on the new resting postion, or on the one that the factory defined? I'm not sure which is better, or if it even makes that much difference.
We're only talking what, a quarter of an inch? All I can think of is doing it your way would allow the drive shaft splines to engage more deeply. That would probably be good as long as the slip joint never bottoms out; if it does something is going to break.
The other thing is a minor install issue; you will need to shove the axle forward so the holes line up in the new part.
09-19-2005, 03:57 PM
#17
I don't think doing it my way would cause the drive shaft splines to engage more deeply, no more deeply than when it was stock.
I think the new arc would be better because you set the LCA in the new middle hole only once, when you lower the car. From that point on, you can adjust it in small increments without having to move the axle.
To me it looks like all the relocation bracket makers are designing their stuff for stock height cars that want to go drag racing. Even so, that's not so bad.
Here's what I said on another post to Lee Spicher of BMR:
I'm curious as to what he has to say.
https://ls1tech.com/forums/suspension-brakes/378735-lca-relocation-brackets-wrong-angle.html
This may be another area in which I'm overthinking things, because any of the brackets will work as long as they are welded in place the same front to rear. Even if you have to roll the axle forward or rearward every time you change the hole position, it will still work and hardly be noticable so I guess I shouldn't make a big deal about it.
I have been looking at the design for about half a day now and I think I see what's going on here. Maybe not, but I'm sure I can make some good brackets for my car. I realize almost all the force is applied to the front and rear of the holes, but depending on how much the car is leaning in the rear, some of the force gets pushed up and down, so I'm not sure how closely I could drill the holes and still have a strong enough part that the holes won't stretch or weaken the bracket. If I made that picture I posted a bit longer on the bottom, I think it would be strong enough with the holes that close. I may only run 3 holes total. Haven't decided yet.
I think the new arc would be better because you set the LCA in the new middle hole only once, when you lower the car. From that point on, you can adjust it in small increments without having to move the axle.
To me it looks like all the relocation bracket makers are designing their stuff for stock height cars that want to go drag racing. Even so, that's not so bad.
Here's what I said on another post to Lee Spicher of BMR:
Depending on how much lower the new ride height is, the arc of the lower holes will change. There is no one arc that will work with all the cars.
It looks as if the BMR's only use a small arc that only changes the axle center 1/8" or so. I doubt that would be visable with the naked eye. I mean you could move the whole axle forward or rearward a good 1/2" and not be too noticable. I think the industries standard 1/8" to 1/4" difference in hole spacing front to rear on the lower 2 holes is negligible. I'm guessing you guys base it on a vehicle lowering of 1" to 1.5" and make your arc based on that. It may not be perfect, but it is close enough and works on the vast majority of cars out there.
It looks as if the BMR's only use a small arc that only changes the axle center 1/8" or so. I doubt that would be visable with the naked eye. I mean you could move the whole axle forward or rearward a good 1/2" and not be too noticable. I think the industries standard 1/8" to 1/4" difference in hole spacing front to rear on the lower 2 holes is negligible. I'm guessing you guys base it on a vehicle lowering of 1" to 1.5" and make your arc based on that. It may not be perfect, but it is close enough and works on the vast majority of cars out there.
https://ls1tech.com/forums/suspension-brakes/378735-lca-relocation-brackets-wrong-angle.html
This may be another area in which I'm overthinking things, because any of the brackets will work as long as they are welded in place the same front to rear. Even if you have to roll the axle forward or rearward every time you change the hole position, it will still work and hardly be noticable so I guess I shouldn't make a big deal about it.
I have been looking at the design for about half a day now and I think I see what's going on here. Maybe not, but I'm sure I can make some good brackets for my car. I realize almost all the force is applied to the front and rear of the holes, but depending on how much the car is leaning in the rear, some of the force gets pushed up and down, so I'm not sure how closely I could drill the holes and still have a strong enough part that the holes won't stretch or weaken the bracket. If I made that picture I posted a bit longer on the bottom, I think it would be strong enough with the holes that close. I may only run 3 holes total. Haven't decided yet.
09-19-2005, 04:22 PM
#18
Well that's one of the advantages of making your own; you can do it the way you want. The other is cost. If I were going to do it again, I definately would put as many holes in it as possible, that is, without weakening it as you say. It's sure a lot easier to do that now with a drill press, then later under the car with a hand drill. I really don't know how close the holes can be, but like you say, not much load in that direction. When I made mine, I had stock springs, so I only put one set of holes in them. Now I have spring jackers, and I wish I had a more holes.