Bazooka 6 1/4" 4 Ohm DVC Sail Panel Install w/ pics
 06-02-2008, 10:22 PM
#1
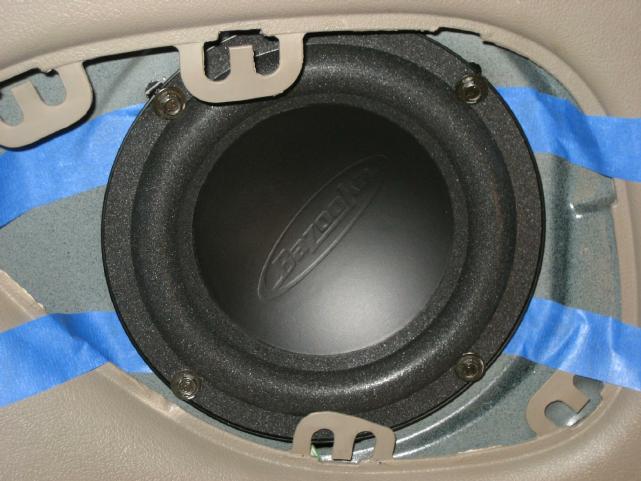
Below are some pictures and methods I used to install new Bazooka DVC speakers for my ’99 Firebird Monsoon system. Overall, the install went smoothly; however I did have to make some hardware modifications and nibble some sheet metal to get them to go in perfectly. Hopefully, this will help others from having to do some of the re-work I went through.
Before I get started - I'd like to thank Ian from Kee Audio (he's a lifesaver) for tracking these speakers down. They are a great fit and sound great! I've had torn speakers for a couple of years now, but to the best of my recollection, these new speakers blow away the stockers.
Below is a sampling of the "new stuff." I had some spare connector parts & tools lying around, so I made a custom harness (to replace the OEM wires) in anticipation of a future wiring upgrade to the rest of my car. This is probably overkill for most people as the tools to do the crimps cost almost as much as the speakers. (If anyone is interested in more info on building the harness, please let me know.) Most will want to re-use the original wires/harness, which can be soldered to the new speakers.
I also used a Nibbler Tool (can be purchased from Radio Shack) and required new speed nuts from my local auto parts store. (Dorman Body-Tite! #6 Speed Nuts #45401)
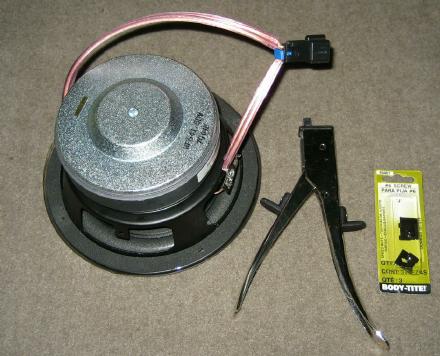
The bolt holes in my new speakers measured 6 1/4", which is the exact measurement between the stock screw holes on my '99. So, I was off by about the thickness of the screws. To give a little more play in the holes so the screws would go in straight, I used the Nibbler Tool to take just one bite out of each hole. (Others may choose not to do this step or may not need the additional room, so I suggest checking the measurements first.)
The distance from the screw holes to the speaker carrier on the Bazookas is also a little shorter than the extended slots on the stock speakers. In my situation, the OEM U-Nuts were too deep to align with the Bazooka's screw holes, so I replaced them with shorter #6 speed nuts from my local auto parts store. I re-used the original screws, which at 4.2mm, are slightly bigger than a #6 hole. However; the design of the new nuts allowed them to work perfectly with the stock screws.

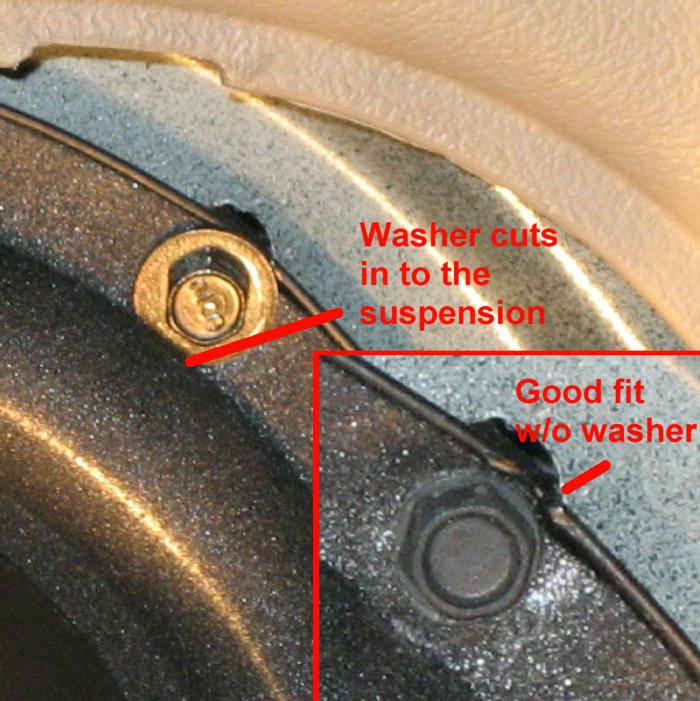
I also had to modify screws by taking off the washers. After originally installing the stock screws, the washers bit in to the speaker's suspension and overlapped the metal rim around the speaker. The washers actually cut completely through the lip in the suspension, which is bad. (So... I'm now hoping the tears don't get any bigger.) I highly recommend this modification. The washers are very soft. To get them off the screws, I took two vice grip pliers and clamped them down to either side of the washers. Slightly twisting the pliers axially in opposite directions was enough to tear the washers apart.
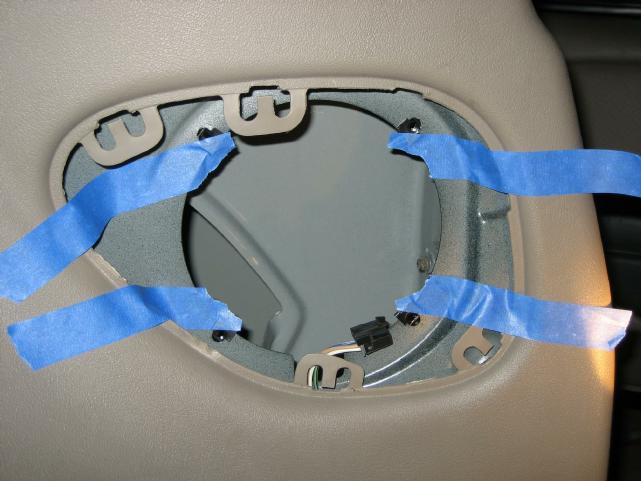
To install the speakers, I positioned the new speed nuts, using tape to hold them in place. (They don't have the nice captive lip that the original u-nuts have.)
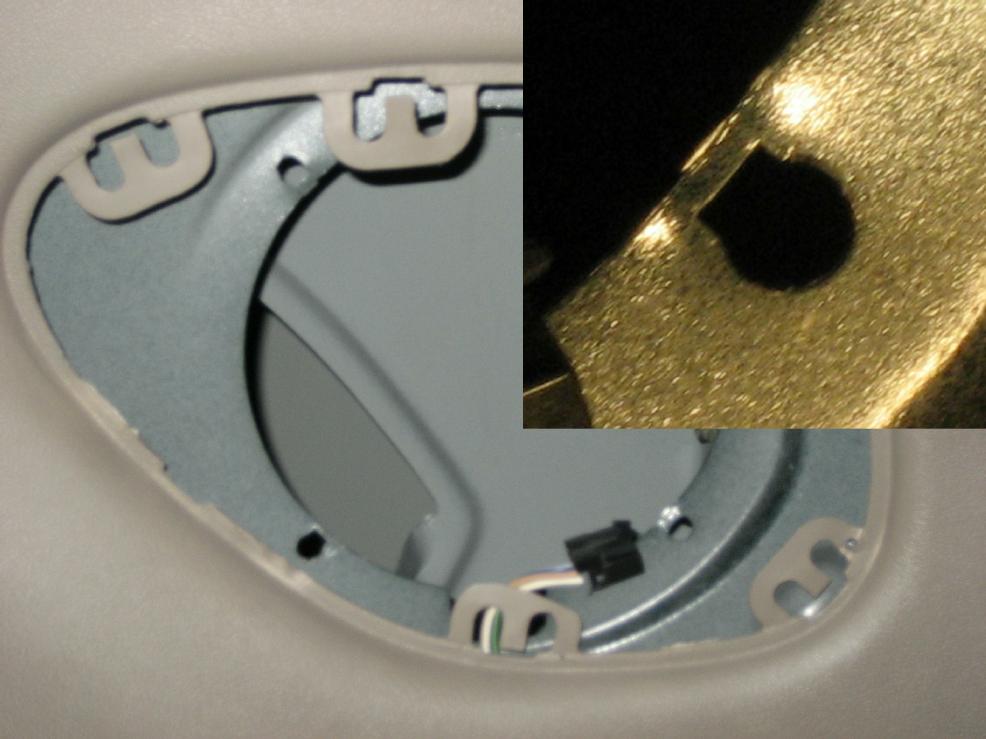
Removing the sail panels will make this install much easier, but I chose to work around them. The catch is making sure the grill holders don’t tear in to the foam suspension on the speakers. Once positioned in the holes, the speakers screwed right in. (Before tightening, I pulled the tape out.)
To finish off the install, I used some small pieces of sound matting to cover the wire hole at the bottom of the speaker, letting the wires come out over top of the matting. (not pictured) I found that this helped tighten the sound up noticeably. There's still a slight echo in the sound from the speakers, so I expect people choosing to put sound matting behind the speaker will be additionally rewarded in this regard.
Before I get started - I'd like to thank Ian from Kee Audio (he's a lifesaver) for tracking these speakers down. They are a great fit and sound great! I've had torn speakers for a couple of years now, but to the best of my recollection, these new speakers blow away the stockers.
Below is a sampling of the "new stuff." I had some spare connector parts & tools lying around, so I made a custom harness (to replace the OEM wires) in anticipation of a future wiring upgrade to the rest of my car. This is probably overkill for most people as the tools to do the crimps cost almost as much as the speakers. (If anyone is interested in more info on building the harness, please let me know.) Most will want to re-use the original wires/harness, which can be soldered to the new speakers.
I also used a Nibbler Tool (can be purchased from Radio Shack) and required new speed nuts from my local auto parts store. (Dorman Body-Tite! #6 Speed Nuts #45401)
The bolt holes in my new speakers measured 6 1/4", which is the exact measurement between the stock screw holes on my '99. So, I was off by about the thickness of the screws. To give a little more play in the holes so the screws would go in straight, I used the Nibbler Tool to take just one bite out of each hole. (Others may choose not to do this step or may not need the additional room, so I suggest checking the measurements first.)
The distance from the screw holes to the speaker carrier on the Bazookas is also a little shorter than the extended slots on the stock speakers. In my situation, the OEM U-Nuts were too deep to align with the Bazooka's screw holes, so I replaced them with shorter #6 speed nuts from my local auto parts store. I re-used the original screws, which at 4.2mm, are slightly bigger than a #6 hole. However; the design of the new nuts allowed them to work perfectly with the stock screws.
I also had to modify screws by taking off the washers. After originally installing the stock screws, the washers bit in to the speaker's suspension and overlapped the metal rim around the speaker. The washers actually cut completely through the lip in the suspension, which is bad. (So... I'm now hoping the tears don't get any bigger.) I highly recommend this modification. The washers are very soft. To get them off the screws, I took two vice grip pliers and clamped them down to either side of the washers. Slightly twisting the pliers axially in opposite directions was enough to tear the washers apart.
To install the speakers, I positioned the new speed nuts, using tape to hold them in place. (They don't have the nice captive lip that the original u-nuts have.)
Removing the sail panels will make this install much easier, but I chose to work around them. The catch is making sure the grill holders don’t tear in to the foam suspension on the speakers. Once positioned in the holes, the speakers screwed right in. (Before tightening, I pulled the tape out.)
To finish off the install, I used some small pieces of sound matting to cover the wire hole at the bottom of the speaker, letting the wires come out over top of the matting. (not pictured) I found that this helped tighten the sound up noticeably. There's still a slight echo in the sound from the speakers, so I expect people choosing to put sound matting behind the speaker will be additionally rewarded in this regard.
Last edited by wssix99; 06-03-2008 at 07:09 PM. Reason: Pictures were too large - replaced with smaller

 06-03-2008, 04:38 AM
#3
Copy & Paste Moderator

The pictures were visible last night. It looks like they were attachments. When I try to view one in a new window, it says that the attachment doesn't exist. Maybe they were deleted, or just not currently available.
06-03-2008, 09:21 AM
#5
Yea - I originally posted them as attachments and they were too big. I went in and edited the post, pasted smaller pictures in, and took out the attachments.
Can you see them now within the text of the post? If not, I will re-do the post from scratch.
Can you see them now within the text of the post? If not, I will re-do the post from scratch.
Trending Topics
06-03-2008, 09:11 PM
#8
Banned

Join Date: Oct 2007
Location: Marysville/Manhattan, Ks
Posts: 240
Likes: 0
Received 0 Likes
on
0 Posts
Good writeup! I did my EU700's very similar. I drilled a hole for the back to vent though, and had to use an mdf spacer though. Do those have little enough mounting depth to not use a spacer?
06-03-2008, 10:18 PM
#10
Pics work. Thanks for the writeup. I just did this myself only a couple weeks ago. Really, the only thing I did differently is that I snipped and soldered the factory harness and used 4 new self-tapping screws and to make new holes. They zipped right in and are very secure without worrying about those stupid washers. That and I installed a Dynamax speaker kit. Thanks again Kee!

 05-06-2009, 09:09 PM
#18
Here's a link:
http://www.keeaudio.com/id72.html
05-06-2009, 10:21 PM
#19
TECH Apprentice
Join Date: Aug 2007
Location: Mississippi
Posts: 317
Likes: 0
Received 0 Likes
on
0 Posts

They are the 6.5" Bazooka subwoofers.They are sold in pairs and price includes shipping to the lower 48.
Here's a link:
http://www.keeaudio.com/id72.html
Here's a link:
http://www.keeaudio.com/id72.html
ordered...thanks
 10-09-2009, 12:33 PM
#20
Registered User

Join Date: Oct 2009
Posts: 1
Likes: 0
Received 0 Likes
on
0 Posts
I just got mine from Kee Audio - I had the same problem - I have a 2000 TA Ram-Air with the Monsoon system, and this was the second time my subwoofers in the rear passenger area went out. A few years ago I replaced them with the Delco replacements at the time, but, as Ian from Kee Audio told me, they weren't any better than the originals. I took out the speakers, snipped the wires from the speakers to keep the wiring harness, then taped them to the new speakers and reinstalled. Not an absolute perfect fit, but they did go in.
I'm not an audiophile and I don't work on my car (I'm a CPA, if the truth be told, but I don't take my car to the shop for every little thing either), but I did the best with what I had, and I'm pleased to have working subwoofer speakers in my car again.
I had the subwoofers from Kee Audio within a few days of ordering, and I used Paypal. The link to those speakers is:
http://www.keeaudio.com/bazooka.html