
 04-29-2016, 04:51 PM
Last edit by: IB Advertising
See related guides and technical advice from our community experts:
- Camaro and Firebird How to Install a Double Din Bezel for Stereo<br>Step by step instructions for do-it-yourself repairs.

How To: camaro double din bezel
04-14-2009, 05:57 AM
#1
On The Tree
Thread Starter
iTrader: (3)
Join Date: Aug 2006
Location: Palm Beach, FL
Posts: 155
Likes: 0
Received 0 Likes
on
0 Posts
Considering that we have enough room to have a double din system, I think we should. I personally became tired of listening to my ipod using the tape deck.
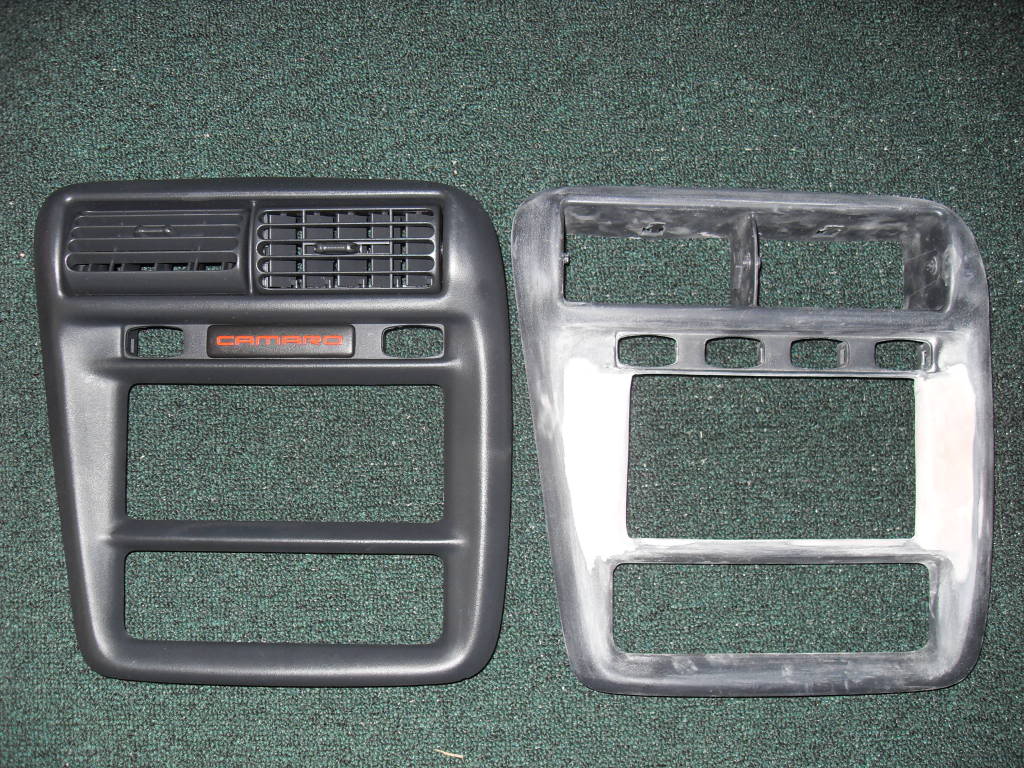
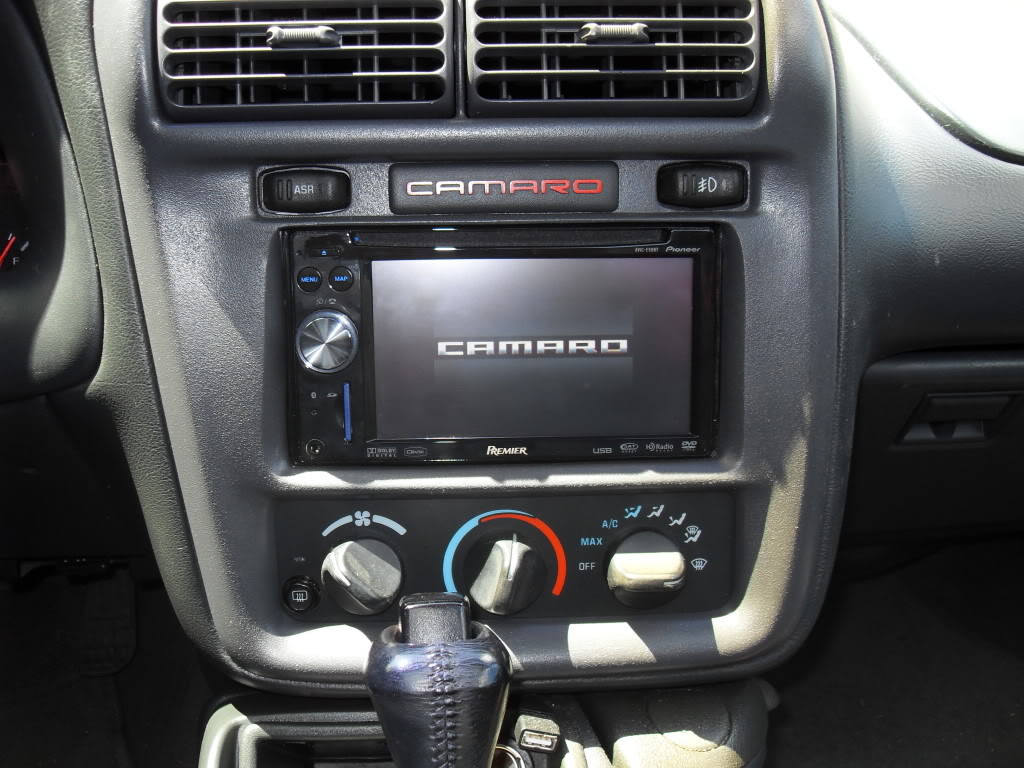
Let’s start with the: Metra 95-3302 Double-DIN kit which was originally suggested by phantomzer0. It was screwed in at the top and one piece was snipped off on the bottom on each side. The install was professionally done by Ian Kee of Kee Audio. Remember to cut the plastic piece in the back of your radio deck since it keeps it from sliding your new radio all the way back.
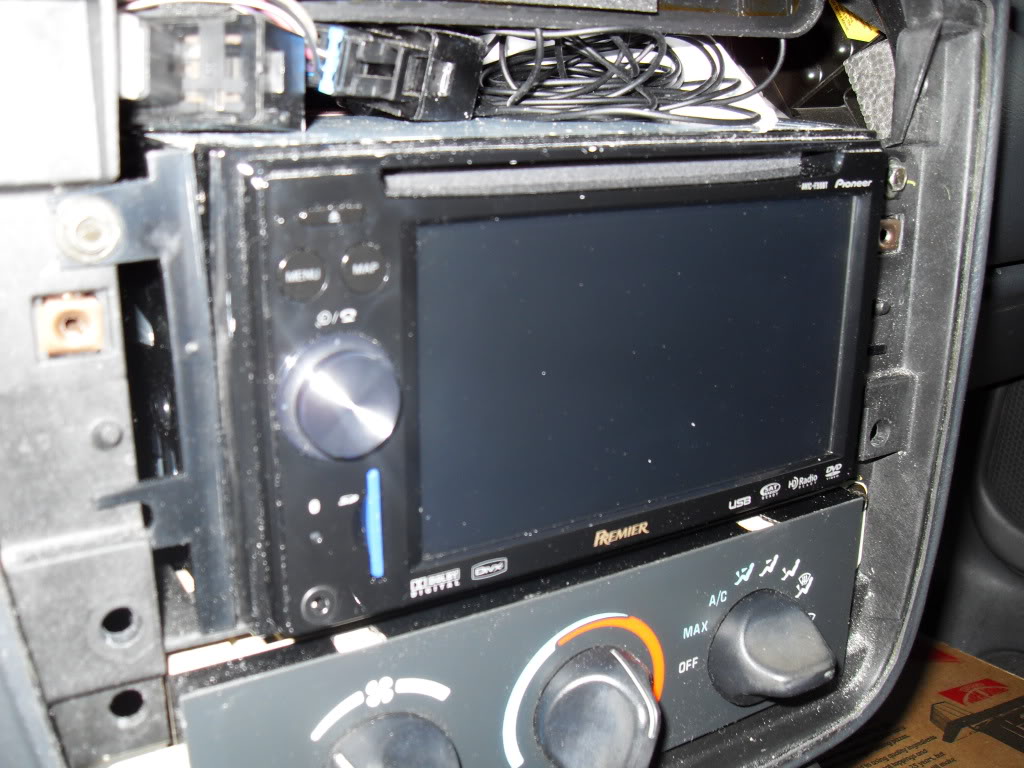
Don’t forget that a new radio will need a 88+ GM harness and a new antenna jack. Your radio might require you to take that light green wire to your green wire at the hand break. This is to keep you from watching videos while driving.
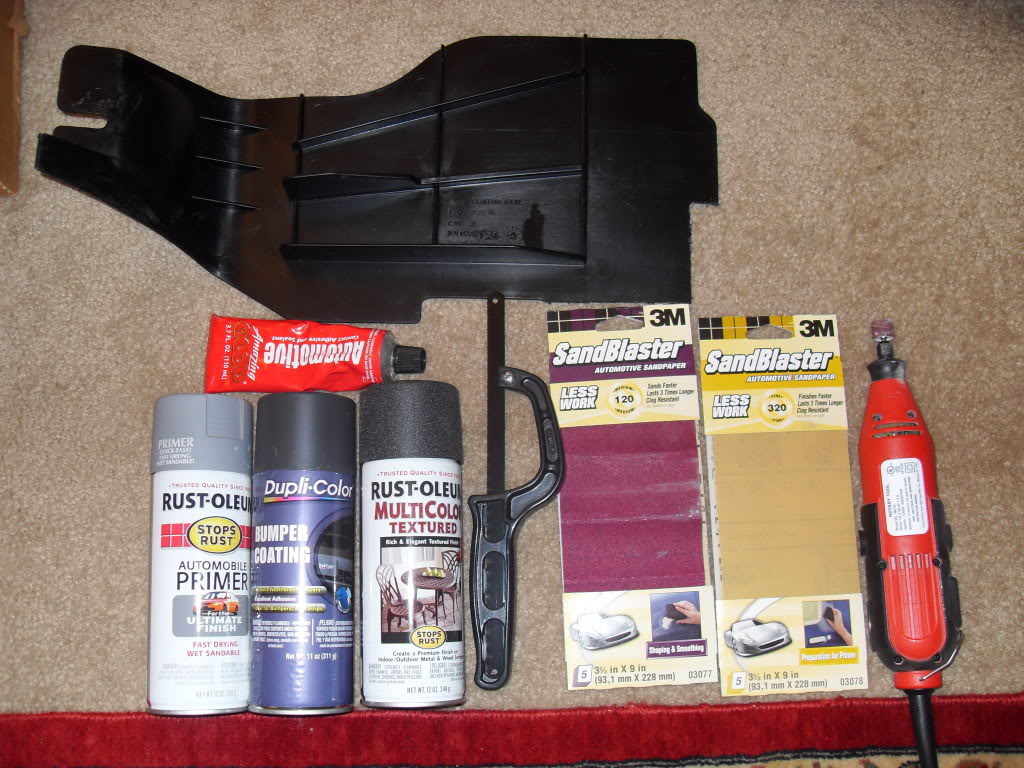
Now that you have a new radio that works, you can start thinking about a bezel for it. Now here are all the things you’ll need to buy to make this work. We have bondo, plastering tools, a small saw, and sandpaper: 60, 120, 180, 320, and 400 grit will do, gray primer, textured multicolor paint, dark charcoal grey bumper paint, and glue to put that plastic piece you cut out onto your bezel.
In general, you’ll be cutting ALL the way up the upper lip, right up to where the clips hold your controls. You’ll also have to cut into the bottom lip some too, but don’t be too liberal here.
As for the sides, you’ll need something at least temporarily to glue on the side so that you can start bondo-ing. I used the plastic piece from the spare tire that I cut into. It eventually fell off, but at that time the bondo wasn’t going anywhere and I guess I can reuse them if I want.
1. The day you start cutting your bezel you’ll probably make lots of trips to your car to make sure your not cutting too much or not enough. Have fun, I hope its not cold or rainy that day.
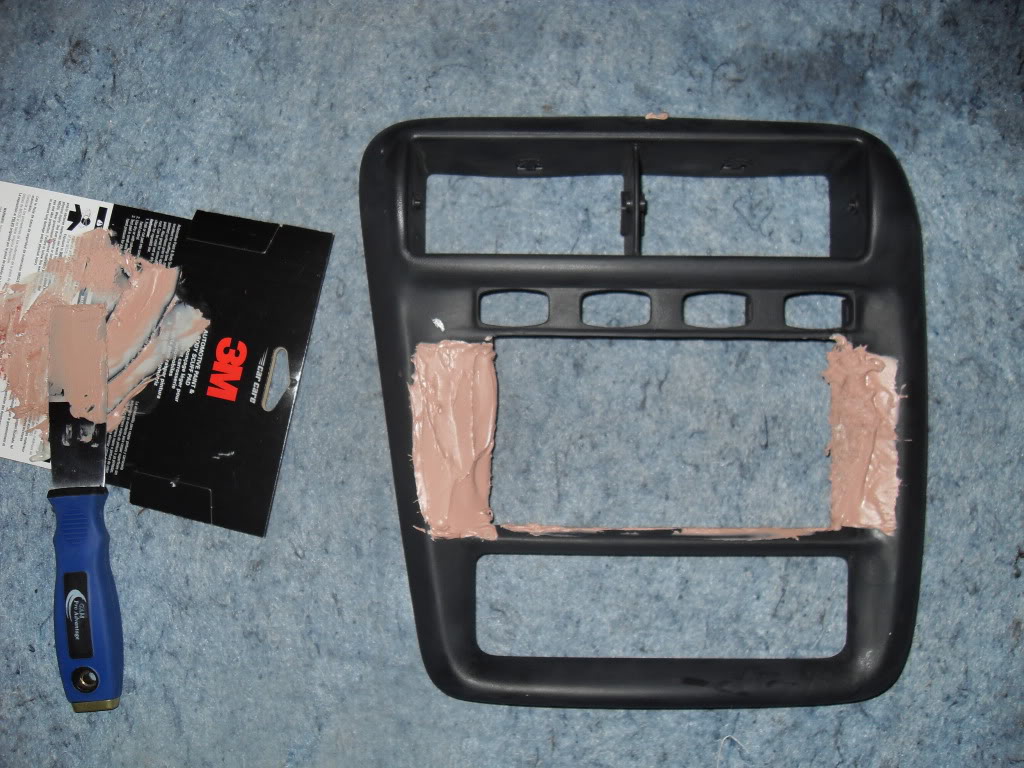
2. Glue your plastic piece to the sides to cover the hole on the sides of your bezel.

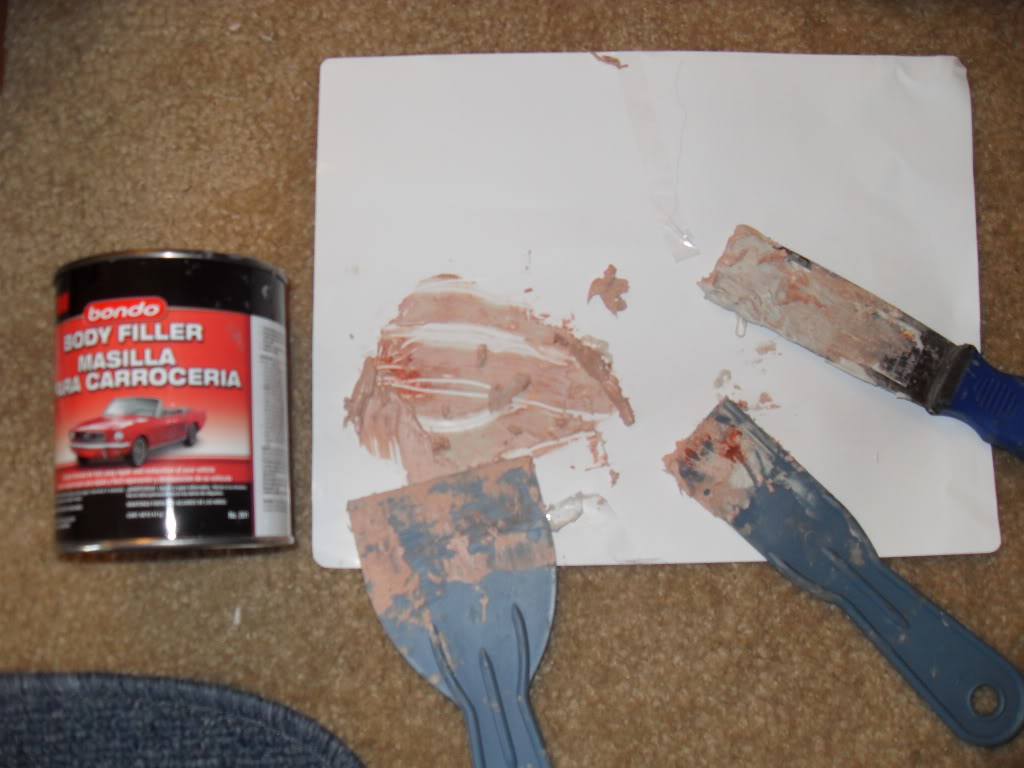
3. Add bondo liberally on the sides. Bondo is tricky. Once you add the hardener, you only have about a minute to do your best work. If you made too much mix, it might dry on you before your done adding it. Remember to add only a “pea size” hardener to a golf ball size bondo.
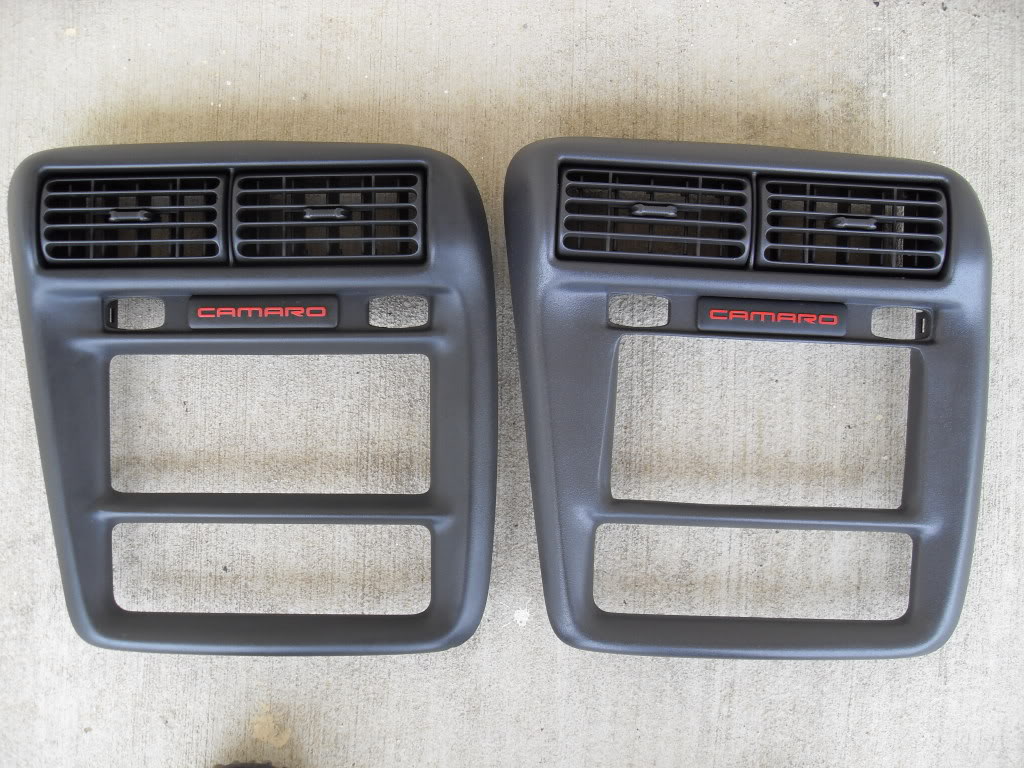
4. Here comes the hard part. Sanding. Start with the lowest grit and work your way up. Add more dondo when nessisary. You’ll even need to bondo and sand the bottom piece too, cause if you don’t, you’ll be able to see behind the bezel on the bottom. Most of the difference in the variations of the bezels you see in all the work everyone’s done comes from this step.
5. I gave edges to my bezels corners. Its not that hard to think up, it’s just hard to execute cause how much laser precision is your hands going to have. NONE, that’s right. The dremel tool helps here.
6. Wipe it then Prime it, or it’ll chip. Don’t get that cheap clear primer either. Rust-oleum is high quality, try using it whenever possible. After you prime it you might notice everywhere you screwed up, haha, sad. You might need to do more bondo-ing and sanding again.
7. Paint it with dark charcoal gray.
8. Add textured multicolor paint. It’ll look more like clear paint with fine sand in it. Make sure its uniform.
9. Add your last coat of dark charcoal gray to make that textured paint all the same color.
Here is a picture of my backside... I mean the bezels back side:

and lastly, here is the before and after:
I'm a chiropractic student, and in 2 months I graduate and open a business thereafter. I'm not sure how interested I would be in making bezels for others. Its time consuming and I'm extremely **** sometimes, so I don't think i'd like to make a living breathing in bondo and sanding for others. Unless someone can mold mine?
Investment: $75 for tools. you might already have some, and it could be less.
used ebay bezel: $30
time: 10-100 hours, based on how experienced you are and how much attention to detail. I was closer to the later end.
Let’s start with the: Metra 95-3302 Double-DIN kit which was originally suggested by phantomzer0. It was screwed in at the top and one piece was snipped off on the bottom on each side. The install was professionally done by Ian Kee of Kee Audio. Remember to cut the plastic piece in the back of your radio deck since it keeps it from sliding your new radio all the way back.
Don’t forget that a new radio will need a 88+ GM harness and a new antenna jack. Your radio might require you to take that light green wire to your green wire at the hand break. This is to keep you from watching videos while driving.
Now that you have a new radio that works, you can start thinking about a bezel for it. Now here are all the things you’ll need to buy to make this work. We have bondo, plastering tools, a small saw, and sandpaper: 60, 120, 180, 320, and 400 grit will do, gray primer, textured multicolor paint, dark charcoal grey bumper paint, and glue to put that plastic piece you cut out onto your bezel.
In general, you’ll be cutting ALL the way up the upper lip, right up to where the clips hold your controls. You’ll also have to cut into the bottom lip some too, but don’t be too liberal here.
As for the sides, you’ll need something at least temporarily to glue on the side so that you can start bondo-ing. I used the plastic piece from the spare tire that I cut into. It eventually fell off, but at that time the bondo wasn’t going anywhere and I guess I can reuse them if I want.
1. The day you start cutting your bezel you’ll probably make lots of trips to your car to make sure your not cutting too much or not enough. Have fun, I hope its not cold or rainy that day.
2. Glue your plastic piece to the sides to cover the hole on the sides of your bezel.
3. Add bondo liberally on the sides. Bondo is tricky. Once you add the hardener, you only have about a minute to do your best work. If you made too much mix, it might dry on you before your done adding it. Remember to add only a “pea size” hardener to a golf ball size bondo.
4. Here comes the hard part. Sanding. Start with the lowest grit and work your way up. Add more dondo when nessisary. You’ll even need to bondo and sand the bottom piece too, cause if you don’t, you’ll be able to see behind the bezel on the bottom. Most of the difference in the variations of the bezels you see in all the work everyone’s done comes from this step.
5. I gave edges to my bezels corners. Its not that hard to think up, it’s just hard to execute cause how much laser precision is your hands going to have. NONE, that’s right. The dremel tool helps here.
6. Wipe it then Prime it, or it’ll chip. Don’t get that cheap clear primer either. Rust-oleum is high quality, try using it whenever possible. After you prime it you might notice everywhere you screwed up, haha, sad. You might need to do more bondo-ing and sanding again.
7. Paint it with dark charcoal gray.
8. Add textured multicolor paint. It’ll look more like clear paint with fine sand in it. Make sure its uniform.
9. Add your last coat of dark charcoal gray to make that textured paint all the same color.
Here is a picture of my backside... I mean the bezels back side:
and lastly, here is the before and after:
I'm a chiropractic student, and in 2 months I graduate and open a business thereafter. I'm not sure how interested I would be in making bezels for others. Its time consuming and I'm extremely **** sometimes, so I don't think i'd like to make a living breathing in bondo and sanding for others. Unless someone can mold mine?
Investment: $75 for tools. you might already have some, and it could be less.
used ebay bezel: $30
time: 10-100 hours, based on how experienced you are and how much attention to detail. I was closer to the later end.
 04-14-2009, 08:51 AM
#2
On The Tree
Thread Starter
iTrader: (3)
Join Date: Aug 2006
Location: Palm Beach, FL
Posts: 155
Likes: 0
Received 0 Likes
on
0 Posts
I forgot to mention two things:
1. sand the WHOLE bezel. It needs to be uniform before being painted. Not to mention it gets rid of your griddy *** finger oils from 10 years of use.
2. prime and paint the air vent plastic things. They're old and will look slightly different in color from the rest of the bezel if you don't.
1. sand the WHOLE bezel. It needs to be uniform before being painted. Not to mention it gets rid of your griddy *** finger oils from 10 years of use.
2. prime and paint the air vent plastic things. They're old and will look slightly different in color from the rest of the bezel if you don't.


 04-16-2009, 12:04 PM
#7
On The Tree
Thread Starter
iTrader: (3)
Join Date: Aug 2006
Location: Palm Beach, FL
Posts: 155
Likes: 0
Received 0 Likes
on
0 Posts
thanks guys. Double dins are a must for nav and long trips. Wish the new camaros would come with them. But then again, it makes my car feel new all over again. I guess all i need now is heated seats, jk maybe...
Trending Topics
05-11-2009, 08:41 AM
#11
On The Tree
Thread Starter
iTrader: (3)
Join Date: Aug 2006
Location: Palm Beach, FL
Posts: 155
Likes: 0
Received 0 Likes
on
0 Posts
If your truly worried about it cracking (i agree with phantomzer0 that it wont crack-ps i'm sorry about the break-in into your car) then there is bondo stuff out there with fiber in it, that should prevent cracking even more...
Plus, if you made it, i'm sure if it cracks, you know how to fix it. you wont have to worry about using the wrong material since you chose the material in the first place.
Plus, if you made it, i'm sure if it cracks, you know how to fix it. you wont have to worry about using the wrong material since you chose the material in the first place.
05-20-2009, 02:33 PM
#12
TECH Apprentice

Join Date: Sep 2003
Posts: 302
Likes: 0
Received 0 Likes
on
0 Posts
Awesome job man. I'm sure this will inspire many to follow in your footsteps!
05-21-2009, 06:26 PM
#13
On The Tree
Thread Starter
iTrader: (3)
Join Date: Aug 2006
Location: Palm Beach, FL
Posts: 155
Likes: 0
Received 0 Likes
on
0 Posts
I hope they do follow my footsteps.
And let me get on a rant for a second:
I've been reading the other threads and it looks like they never use the search button. If they did, they wouldn't be using the textured flat black, or that glittery sh*t. Isn't the reason we all get on here to not inadvertently "rice out" our look?
That to me includes sparkly paint...
12-19-2011, 06:55 PM
#14
Launching!

Join Date: Feb 2004
Location: Ottawa, Ontario
Posts: 214
Likes: 0
Received 0 Likes
on
0 Posts

Well I am in no way a professional but I do have experience with bondo and fiberglass products. This summer I fixed cracks and holes all over my fiberglass pool and re-sprayed the entire top with gelcoat. I learned a ton about fiberglassing talking with professionals and watching vids here and there. I had paid someone to do the work the year before and they simply used bondo. At the time I didn't know better but the next year the stuff was crumbling apart. IMO anything that has the minimal give will crumble. You don't want to have anything more than a few mils of bondo. I myself would glass it using resin and fiberglass strands or powder. Make it literally indestructable and mixed properly fiberglass powder with resin can have a consistency much like bondo. Be careful tho because that stuff is 10 times harder than bondo and such much harder to sand. Anyways that is just my opinion. Another thing to remember is that the Bondo kitty hair has great compressive strenght and that is about it. Flexed it will break... You can get milled fiberglass in boat shops.


