Double Din Wallpapers
 05-29-2008, 07:22 PM
#1
Hey guys, I noticed a bunch of guys are joining the Double Din Club, so I thought it would be cool to get some wallpapers posted up for the Avic.
First off I wanted to share with you guys the steps needed to get wallpapers onto a disc for you to install them onto your Avic. I'm not sure how this works for other double din units, but this method works for Pioneer's Avic Models, specifically the Avic D3.
STEP1:
First what you want to do is make 2 new folders on your desktop. One is going to be called "DUMMY TEXT". Make sure you name it in all caps and have the space between the two words. YOU HAVE TO DO IT LIKE THIS! The next folder is going to be called "PICTURES". Once again, all caps.
The dummy text folder is going to literally have thousands of text files in it. Open up notepad, mash down on your keyboard for about 5 minutes and just let the file fill up. Save the file as any name you want. I just used "text1". Now you need to copy that file and fill your folder up to 345 megabytes. I ended up having 4,500 files in my folder, but your may be different depending on how much text you have in each file. The reason you need to do this is because the avic only reads cds if they are a certain size. The dummy text fills the cd so it will read it.
There are methods out there that don't have you doing this, but it is still the most reliable. For the purpose of this tutorial we will be working with the most reliable method.
Now that that is finished, you can add some wallpapers.
Step 2:
Put all your pictures in the "PICTURES" folder. You can only have 20 pictures MAX on your disc.
The dimensions for a wallpaper are 500 x 240.
Step 3:
Next up you need to burn these folders to a disc via a program called power iso.
You can download a free trial of the program over here:
http://www.poweriso.com/download.htm
Step 4:
Insert your 2 folders. It may take a while but they will load. The text file is what will end up lagging your system.
The demo only lets you burn like half the size of your disk, but if you followed this tutorial then you will be fine.
Next you are gonna have to hit burn, its a little image of a fire. A little box will pop up and show you some more options. MAKE SURE YOU CLICK "FINALIZE". You have to finalize the cd or the Avic will NOT read it. Put your burn speed all the way up and burn that bitch. I chose not to test burn or any of that stuff.
Once the disc is finished you can put it into your Avic.
Step 5:
The disc will take like 3 LONG minutes to read. If it says "Reading Error" then you have to try again.
Once it has been read, go to your Navigation Menu. There is an option in here to change your wallpapers/backgrounds. Once you find it just go through and switch all your backgrounds to the new ones off the disc. Once you take the disc out, YOUR DONE!
I'm going to try and get some pictures to help out with this tutorial. If anyone goes through this process and takes pictures, send them to me and I'll get them into this thread.
Now for some wallpapers! Please, everyone who has made wallpapers submit them!
Last edited by phantomzer0; 05-29-2008 at 07:43 PM.
 05-29-2008, 07:22 PM
#2


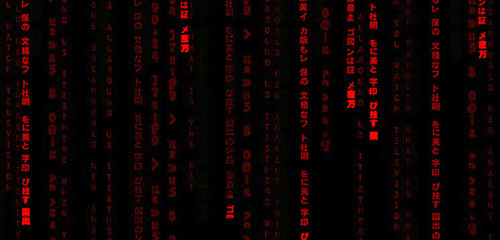
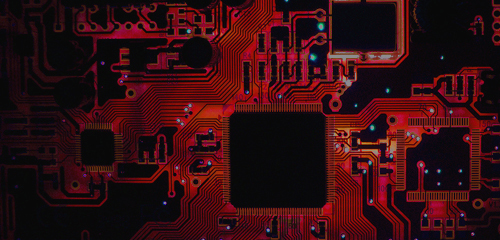
This is my personal wallpaper:

These are just the ones I made myself and my girlfriend, if anyone wants anything specific I'm sure I can make something up real quick!
Just post in this thread, please don't PM me if you need something done.
Last edited by phantomzer0; 05-29-2008 at 07:39 PM.
05-29-2008, 07:58 PM
#3
TECH Resident
Join Date: Mar 2008
Posts: 771
Likes: 0
Received 0 Likes
on
0 Posts
Phant..That was some good stuff..I Have a Kenwood 512.. How do you use a usb and get cover art? Do you have to use the usb attached to the radio or can you use the one attached to the ipod attachment? I have the ipod attachment add on too and it has a usb attachment on that..
05-29-2008, 08:51 PM
#4
Phant..That was some good stuff..I Have a Kenwood 512.. How do you use a usb and get cover art? Do you have to use the usb attached to the radio or can you use the one attached to the ipod attachment? I have the ipod attachment add on too and it has a usb attachment on that..
05-29-2008, 10:59 PM
#5
Copy & Paste Moderator

Step 1..... Is over kill.
You only need a minimum of 1.8MB in a CD for the AVIC-D3 to read it.
What I did was have a sub-folder in the PICTURES folder called BMP that held some image files in the Windows Bipmap (BMP) format that filled in to just over 2MB of space total on the disk. That way the disk will take a lot less time to burn and the AVIC-D3 will take a lot less time to read it.
Here is what I am currently using for backgrounds:
Load/Splash Screen
Nav Menu
AV Menu
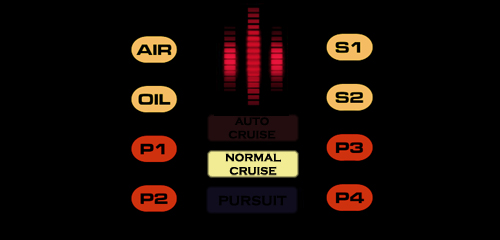
.... and here is shot of the AV background in use ....
.jpg)
You only need a minimum of 1.8MB in a CD for the AVIC-D3 to read it.
What I did was have a sub-folder in the PICTURES folder called BMP that held some image files in the Windows Bipmap (BMP) format that filled in to just over 2MB of space total on the disk. That way the disk will take a lot less time to burn and the AVIC-D3 will take a lot less time to read it.
Here is what I am currently using for backgrounds:
Load/Splash Screen
Nav Menu
AV Menu
.... and here is shot of the AV background in use ....
05-30-2008, 07:36 AM
#7
You can use any non-media files (that is...files that the AVIC won't try to use such as MP3s, JPGs, etc.) to fill up enough disc space so that the HU doesn't treat it as an empty disc. An easy way is to pick a few DLL files from the Program Files folder or something from the C:\cabs folder (if you have one). These files can go in the root of the CD or in any subfolder as long as the total used disc space is sufficient.
The background images must be in JPG format and stored in a folder off the root named PICTURES (although it isn't case-sensitive). The HU will scale down images that are larger than 500x240 but it doesn't do a very good job so you're better off doing it yourself before loading.
Phantomzer0, those are some great images! The Kenwood uses the same size and format so they'll work with either HU.
Trending Topics
05-30-2008, 08:02 AM
#8
Phant..That was some good stuff..I Have a Kenwood 512.. How do you use a usb and get cover art? Do you have to use the usb attached to the radio or can you use the one attached to the ipod attachment? I have the ipod attachment add on too and it has a usb attachment on that..
To load a new background:
1. Copy your JPG file(s) to a USB device. It can go anywhere but I use a Pictures folder for consistency. Connect the device to the HU.
2. Switch to the main source screen (the one with all devices not the favorites screen)
3. Scroll the screen down until you see the "Standby" option and select it.
4. Select the Setup option then select the User Interface menu item.
5. Press the Memory button in the User Bacground item then select your desired image from the displayed directory listing. When you select an image file it will be loaded and displayed. You can rotate it if necessary.
6. Press Cancel to select a different image or Enter to set the viewed image as the new background.
To load a new splash screen:
1. Copy your JPG file(s) to a USB device. It can go anywhere but I use a Pictures folder for consistency. Connect the device to the HU.
2. Press and hold the SRC and Eject buttons together and then press the Reset button. Continue to hold the SRC and Eject buttons while the system restarts until the menu displays.
3. Select OEM from the menu.
4. Browse and select the JPG that you want to use as a splash screen and press Enter.
Cover art can only be displayed if it is embedded in the MP3 files. Kenwood doesn't support the common usage of putting a single image in the folder named folder.jpg or AlbumArtSmall.jpg. Media Monkey is a great free program for manipulating MP3 files and embedding cover art in them -it can even downloads cover art from Amazon automatically.
I have found that the Kenwood will work well with USB devices up to 4GB. It will recognize and read larger capacity devices but you have to unplug them and plug them back in each time you start the car to get them recognized.
05-30-2008, 10:08 AM
#9
TECH Resident
Join Date: Mar 2008
Posts: 771
Likes: 0
Received 0 Likes
on
0 Posts
Thanks Whitebird..Your the greatest! If you know of any other tricks with the Kenwood,I'd love to hear them..I took your advice and downloaded the monkey program. Do I have to use the usb attached to the kenwood to get cover art or can I use the ipod connector usb. My iphone doesn't work with this head unit.. Also,how can you make the Kenwood control the ipod? Thanks Bird.. 
05-30-2008, 10:36 AM
#10
Man, this thread is sweet. Thanks for the input guys! Though step 1 may be overkill it is the way I learned how to do it and it works every time. Thanks for bringing that to my attention though, I guess I can remove some of that **** 
05-30-2008, 01:14 PM
#11
Copy & Paste Moderator
 05-30-2008, 06:21 PM
#12
Banned
iTrader: (1)

Join Date: Jan 2006
Location: ohio
Posts: 297
Likes: 0
Received 0 Likes
on
0 Posts
sweeeeeet.... subscribed!
i was just about 2 type in a search for this and saw it just posted lol.
just installed mine today.... anyways my question is... how do i resize an image?
i was just about 2 type in a search for this and saw it just posted lol.
just installed mine today.... anyways my question is... how do i resize an image?
05-30-2008, 06:47 PM
#13
If you using photoshop just click the marching ants selection tool, then right click your layer. Next you want to select the free transform option from the little drop down menu. Now just hold down the shift button, go to a a corner click and drag. That's how I do it at least.
05-30-2008, 10:14 PM
#14
Copy & Paste Moderator
If you using photoshop just click the marching ants selection tool, then right click your layer. Next you want to select the free transform option from the little drop down menu. Now just hold down the shift button, go to a a corner click and drag. That's how I do it at least.
...OR...
Method 1
* From the "Image" option on the toolbar, select "Image Size" and set the Width to 500 and Height to 240.
* Make sure the measurement is in Pixels.
* Make sure "Constrain proportions" is OFF.
* Click OK.
* Since the screen is a widescreen and 500 x 240 is a widescreen resolution, if the starting image is not widescreen, the image will be slightly distorted width-wise. If the starting image is widescreen, there shouldn't be any distortion unless it used a different aspect ratio.
Method 2
* From the "Image" option on the toolbar, select "Image Size" and set the Width to 500.
* Make sure the measurement is in Pixels.
* Make sure "Constrain proportions" is ON.
* Click OK.
* From the "Image" option on the toolbar, select "Canvas Size" and set the height to 240. Set the cropping pattern/area in the 3x3 "Anchor" grid. This determines how/where the image will be cropped to the selected size. You may need to try this a few times to get the best results.
* Click OK
* The image will not be distorted but some of it will have been cropped out.
Method 3
* Trial and error.
* Use a combination of method two and custom cropping via the "Crop" tool to get the image in the desired size and orientation.
Last edited by VIP1; 05-30-2008 at 10:26 PM.

 05-30-2008, 10:24 PM
#16
Copy & Paste Moderator


