
Project Budget 10 Second Camaro Thread


 Like i said just make a list. lol
 The part number for the silver spoke wheel is 415 and the part number for the adapter kit is 3196. I bought them both at AutoZone and they had both in stock. The only thing you will have to do is put a couple washers between the adapter and the steering column base, otherwise the wheel will rub when you turn it. Found that out the hard way.  Other than that, its straight foward.
Other than that, its straight foward. 
Thread Starter
TECH Fanatic
iTrader: (12)
Joined: Aug 2007
Posts: 1,818
Likes: 1
From: Cornfields near Pontiac, IL
 Make sure you rent their steering wheel puller though!


Thread Starter
TECH Fanatic
iTrader: (12)
Joined: Aug 2007
Posts: 1,818
Likes: 1
From: Cornfields near Pontiac, IL


Just wanted to say great job.. I sort of did the same thing you are doing. I "deleted" my rear passenger seat sail panel speakers and removed everything (except my dash and steering wheel) on my 1995 Trans Am. Hat's off to ya.. keep up the good work!
Hey mang, Not thread jacking just wanted to let u know that I Finally got the PS airbag out yesturday. I didnt see the two bolts at the top of the bracket. Its a little harder when u dont have the dash off.
Hey On the steering wheel situation, I pulled the airbag,steering wheel and Clock spring. I bought the 3196 kit as u did, but got a question. Im not going to run a horn so the only thing I need out the kit is the metal ring, adapter, the bolts and the adapter cover right? I started putting it together and I put the ring on first, next the adapter with the A to the top, then the cover and three bolts. Is that right?
thanks sorry for the questions but kinda novice on steering wheel swappage.
sean
Thread Starter
TECH Fanatic
iTrader: (12)
Joined: Aug 2007
Posts: 1,818
Likes: 1
From: Cornfields near Pontiac, IL
Hey mang, Not thread jacking just wanted to let u know that I Finally got the PS airbag out yesturday. I didnt see the two bolts at the top of the bracket. Its a little harder when u dont have the dash off.
Hey On the steering wheel situation, I pulled the airbag,steering wheel and Clock spring. I bought the 3196 kit as u did, but got a question. Im not going to run a horn so the only thing I need out the kit is the metal ring, adapter, the bolts and the adapter cover right? I started putting it together and I put the ring on first, next the adapter with the A to the top, then the cover and three bolts. Is that right?
thanks sorry for the questions but kinda novice on steering wheel swappage.
sean
Hey On the steering wheel situation, I pulled the airbag,steering wheel and Clock spring. I bought the 3196 kit as u did, but got a question. Im not going to run a horn so the only thing I need out the kit is the metal ring, adapter, the bolts and the adapter cover right? I started putting it together and I put the ring on first, next the adapter with the A to the top, then the cover and three bolts. Is that right?
thanks sorry for the questions but kinda novice on steering wheel swappage.
sean
Where do the washer need to be placed? Before the adapter I assume? How fat/diameter of washers? According to the directions you bolt the steering wheel up to the hub loosely install the 22mm nut handtight and check that the wheel is straight before tightening down.
Thread Starter
TECH Fanatic
iTrader: (12)
Joined: Aug 2007
Posts: 1,818
Likes: 1
From: Cornfields near Pontiac, IL
I just stacked 2 thicker washers on top of each other and that was enough. You get the wheel on yet?
As far as today, had a setback and cracked the windshield. I was trying to pull the wiper arms and motor out and was trying to pop the drivers arm off and put to much pressure on the windshield when i was using the hammer as a pry bar Ended up saying screw it for the day and I'll continue it another day. I guess on the plus side, gives me a reason to get a lexan windshield if i cant find a cheap glass one
As far as today, had a setback and cracked the windshield. I was trying to pull the wiper arms and motor out and was trying to pop the drivers arm off and put to much pressure on the windshield when i was using the hammer as a pry bar
Ended up saying screw it for the day and I'll continue it another day. I guess on the plus side, gives me a reason to get a lexan windshield if i cant find a cheap glass one yeah I got it on, I went with the same wheel as you except mines black. I got a deal on it cause the horn was missing so they gave me 10% off and I had some store credit so I walked out the store only paying $7.25 for my new steering wheel.
Thread Starter
TECH Fanatic
iTrader: (12)
Joined: Aug 2007
Posts: 1,818
Likes: 1
From: Cornfields near Pontiac, IL
BTW...does anyone have a spare windshield laying around locally??
Last edited by Black94Z28; Feb 15, 2009 at 10:43 PM.
On The Tree
Joined: Jun 2008
Posts: 145
Likes: 0
From: Dayton TX AKA hicktown
good luck with the rust I just discovered my floor was rusted and the jute was all wet. I'm headed to PICK-A-PART next weekend with my sawzall and hoping to find some good floor pans.
Thread Starter
TECH Fanatic
iTrader: (12)
Joined: Aug 2007
Posts: 1,818
Likes: 1
From: Cornfields near Pontiac, IL
Well there's going to be a setback on the build, looks like I will be shelling out money for a replacement window or trying to decide if its worth getting a Lexan windshield and save a couple pounds. May try and hit the junkyards and see if they have any 4th gens laying around. Kind of a bummer since the build was going pretty good so far, now I am just frustrated that it happened. Probably more at myself for not even thinking that the glass may shatter if i pressed to hard on it. 

Updated the weight reduction list...
Front Bumper Support = 25.375 lbs
Fog lights and brackets = 4.0625 lbs
Cruise control, cable, and throttle cable cover = 4.4375 lbs
Air pump and brass fittings = 5.9375 lbs
Rear Seatbelts = 4.1375 lbs
Windshield washer fluid reservoir with water = 8.0625 lbs
Heat shields beneath the car = 2.1875
Rear Seats = 22.4375 lbs
Front Speakers = 2.75 lbs
Driver's Air Bag = 3.625 lbs
Passenger's Air Bag = 9.46875
Heater Core (empty) = 1.03125
Airbag Crash Sensors = 1.53125 lbs
Mat that is Underneath the Dash Pad = 2.34375 lbs
Heater Core Hoses = 2.0125 lbs
Front Sway Bar = 15.09375 lbs
Plastic Shrouding = 4.968749 lbs
EVAP parts = 1.625 lbs
Sun visors = 2 lbs
Spare tire and jack = 37 lbs
Power steering pump, pulley, idler pulley = 12 lbs
Inner fenderwells, plastic = 3 lbs
Hood (Got the Glasstek one, have to find out weight on that) = 42 lbs
Firewall plastic = 10 lbs
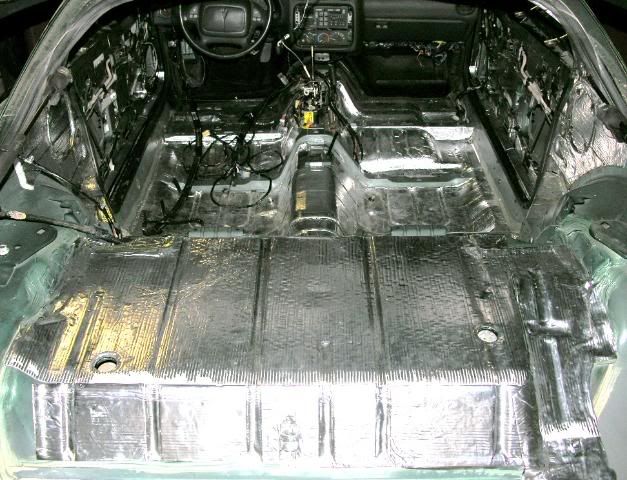
Carpet insulation = 15 lbs
Metal dash covers = 1 lbs
Complete HVAC system = ???
LT1 accesory bracket = ???
Next on the list is to remove the wiper arms and motor which is good for 10 pounds. The drivers arm is on there really good, may try and hit it with some PB Blaster.
Updated the weight reduction list...
Front Bumper Support = 25.375 lbs
Fog lights and brackets = 4.0625 lbs
Cruise control, cable, and throttle cable cover = 4.4375 lbs
Air pump and brass fittings = 5.9375 lbs
Rear Seatbelts = 4.1375 lbs
Windshield washer fluid reservoir with water = 8.0625 lbs
Heat shields beneath the car = 2.1875
Rear Seats = 22.4375 lbs
Front Speakers = 2.75 lbs
Driver's Air Bag = 3.625 lbs
Passenger's Air Bag = 9.46875
Heater Core (empty) = 1.03125
Airbag Crash Sensors = 1.53125 lbs
Mat that is Underneath the Dash Pad = 2.34375 lbs
Heater Core Hoses = 2.0125 lbs
Front Sway Bar = 15.09375 lbs
Plastic Shrouding = 4.968749 lbs
EVAP parts = 1.625 lbs
Sun visors = 2 lbs
Spare tire and jack = 37 lbs
Power steering pump, pulley, idler pulley = 12 lbs
Inner fenderwells, plastic = 3 lbs
Hood (Got the Glasstek one, have to find out weight on that) = 42 lbs
Firewall plastic = 10 lbs
Carpet insulation = 15 lbs
Metal dash covers = 1 lbs
Complete HVAC system = ???
LT1 accesory bracket = ???
Next on the list is to remove the wiper arms and motor which is good for 10 pounds. The drivers arm is on there really good, may try and hit it with some PB Blaster.
Last edited by Black94Z28; Feb 17, 2009 at 09:26 PM.
Thread Starter
TECH Fanatic
iTrader: (12)
Joined: Aug 2007
Posts: 1,818
Likes: 1
From: Cornfields near Pontiac, IL
Despite having a touch of the flu, I was stuck in the house all day and this was on the back of my mind. I wanted to finish pulling the wiper motor and arms out.
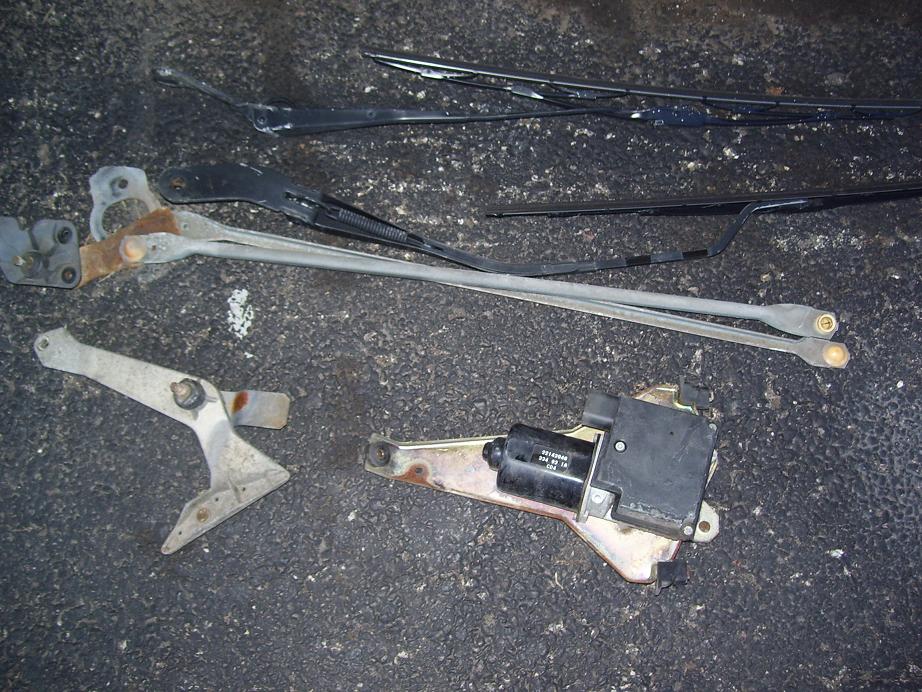
First thing I did was I pulled the wiper arms off. They are held on by two 13 mm nuts. To access these you need to flip the plastic covers up, just pinch the ends and they pop up.
Next, after you get the arms off, you want to pull the weatherstrip up. It is held on by a bunch of little push pins. Take you time and you can slide the pins out of the weatherstrip so you can reuse it (not sure if I am going to reuse it though...is there an actual reason for reinstalling it?)
Then there will be a couple push pins holding the actual wiper cowl trim on. Just take a flathead screwdriver and pop up the middle piece and then you can pull the outer ring out. There are maybe 6 of these. Just make sure you get them all. Then just carefully slide the trim off. There will be the windshield washer squirter line you will have to pull off once you have the pieces loose.
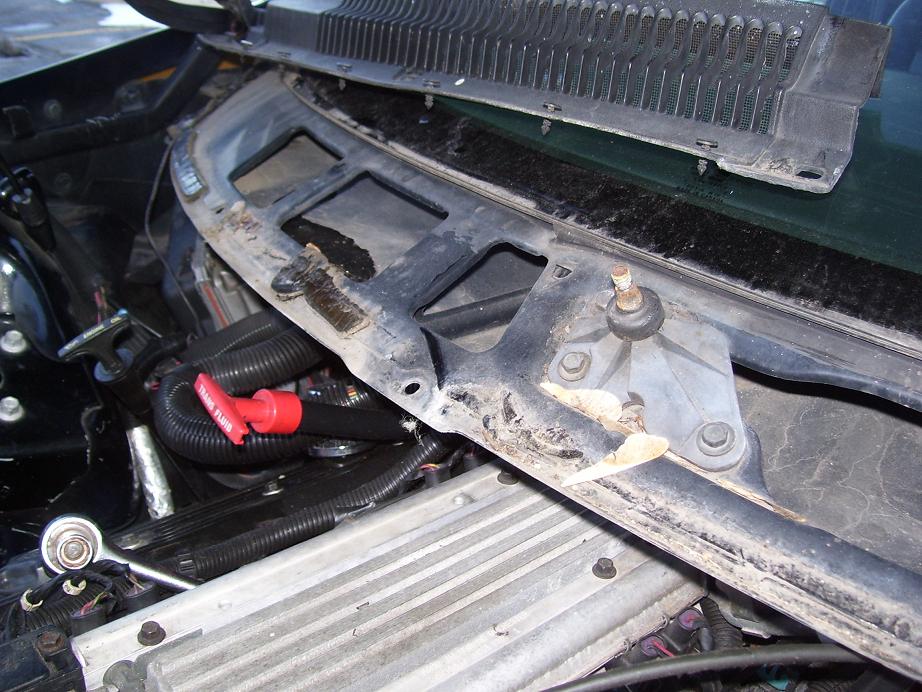
After that, you will see the wiper motor assembly. There are 3 10 mm bolts on the passenger arm motor and then 2 more on the drivers side, along with a 10 mm nut that is hidden underneath the cowl, you will have to feel for this, cant really see it.

Careful of the cowl lip though, it is really sharp, I cut a chunk of my skin off on my fingers as you can see here.

Next step, you will need to pop the arms off (they literally just pop off) Gently pull on the arms and they will break free, I just had to pop the drivers side off and the rest slid out of the passenger side hole.

Here is what was removed, seems like around 10-12 pounds from what I have read.
Then reinstall your cowl cover and enjoy the 10 pounds you saved and make sure you Rain-X your windshield just in case


First thing I did was I pulled the wiper arms off. They are held on by two 13 mm nuts. To access these you need to flip the plastic covers up, just pinch the ends and they pop up.
Next, after you get the arms off, you want to pull the weatherstrip up. It is held on by a bunch of little push pins. Take you time and you can slide the pins out of the weatherstrip so you can reuse it (not sure if I am going to reuse it though...is there an actual reason for reinstalling it?)
Then there will be a couple push pins holding the actual wiper cowl trim on. Just take a flathead screwdriver and pop up the middle piece and then you can pull the outer ring out. There are maybe 6 of these. Just make sure you get them all. Then just carefully slide the trim off. There will be the windshield washer squirter line you will have to pull off once you have the pieces loose.
After that, you will see the wiper motor assembly. There are 3 10 mm bolts on the passenger arm motor and then 2 more on the drivers side, along with a 10 mm nut that is hidden underneath the cowl, you will have to feel for this, cant really see it.
Careful of the cowl lip though, it is really sharp, I cut a chunk of my skin off on my fingers as you can see here.
Next step, you will need to pop the arms off (they literally just pop off) Gently pull on the arms and they will break free, I just had to pop the drivers side off and the rest slid out of the passenger side hole.
Here is what was removed, seems like around 10-12 pounds from what I have read.
Then reinstall your cowl cover and enjoy the 10 pounds you saved and make sure you Rain-X your windshield just in case