


 you'll live.


Project Budget 10 Second Camaro Thread
Thread Starter
TECH Fanatic
iTrader: (12)
Joined: Aug 2007
Posts: 1,818
Likes: 1
From: Cornfields near Pontiac, IL
Yeah, the headers are off to the dump once I get some longtubes, cant believe the previous owner wasted his time and money on these things. I want to run true duals off the longtubes as well, which reminds me, I need to find out what kind of catback is on my car so I can sell it to help fund some headers...
LS1 Tech Stories
The Best V8 Stories One Small Block at Time

6 Common C5 Corvette Failures and What's Involved In Repairing Them
Pouria Savadkouei
Retro Modern Bandit Pontiac Trans AM Comes With Burt Reynolds' Autograph
Verdad Gallardo
Top 10 Greatest Cadillac V Series Performance Models Ever, Ranked
Pouria Savadkouei
Top 10 Most Powerful Chevy Trucks Ever Made!

Hennessey's New Supercharged Silverado ZR2 Has 700 HP
Verdad Gallardo
Coachbuilt N2A Anteros Is an LS2-Powered C6 Corvette In Italian Clothes
Verdad Gallardo
Awesome K5 Blazer Restomod Comes With C7 Corvette Power
Verdad Gallardo
10 Camaros You Should Never Buy

10 LS Engine Myths That Refuse to Die
Verdad Gallardo Thread Starter
TECH Fanatic
iTrader: (12)
Joined: Aug 2007
Posts: 1,818
Likes: 1
From: Cornfields near Pontiac, IL
Good progress. I managed to break my windshield too. I did it removing the plastic cowling. I thought wow he is getting really in depth with the weights and then I noticed you were using parts of my list. You're doing a good job so far. Keep up the good work.
Thread Starter
TECH Fanatic
iTrader: (12)
Joined: Aug 2007
Posts: 1,818
Likes: 1
From: Cornfields near Pontiac, IL
Good progress. I managed to break my windshield too. I did it removing the plastic cowling. I thought wow he is getting really in depth with the weights and then I noticed you were using parts of my list. You're doing a good job so far. Keep up the good work.
 still not seeing the 15 mm bolt yet. all 4 of the passenger door bolts have been 10 mm
 Last edited by Black94Z28; Feb 25, 2009 at 08:45 AM.
No problem what so ever. Cut the door bars out. If you have access to any sort of small cutting wheel or saw you should be able to do it. You'll take out an extra 4 lbs total of metal if you cut out the brackets that hold the door bars in. It may be a pain in the ***, but once you get to the point where you're running out of things to do every little bit adds up.

Just read your thread...
Sounds like you engine build up is giong to be very simular to mine.
I'm building a forged 383 with(hopefully) AI 200cc heads and a 200 shot. Should get me into the 10's. At least I hope it does...lol.
Sounds like you engine build up is giong to be very simular to mine.
I'm building a forged 383 with(hopefully) AI 200cc heads and a 200 shot. Should get me into the 10's. At least I hope it does...lol.
if that 383 with ai heads and a 200 shot don't get you into the 10 there is something worng. i had a friend where i live that had a cam only with a 3200 stall 4:10 gears with a 28.5 tire and a 150 shot went 10.97 in the quarter.. and full bolt ons...
Thread Starter
TECH Fanatic
iTrader: (12)
Joined: Aug 2007
Posts: 1,818
Likes: 1
From: Cornfields near Pontiac, IL
Was a rain day today so got a little bit done on the car between breaks in the rain and friends coming over. I managed to get the door bars out and start on the LS1 lid and LS1 base conversion...
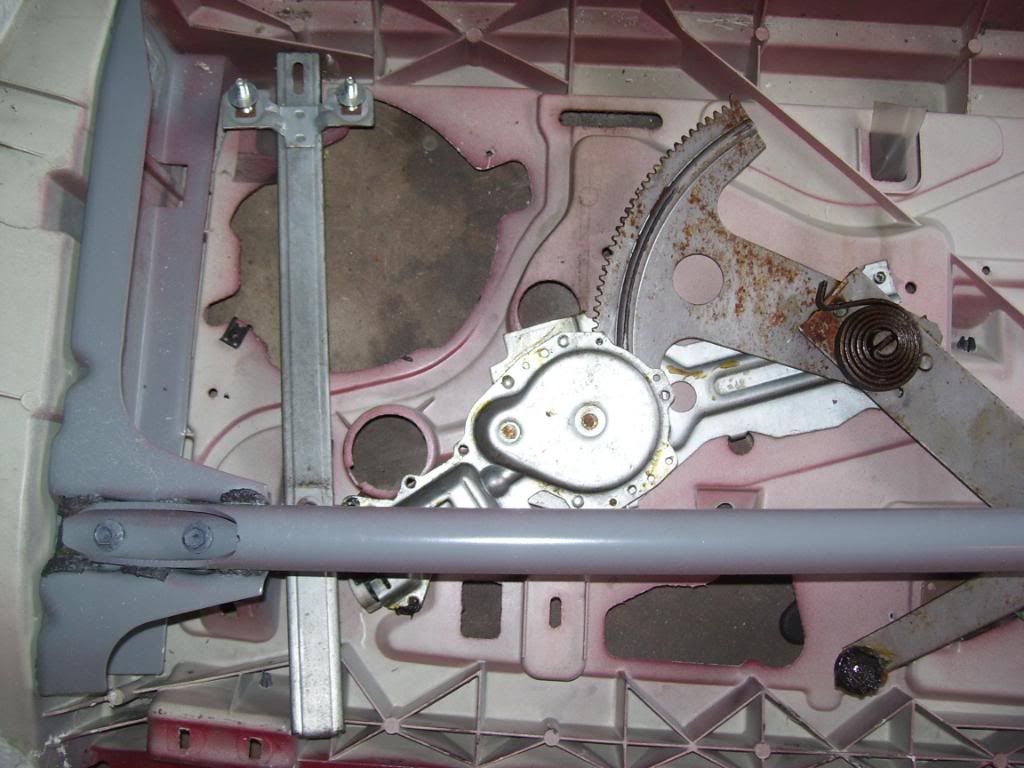
Door Bar Removal
The things I do for you guys...Opened up a door off an LS1 car so you guys can see what you are dealing with that you cant see. Here is the door bar exposed.
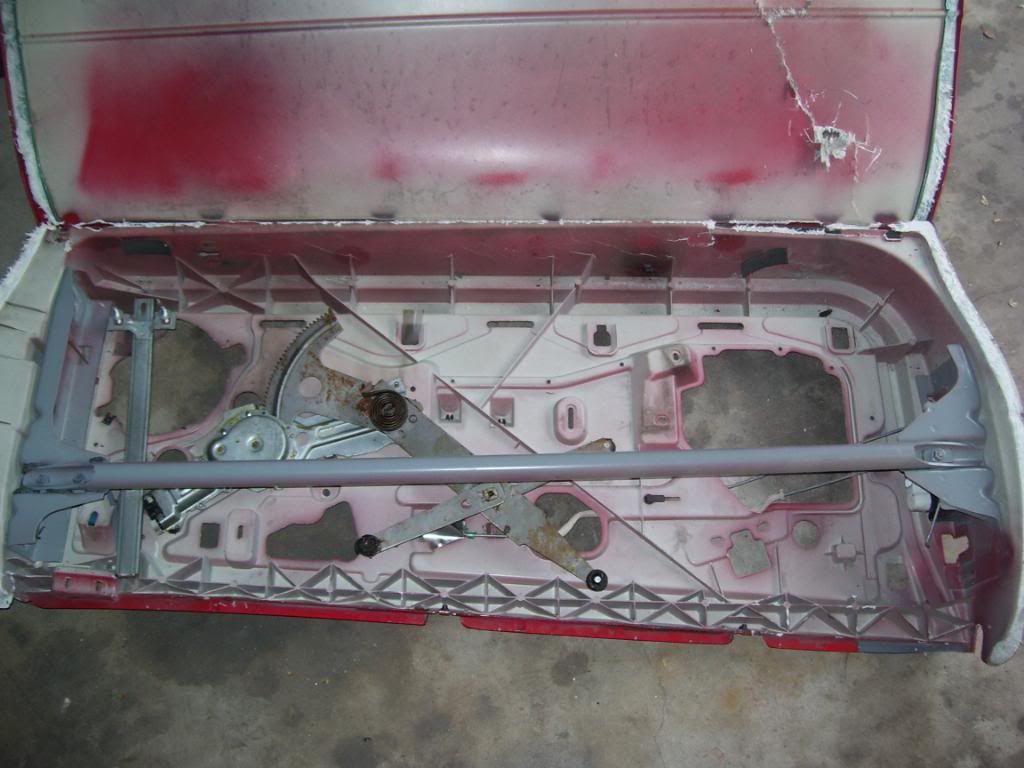
The end facing the 1/4 panel...
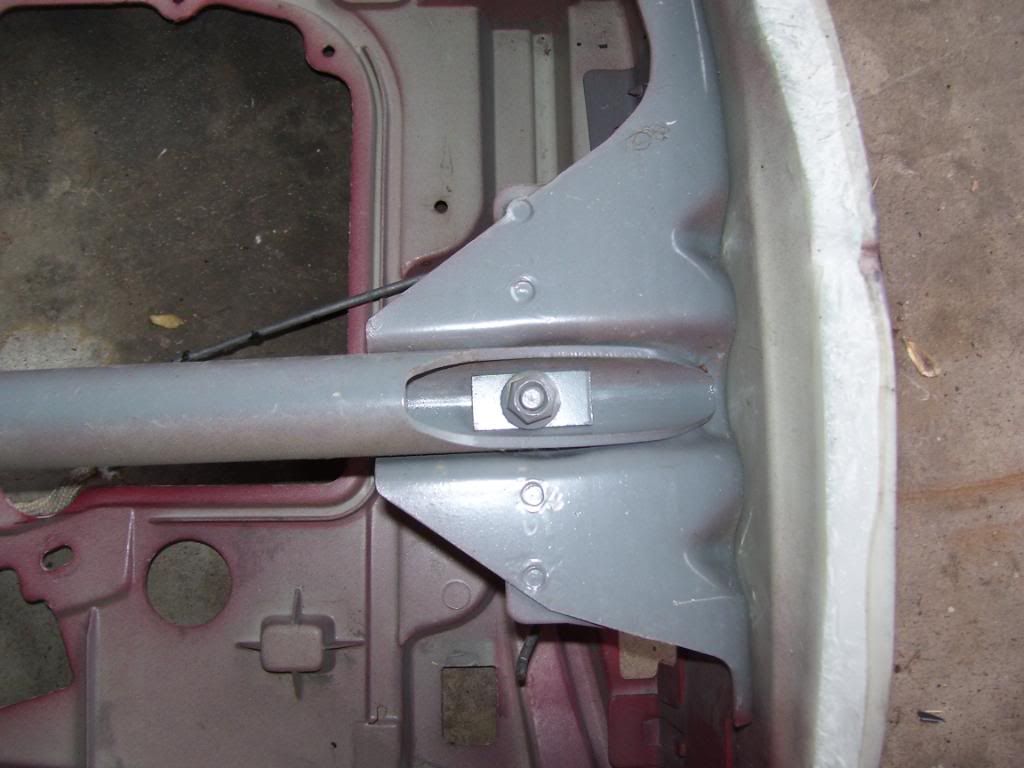
And the end facing the fender...
Before anyone tries this, unless you plan on cutting the bars out, you will need to make one or both of these two tools. (I had to replace the drivers door with a door off an LS1 camaro awhile back, so Im guessing for the LS1's there is two 10 mm bolts holding the door bars in the front and one 15 mm bolt holding the bar in the back. Im guessing that the LT1 drivers door had 2 10 mm bolts in front and back like the passenger door too) Because of the tight space, you can get one or two of the bolts out with just a wrench or a socket, but the bolts that killed me where the 2nd bolt back on the door bars. You cant get a wrench on it because you need something to bend inwards and a wrench wont fit in there. So here is what I came up with to fix the problem and get these bars out...

I had to take a 15 mm socket and a 10 mm socket, grind them down on the bottom, and then weld them to a thick piece of metal.
Next, you will want to break the rest of the bolts loose with this tool. It still is really time consuming as I probably spent a total of 2 hours per door. Also if you have a beer or two, it will help you relax and not throw any wrenches. After you get the bolts all out, you will want to try and turn the bar in its holder to break the glue that GM put on there. (The drivers door was the worse for this, had to also take a thin screwdriver and slide it between the bar and the bracket)
Once the bar is loose you will want to slide the back of the bar up as far as you can and that will cause the front of the bar to drop free and the bar will then be loose in the door. To get the door bar out with the front clip still on the car, you will need to jack the front of the car up and pull off your front tires and if you have the wheelwell plastic, pop that off too (mine was already off at the time) What I did next was I pulled the wiring harness grommet out (left the wires still there since there is room to get both through the hole) then close the door and slide the bar out of using the wiring harness hole. (If you have a friend handy, they can be in the car feeding you the bar, but it can be done with one person, just have to go back and forth and enter the car from the opposite side) The bar will come out as shown...

Then just continue to pull the bar out and be careful not to hit any painted panels pulling it out. You can at the same time pull the door panel insulation out along with any speaker stuff at this time. The insulation is probably good for a whole pound, but that probably adds up to about 10 pounds removed from each door. Then pop the wiring harness grommet back on and re-install your door panel. This is what I removed from the passenger door...

Then all you need to do is repeat the process for the other door. Like I mentioned above, I had a new door put on awhile back from a donor LS1 Camaro because the door skin had seperated from the door frame. This caused me to make the 15 mm door bar tool. Goes alot easier once you done the first door though. So I guess I did an LS1 Camaro door and a LT1 Camaro door all together. Here is the final results, they do seem pretty heavy, and overall Im happy with the results...
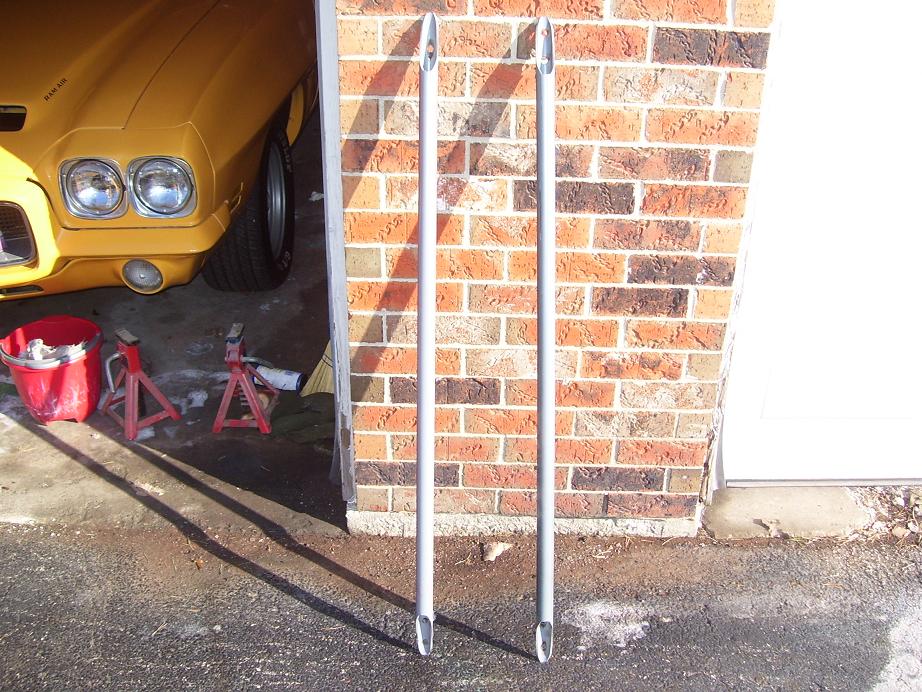
Enjoy the weight savings and easier to close doors!!
After the door bars, I decided to go to Home Depot and pick up a Fenco 3 inch by 3 inch coupling to go inbetween the throttle body and MAF sensor. Since the throttle body is oval, I had to heat up the rubber piece in some boiling water for about 5 minutes and it slid right on without any force. Attached the MAF sensor up and tightened the clamps down...


Looks like I am going to half to lengthen the MAF sensor wires, as this is as far as they go, but shouldnt be a big deal...

Now, I am just waiting on my friend to bring his dremel over and we can try cutting the bracing out from under the hood for the ls1 base and lid. The only part that concerns me are to the right and left of the cowl scoop where the bracing is flush mounted with the top of the hood, so I will need to be careful cutting this away.
Door Bar Removal
The things I do for you guys...Opened up a door off an LS1 car so you guys can see what you are dealing with that you cant see. Here is the door bar exposed.
The end facing the 1/4 panel...
And the end facing the fender...
Before anyone tries this, unless you plan on cutting the bars out, you will need to make one or both of these two tools. (I had to replace the drivers door with a door off an LS1 camaro awhile back, so Im guessing for the LS1's there is two 10 mm bolts holding the door bars in the front and one 15 mm bolt holding the bar in the back. Im guessing that the LT1 drivers door had 2 10 mm bolts in front and back like the passenger door too) Because of the tight space, you can get one or two of the bolts out with just a wrench or a socket, but the bolts that killed me where the 2nd bolt back on the door bars. You cant get a wrench on it because you need something to bend inwards and a wrench wont fit in there. So here is what I came up with to fix the problem and get these bars out...
I had to take a 15 mm socket and a 10 mm socket, grind them down on the bottom, and then weld them to a thick piece of metal.
Next, you will want to break the rest of the bolts loose with this tool. It still is really time consuming as I probably spent a total of 2 hours per door. Also if you have a beer or two, it will help you relax and not throw any wrenches. After you get the bolts all out, you will want to try and turn the bar in its holder to break the glue that GM put on there. (The drivers door was the worse for this, had to also take a thin screwdriver and slide it between the bar and the bracket)
Once the bar is loose you will want to slide the back of the bar up as far as you can and that will cause the front of the bar to drop free and the bar will then be loose in the door. To get the door bar out with the front clip still on the car, you will need to jack the front of the car up and pull off your front tires and if you have the wheelwell plastic, pop that off too (mine was already off at the time) What I did next was I pulled the wiring harness grommet out (left the wires still there since there is room to get both through the hole) then close the door and slide the bar out of using the wiring harness hole. (If you have a friend handy, they can be in the car feeding you the bar, but it can be done with one person, just have to go back and forth and enter the car from the opposite side) The bar will come out as shown...
Then just continue to pull the bar out and be careful not to hit any painted panels pulling it out. You can at the same time pull the door panel insulation out along with any speaker stuff at this time. The insulation is probably good for a whole pound, but that probably adds up to about 10 pounds removed from each door. Then pop the wiring harness grommet back on and re-install your door panel. This is what I removed from the passenger door...
Then all you need to do is repeat the process for the other door. Like I mentioned above, I had a new door put on awhile back from a donor LS1 Camaro because the door skin had seperated from the door frame. This caused me to make the 15 mm door bar tool. Goes alot easier once you done the first door though. So I guess I did an LS1 Camaro door and a LT1 Camaro door all together. Here is the final results, they do seem pretty heavy, and overall Im happy with the results...
Enjoy the weight savings and easier to close doors!!
After the door bars, I decided to go to Home Depot and pick up a Fenco 3 inch by 3 inch coupling to go inbetween the throttle body and MAF sensor. Since the throttle body is oval, I had to heat up the rubber piece in some boiling water for about 5 minutes and it slid right on without any force. Attached the MAF sensor up and tightened the clamps down...
Looks like I am going to half to lengthen the MAF sensor wires, as this is as far as they go, but shouldnt be a big deal...
Now, I am just waiting on my friend to bring his dremel over and we can try cutting the bracing out from under the hood for the ls1 base and lid. The only part that concerns me are to the right and left of the cowl scoop where the bracing is flush mounted with the top of the hood, so I will need to be careful cutting this away.
Last edited by Black94Z28; Sep 13, 2010 at 04:05 PM.
Thread Starter
TECH Fanatic
iTrader: (12)
Joined: Aug 2007
Posts: 1,818
Likes: 1
From: Cornfields near Pontiac, IL
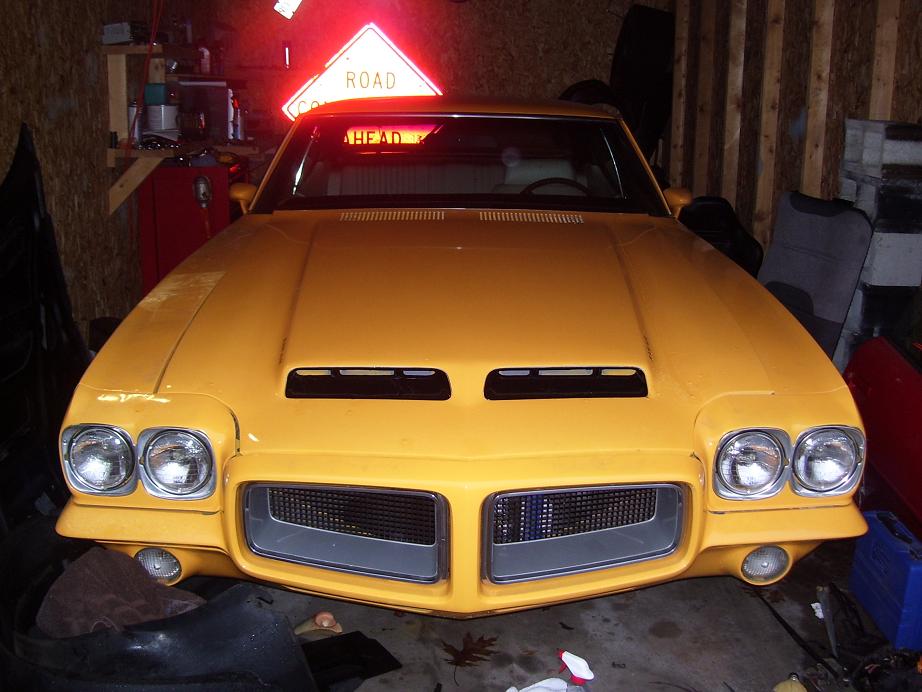
With some stuffed moved around, I could finally unbury my other car...a 1972 Pontiac GTO. This was my first car I drove from 1997-2001 during high school and a little bit of college until I started restoring it. Has a mild 400 with a Hurst shifted TH400 and a 12 bolt. Currently a white interior but changing over to black. This project is on hold right now until I am able to have the money to fix this car right. 
 mmmmm
mmmmm