


Ask a Professional Detailer
This video is just the thing, and what the moderator describes, is exactly what is going on with my paint, and explains why the rough parts are those on top ("horizontal"), and those exposed to air currents.
I'm psyched about using the clay to correct the paint finish.
Thanks, Gents!
I'm psyched about using the clay to correct the paint finish.
Thanks, Gents!

TECH Regular
Joined: Jan 2010
Posts: 449
Likes: 0
From: Bay Area
I'd suggest using the plastic sandwich baggy trick to make sure you got rid of all the contaminants. All you need is a plastic bag I use a sandwich bag and just stick your hand inside it and gently glide it over your paint to see if you need to keep claying that section or your good to go
I'd suggest using the plastic sandwich baggy trick to make sure you got rid of all the contaminants. All you need is a plastic bag I use a sandwich bag and just stick your hand inside it and gently glide it over your paint to see if you need to keep claying that section or your good to go
My suggestion would be to clay also. On a daily driver I've heard suggestions of claying as often as you change your oil. I usually do it at least 2 times a year on the truck, in the spring and fall. The SS rarely sees rain or anything so it usually only gets clayed in the spring.
This video is just the thing, and what the moderator describes, is exactly what is going on with my paint, and explains why the rough parts are those on top ("horizontal"), and those exposed to air currents.
I'm psyched about using the clay to correct the paint finish.
Thanks, Gents!
I'm psyched about using the clay to correct the paint finish.
Thanks, Gents!
On The Tree
Joined: Oct 2011
Posts: 156
Likes: 0
Maybe this was answered in this thread....its kind of long so refer me to what post if it has been answered.
I desperately need to degrease/clean the engine bay. Nervous as hell to be spraying gunk and water around all that expensive electrical ****. Tips/trick/advice? Thanks in advance.
I desperately need to degrease/clean the engine bay. Nervous as hell to be spraying gunk and water around all that expensive electrical ****. Tips/trick/advice? Thanks in advance.
1) make sure the engine isn't hot/warm
2) cover any exposed filters
3) use a light stream of water (fan spray)
4) spray a degreaser/all purpose cleaner
5) use a brush to get into the nooks, crevices, crannies
6) let dwell for a few minutes
7) spray off degreaser/all purpose cleaner with a light stream of water
8) use a leaf blower/compressed air/car dryer to remove standing water
9) turn engine on and let it idle to burn off the remaining water (after removing the covered filters)
10) once engine is cool after letting it idle, apply a dressing to the plastics to protect them and just make them look 100 times better. Just don't use anything too greasy or it'll collect a **** ton of dust... Best bet would be to apply the dressing and then knock it down by going back over it with a towel
LS1 Tech Stories
The Best V8 Stories One Small Block at Time

6 Common C5 Corvette Failures and What's Involved In Repairing Them
Pouria Savadkouei
Retro Modern Bandit Pontiac Trans AM Comes With Burt Reynolds' Autograph
Verdad Gallardo
Top 10 Greatest Cadillac V Series Performance Models Ever, Ranked
Pouria Savadkouei
Top 10 Most Powerful Chevy Trucks Ever Made!

Hennessey's New Supercharged Silverado ZR2 Has 700 HP
Verdad Gallardo
Coachbuilt N2A Anteros Is an LS2-Powered C6 Corvette In Italian Clothes
Verdad Gallardo
Awesome K5 Blazer Restomod Comes With C7 Corvette Power
Verdad Gallardo
10 Camaros You Should Never Buy

10 LS Engine Myths That Refuse to Die
Verdad Gallardo It's also a good idea to cover the pcm, alternator and relay/fuse center with aluminum foil or plastic wrap to prevent water from getting in there.
Try and use a non silicon base spray for the engine compartment. It doesn't attract dust and doesn't have that 'just bought it from the dealership look' unless you like that kinda thing.
Try and use a non silicon base spray for the engine compartment. It doesn't attract dust and doesn't have that 'just bought it from the dealership look' unless you like that kinda thing.
Spot on. I'd say a daily driver truly needs clayed every 4-6 months. Maybe even more often depending on how often it is washed and what lsp is on it. I used to HATE claying with a passion until I got my speedy prep towel. Now I don't mind doing it as much. Makes sealing and waxing like a breeze.
to hang low. I think that alot of the crud on the paint is just that.
Looks like the car will be done at least a couple of times a year.


Staging Lane
Joined: Jan 2013
Posts: 81
Likes: 0
From: South Texas
I recommend superbrightleds.com and use RET71 as a coupon for 5% off.
anyone know what item number is for the lights in rearview mirror and where I may be able to find a write up on install thanks in advance
anyone know what item number is for the lights in rearview mirror and where I may be able to find a write up on install thanks in advance
hey man thanks so much for doing this thread, i've had a question about my wheels and just wanted to know where to start, i bought some aluminum drag wheels and 1 day while cleaning the tires with bleach white it got on the wheels and damn near destroyed them, there's white powdery stuff all over the finish and stained like crazy. How can i get the wheels back to new or almost new?
I remember Jeff touching on this earlier in the thread. Road paint is meant to take a beating and from what I remember its near impossible to remove. I think Jeff told a story how some exotic got road paint on a lot of the car and it was totaled..
From what I can tell from the pic that looks like that's in the base coat not on top. It looks like there was some sort of issue between the primer/sealer and the base coat. I had the same thing happen on a fiberglass hood I painted last year. I had to sand it back down and use a different sealer to make it work. Again I very well could be wrong.
hey man thanks so much for doing this thread, i've had a question about my wheels and just wanted to know where to start, i bought some aluminum drag wheels and 1 day while cleaning the tires with bleach white it got on the wheels and damn near destroyed them, there's white powdery stuff all over the finish and stained like crazy. How can i get the wheels back to new or almost new?
Before
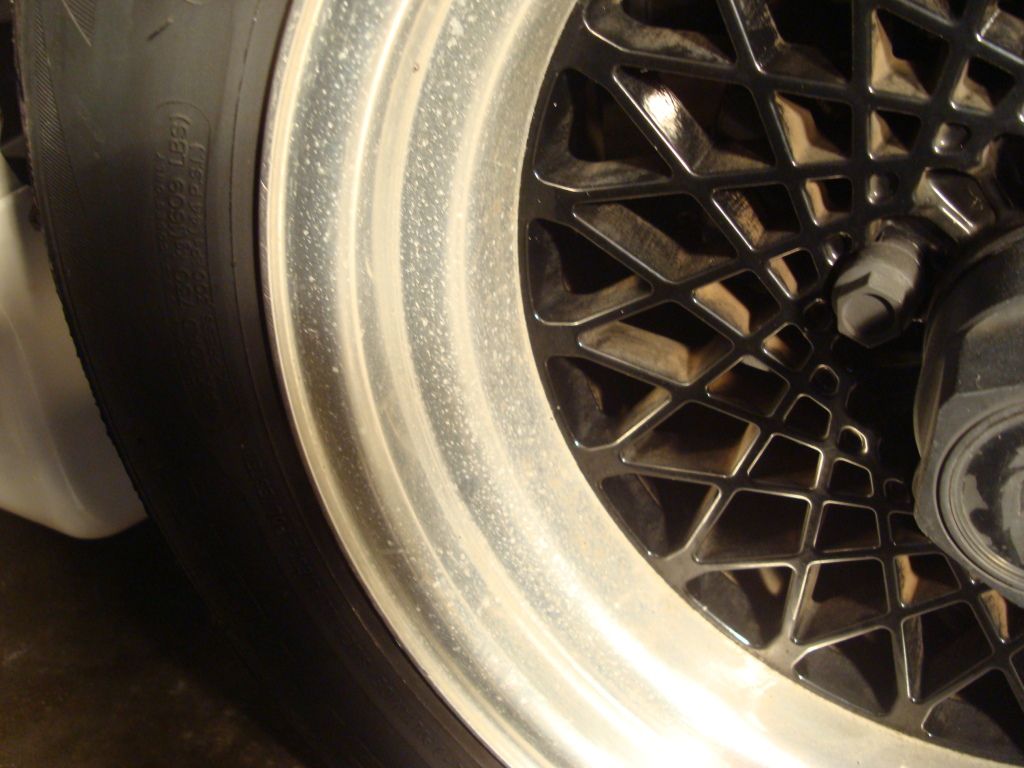
After

There is some fine pitting but you have to get really close with a bright light to see it. Only way to fix that is wet sanding and for what the car is used for there wasn't any reason to go that far with it.
ok yeah i tried just mothers and it did help but i need something more aggressive so i will try the steel wool, thanks alot for the info man, i don't have any pitting just really bad stains and dull, those wheels look 10 times better than the top pic, what brand steel wool do you prefer?
Last edited by shepss217; Feb 9, 2013 at 02:01 PM.