
What did you do to your V today?

 07-21-2017, 11:28 PM
#1682
TECH Addict
iTrader: (19)
Join Date: Aug 2007
Location: Where the Navy tells me to go
Posts: 2,408
Received 107 Likes
on
89 Posts

Put my new HF 4-1/2" angle grinder to use for the first time Friday after work, got the driver side opening roughly cut out. 
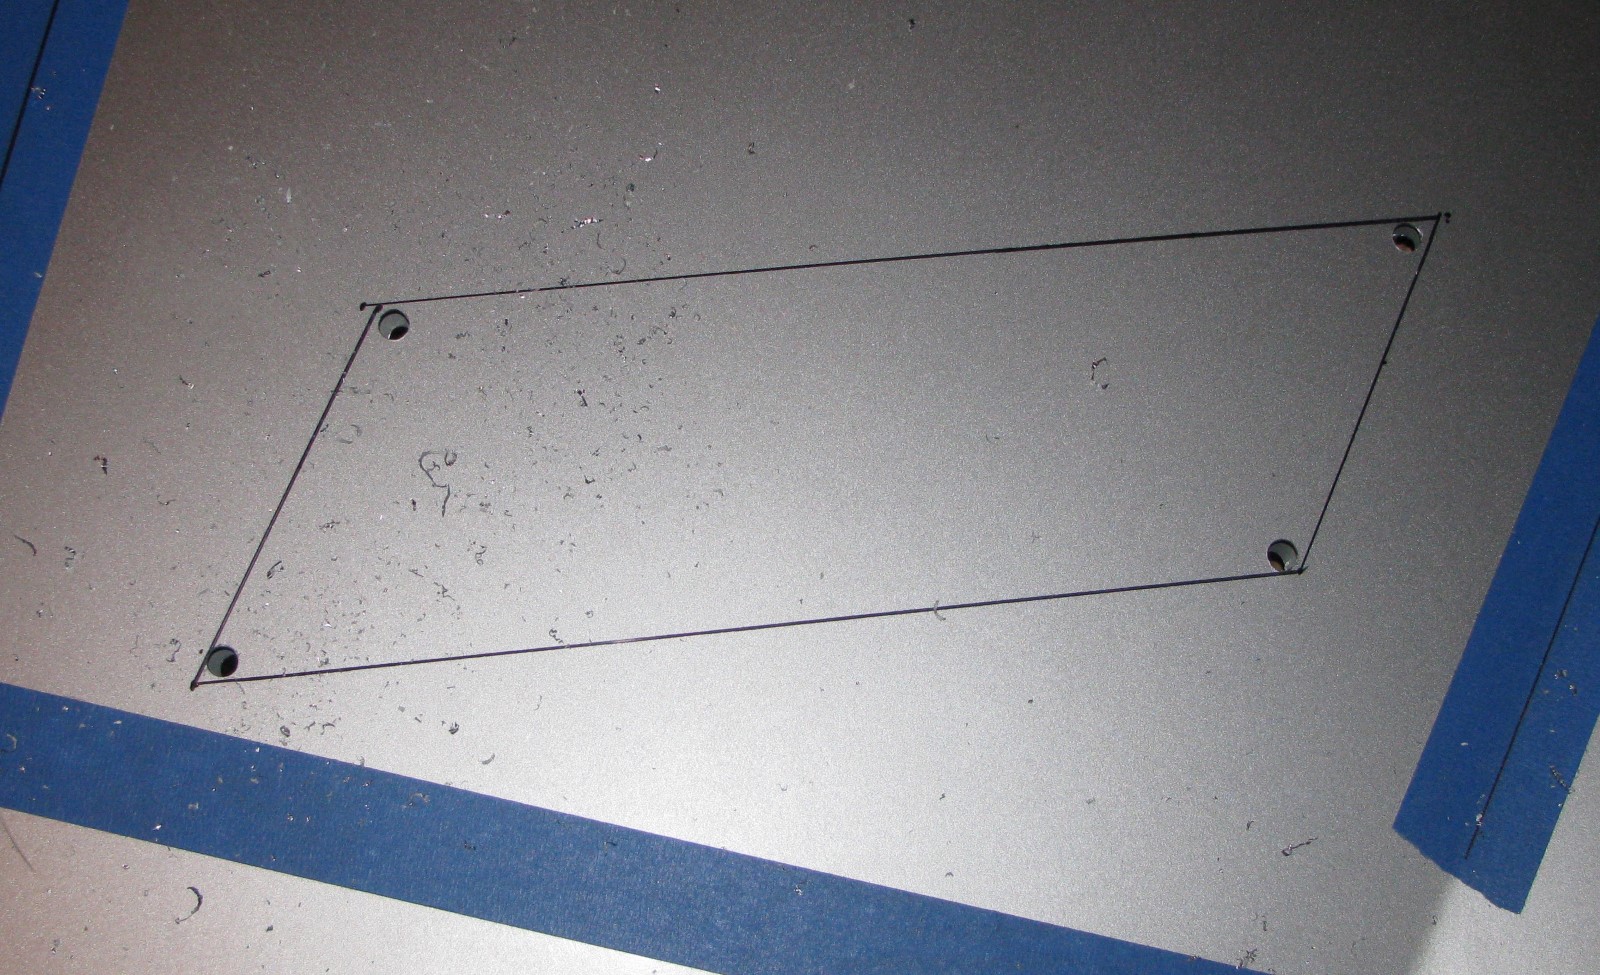
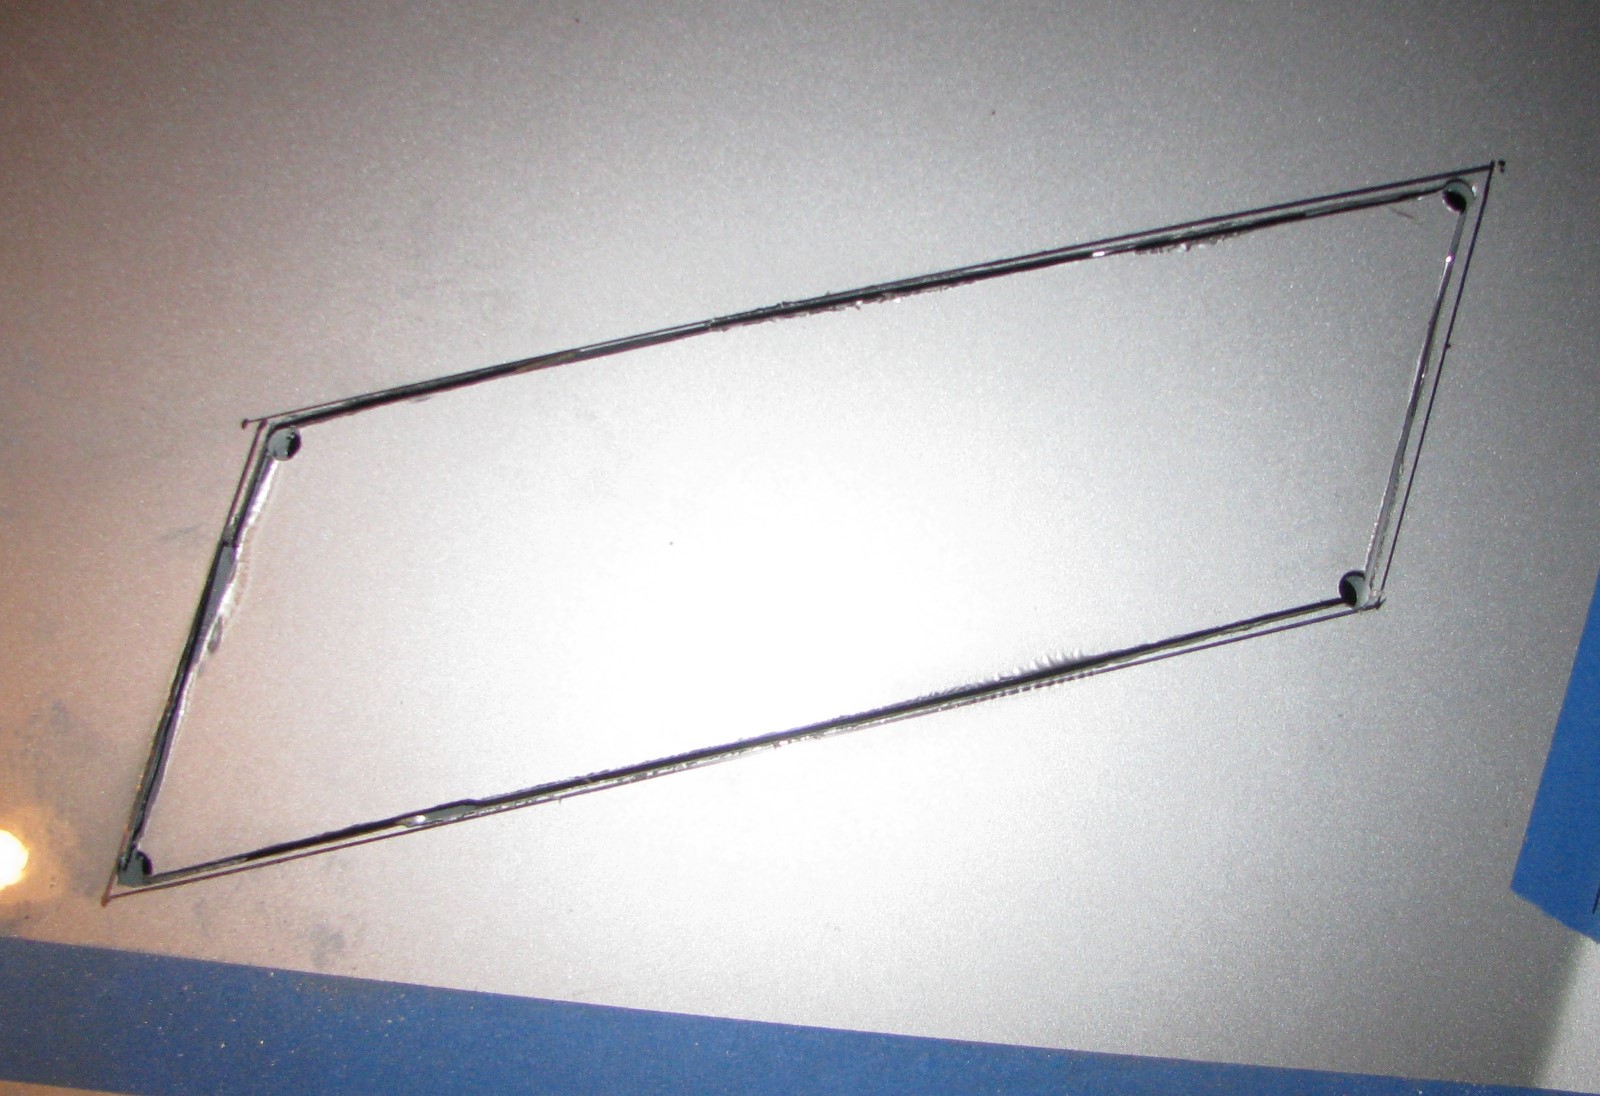

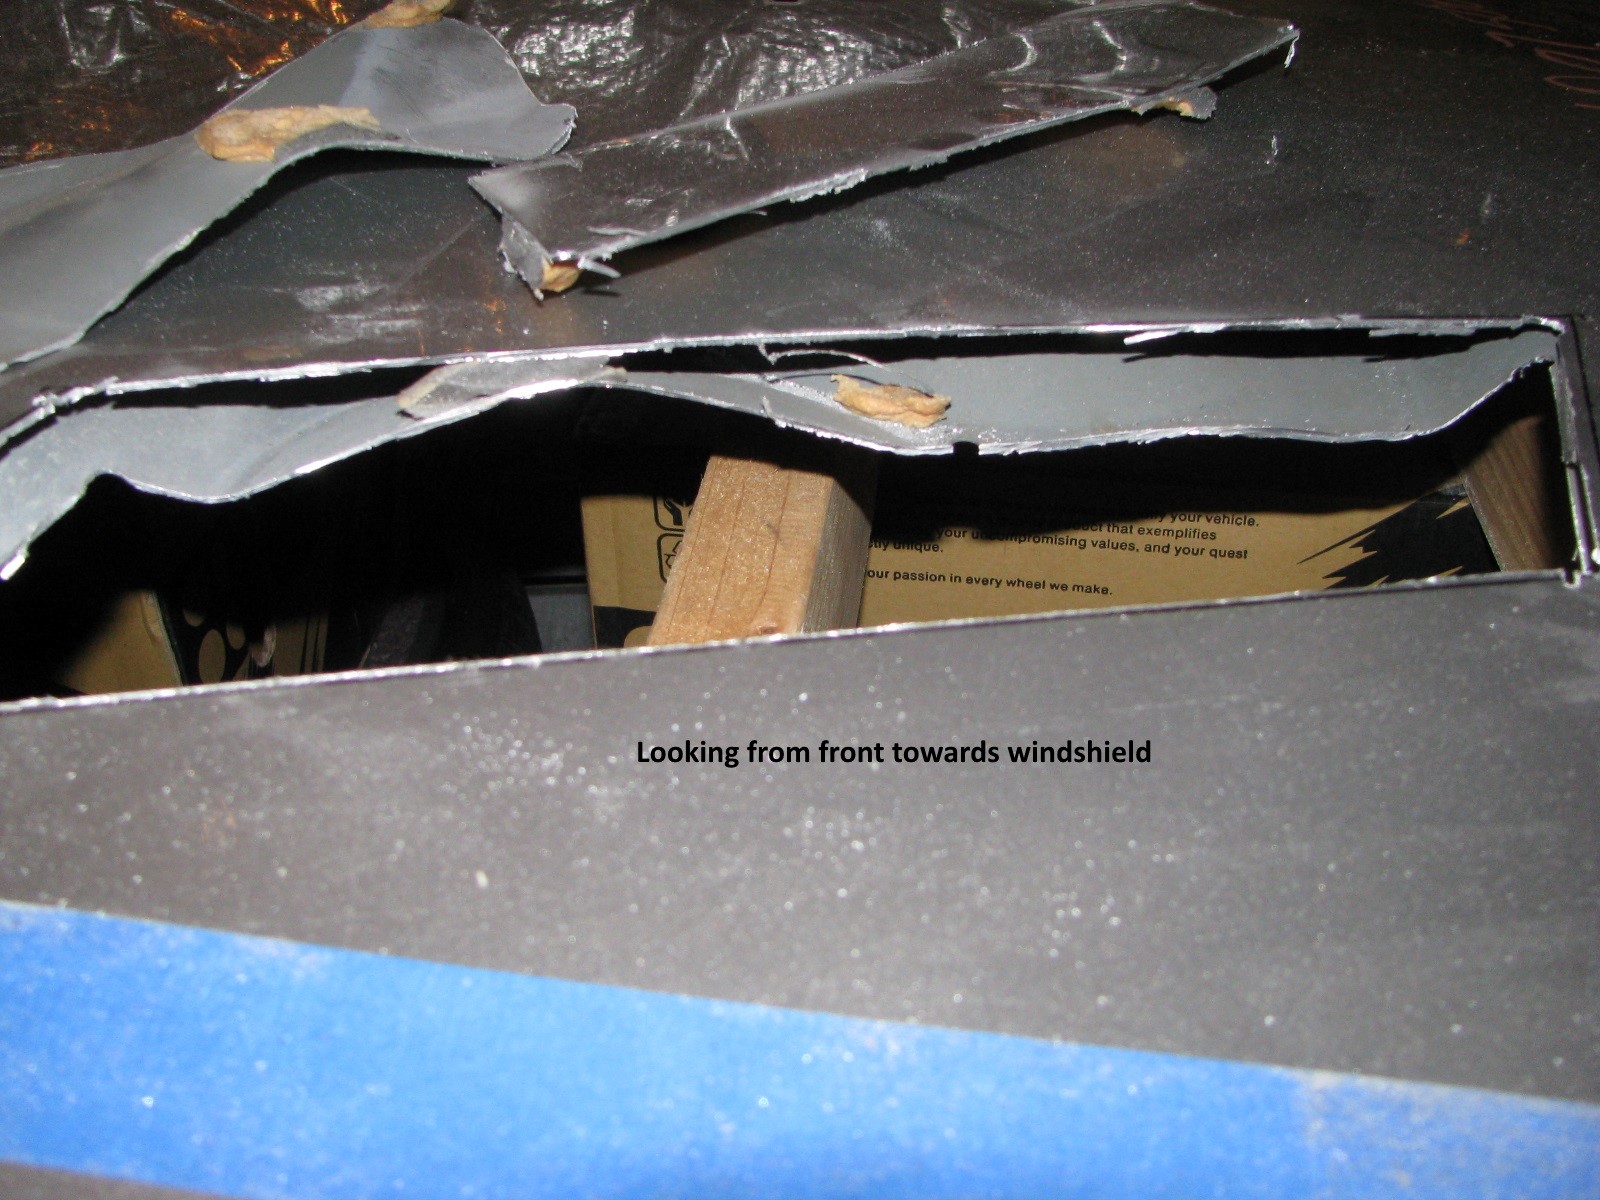
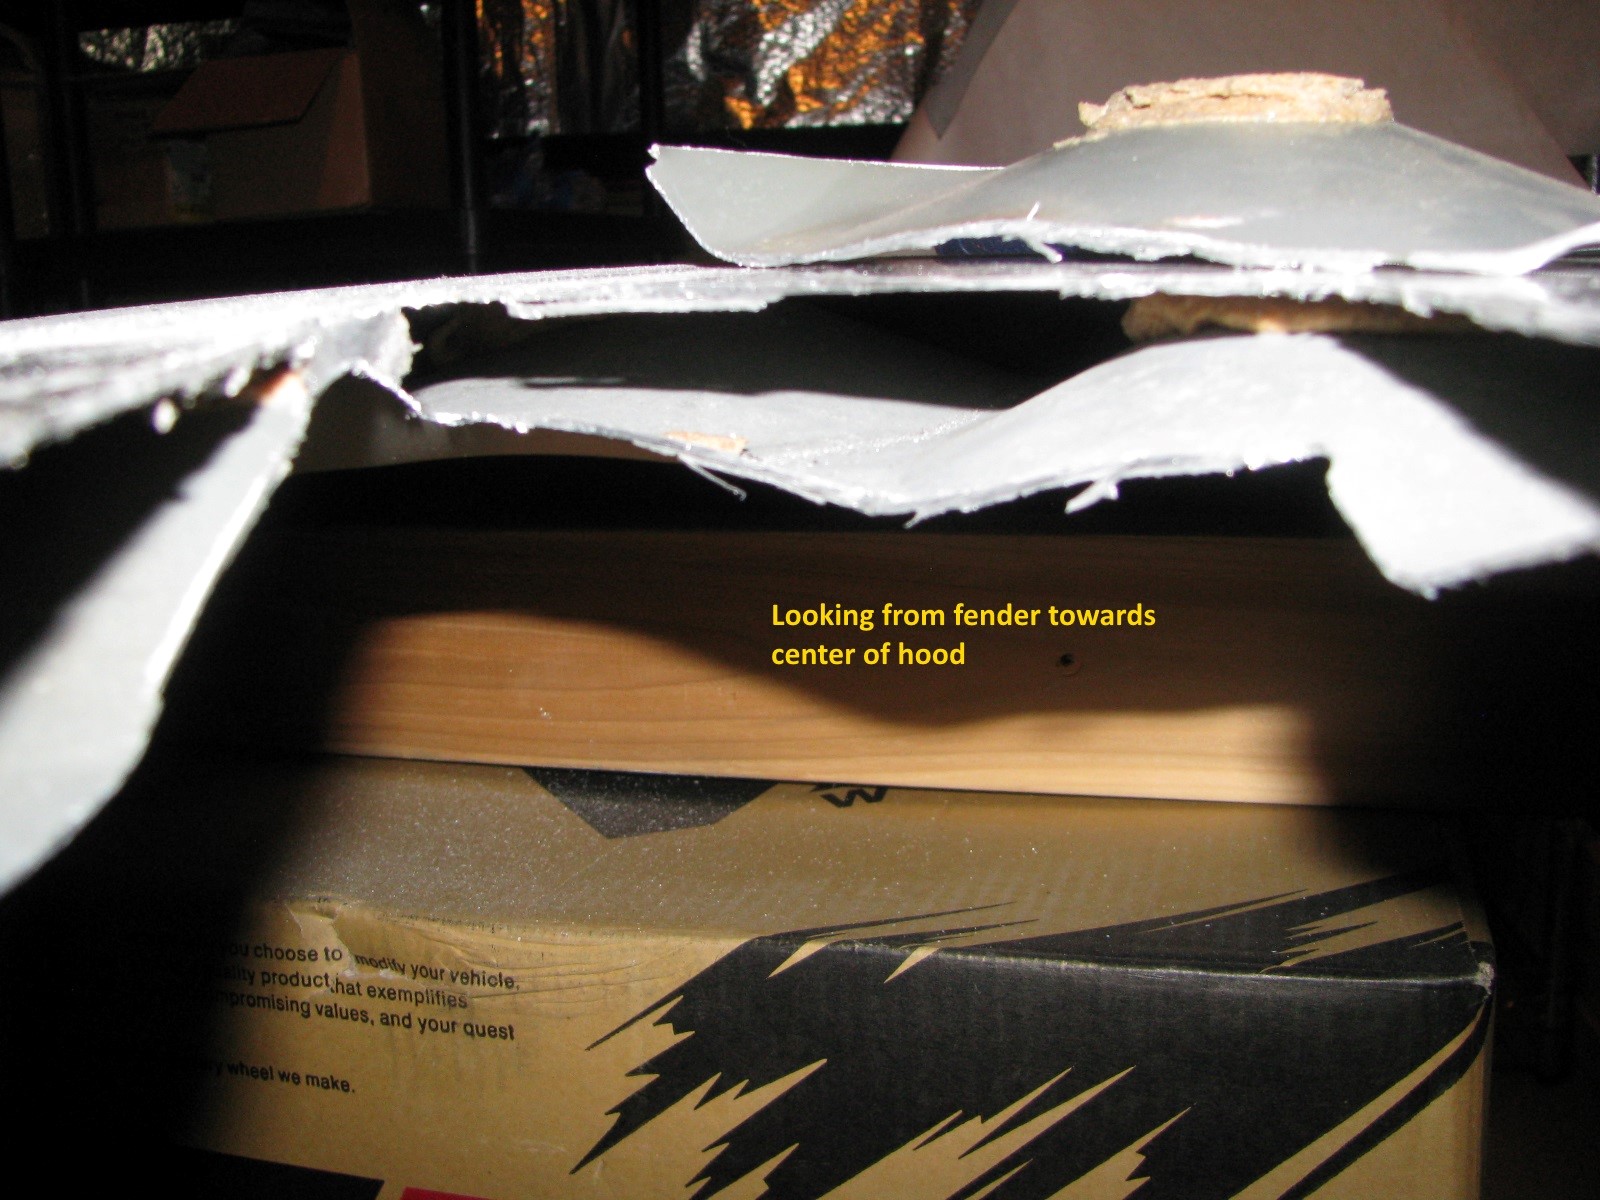
Now that I've got the first opening cut, I have a better idea of what's going inside the hood. I knew there was an inner and outer skin, but I wasn't sure how they were joined together to provide support. As you've seen if you've ever had the hood liner off, the inner skin has kind of a giant golfball pattern to it (as seen here), with each of the dimples being about 6 or 8" in diameter. It appears that the peak of each dimple has that foam adhesive to bond it to the outer skin. Cutting the opening leaves big gaps since the inner skin has that golfball pattern:
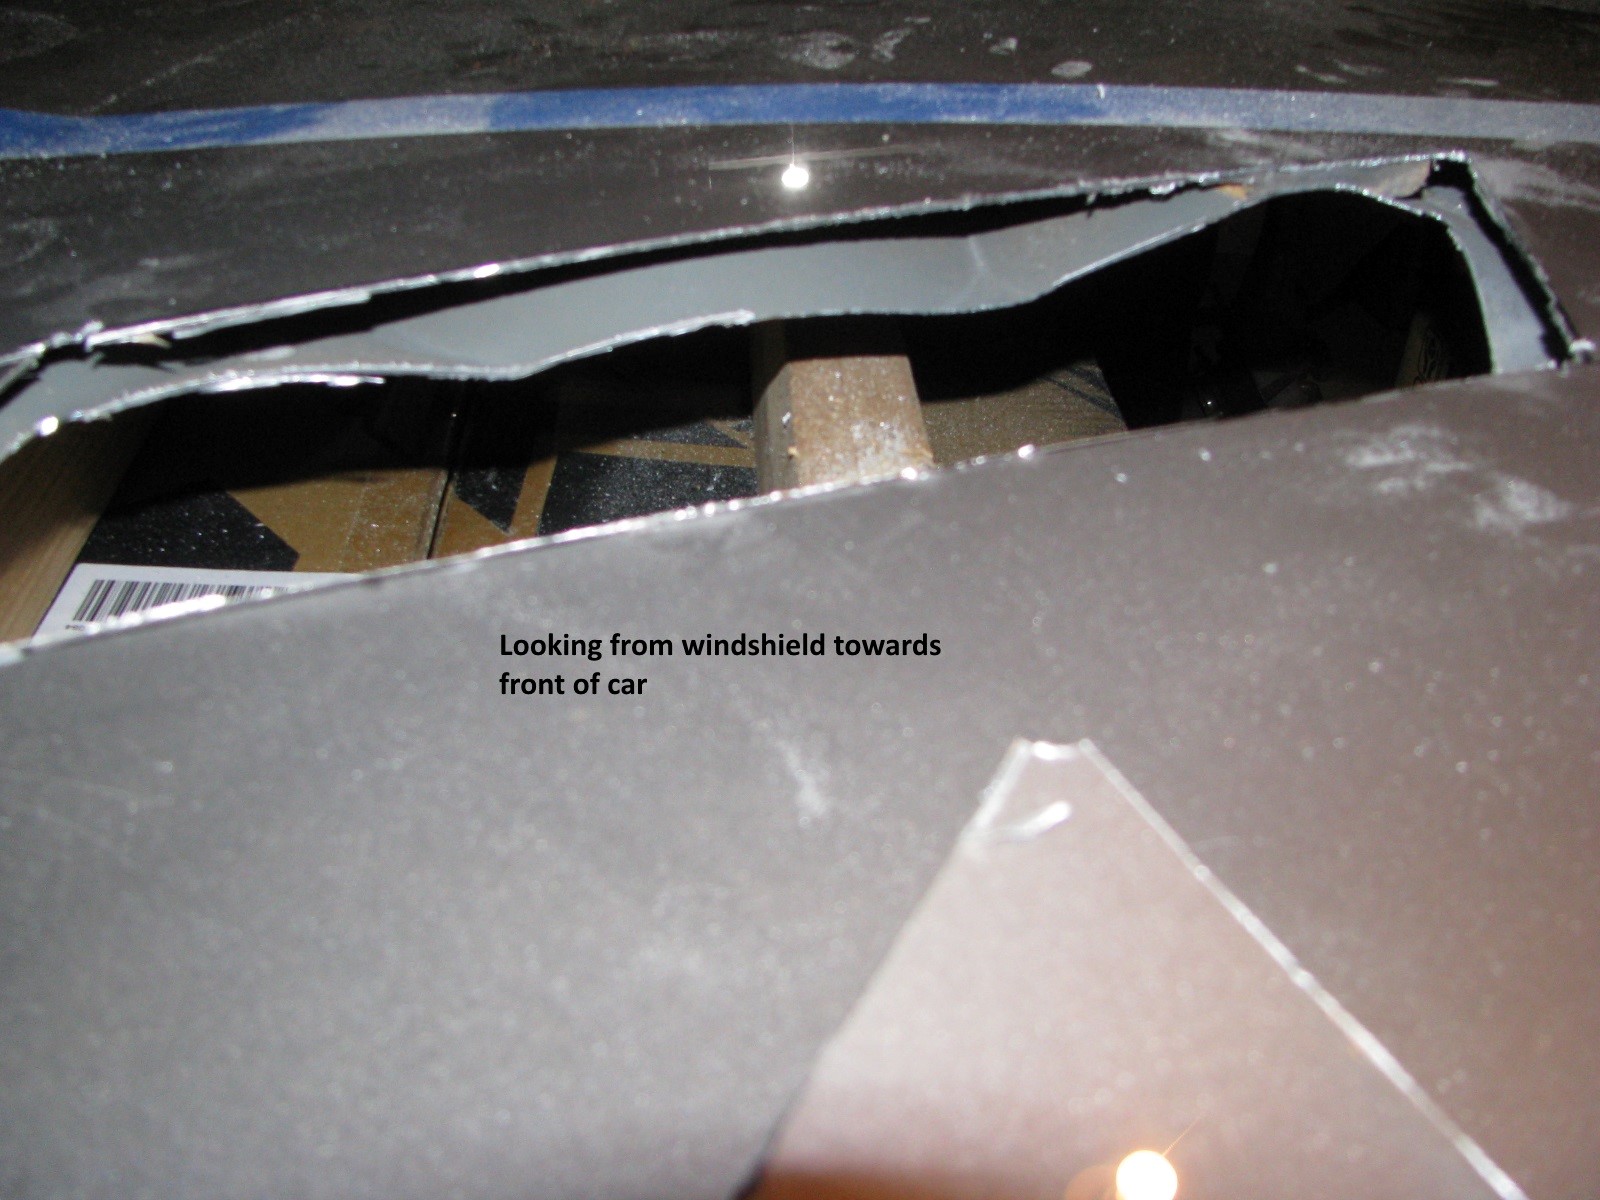
My initial thinking is that I can cut a series of slots perpendicular to the edge of the opening, and then bend the inner skin up to meet the outer skin. Probably seal over where they come together with foil tape to make it "air tight" and prevent air from getting crammed into that gap at the trailing edge of the opening. Remember, this is just a test with a $50 hood, not a final product.
Now that I've got the first opening cut, I have a better idea of what's going inside the hood. I knew there was an inner and outer skin, but I wasn't sure how they were joined together to provide support. As you've seen if you've ever had the hood liner off, the inner skin has kind of a giant golfball pattern to it (as seen here), with each of the dimples being about 6 or 8" in diameter. It appears that the peak of each dimple has that foam adhesive to bond it to the outer skin. Cutting the opening leaves big gaps since the inner skin has that golfball pattern:
My initial thinking is that I can cut a series of slots perpendicular to the edge of the opening, and then bend the inner skin up to meet the outer skin. Probably seal over where they come together with foil tape to make it "air tight" and prevent air from getting crammed into that gap at the trailing edge of the opening. Remember, this is just a test with a $50 hood, not a final product.
Last edited by AAIIIC; 07-28-2017 at 07:20 PM.


 07-22-2017, 12:32 PM
#1684

 07-22-2017, 01:11 PM
#1685
On The Tree

Installed a CTS arm rest and started prepping my shifter surround for vinyl.
Speaking of: does anyone know where to get a new silver piece that is right around the shifter/boot?
Speaking of: does anyone know where to get a new silver piece that is right around the shifter/boot?
Last edited by BaMaDuDe87; 07-22-2017 at 01:19 PM.
07-22-2017, 07:46 PM
#1686
Why didn't you use the oven cured version, and how much did you need?
 Time to look for a new battery.
07-22-2017, 10:14 PM
Time to look for a new battery.
07-22-2017, 10:14 PM
#1688
For a regular weight battery, it's hard to beat the Walmart Everstart Maxx 78N. Consumer Reports recommends due to performance, price, and warranty. I've had two, one of which I killed when my alternator died.
07-22-2017, 10:56 PM
#1689
Because the air cured is just as good and I didn't need to transport it to an oven large enough to bake a set of long tube headders.
Read the TDS and the application instructions on the site, it's almost idiot proof to put on properly.
But it's just as good as anything else I found on the market for heat blocking properties. I'm sure there is better out there but not so much information about the cerakote. It does work as advertised as demonstrated by many videos.
The wrap at this point is purely redundant.
-Byron
07-22-2017, 11:46 PM
#1690
Because the air cured is just as good and I didn't need to transport it to an oven large enough to bake a set of long tube headders.
Read the TDS and the application instructions on the site, it's almost idiot proof to put on properly.
But it's just as good as anything else I found on the market for heat blocking properties. I'm sure there is better out there but not so much information about the cerakote. It does work as advertised as demonstrated by many videos.
The wrap at this point is purely redundant.
-Byron
Last edited by FuzzyLog1c; 07-23-2017 at 12:07 AM.
07-23-2017, 04:58 AM
#1691
I don't buy it. Even if the material has a low coefficient of thermal conductivity, thickness is a factor. I haven't seen videos that provide credible evidence that Cerakote does anything beyond adding moderate corrosion resistance and a tiny bit of thermal insulation. Even Swain Tech White Lightning is not as effective as header wrap, so you can't say that wrap is redundant with Cerakote. I asked about why you picked the air cured version, since the oven cured version is much more durable. Figured I'd see whether you had experience or just took the easy route. Tons of people on various gun forums (where Cerakote is primarily used) identify that the air cured version can be rubbed or chipped off whereas the oven-cured version is much more impact and abrasion resistant. Since you bash the crap out of the headers every time you install or remove them, wear resistance is an important performance characteristic.
The heat blocking product isn't the same as the fire arm coating. You would know that if you had researched it properly.
Of course you could also leave the keyboard, pick up a phone and call them they will be happy to educate you as they did me. I too was wrong. Totally different products with totally different applications.
I can say it's redundant as the wrap is a back up to the coating. The two combined will keep the heat where it's supposed to be, and should the coating fail guess what? It's still wrapped. Thus the redundant statement.
I'm not attacking you. However if you properly research it as I did, to include digging around more on the C-7600 specs, reading the application guide and tds sheets and actually call them you will have a much better understanding of what it is and what it is not.
The heat blocking formula I purchased is designed to be air cured. The alternative products to the cerakote C-7600 required that I would spray it in one location and move it over 30 KM to another location to bake it. There is much more that went into my decision making process.
Were I you, I would start at cerrakote website under the high temp section and begin by actually reading the information on the site.
I compared the two types initially, the fire arm coating and the heat coating as I thought they were similar, and they are not.
I don't see the air cure as a cop out, but if you feel it is then you are entitled to your opinion. Further more the wrap should provide the additional "bash the crap out of it" protection. I'm wrapping it all the way down so I am pretty sure it's not going to rub off any time soon.
-Byron
07-24-2017, 09:45 AM
#1693
I don't see the air cure as a cop out, but if you feel it is then you are entitled to your opinion. Further more the wrap should provide the additional "bash the crap out of it" protection. I'm wrapping it all the way down so I am pretty sure it's not going to rub off any time soon.
-Byron
-Byron
07-28-2017, 09:37 PM
#1694
TECH Addict
iTrader: (19)
Join Date: Aug 2007
Location: Where the Navy tells me to go
Posts: 2,408
Received 107 Likes
on
89 Posts
- Changed the oil. Amazing, right?
- Replaced the oil temp / level sensor, as it has been reading inexplicably high (*) during the last two track events (which were not particularly hot events). When I disconnected the harness from the old sensor, the silicone/rubber seal inside stayed on the sensor. It didn't really click that I needed that seal until I went to plug the connector onto the new sensor and realized that little seal was not inside the female harness connector like it should be. Doh! I had already tossed the sensor in the trash, of course. Dug through the trash, found the sensor, but the lime green seal (which should've been pretty easy to spot) had magically teleported to an alternate dimension. Fock!
  I probably wouldn't worry too much about it if it was somewhere up high in the engine bay, but when it's down there on the side of the oil pan, presumably subjected to more road spray, I'd really like to have that properly sealed.
Looks like GM used that same harness connector (15326808 / ACDelco PT2647 / 13580871) in a million different places, so now the quandary is whether I just order a new connector from Luke @ Lindsay for ~$20, or spend ~2 hours driving to/from the junkyard this weekend to go find one for free. Hmmm...
[* - I say "inexplicably high", but maybe the sample I drew today to send off to Blackstone will tell me that the engine is eating itself. In the meantime, I've got an event next weekend, so I guess I'll just have to go pound on it some more. ]
]
- Replaced the oil temp / level sensor, as it has been reading inexplicably high (*) during the last two track events (which were not particularly hot events). When I disconnected the harness from the old sensor, the silicone/rubber seal inside stayed on the sensor. It didn't really click that I needed that seal until I went to plug the connector onto the new sensor and realized that little seal was not inside the female harness connector like it should be. Doh! I had already tossed the sensor in the trash, of course.
I probably wouldn't worry too much about it if it was somewhere up high in the engine bay, but when it's down there on the side of the oil pan, presumably subjected to more road spray, I'd really like to have that properly sealed.Looks like GM used that same harness connector (15326808 / ACDelco PT2647 / 13580871) in a million different places, so now the quandary is whether I just order a new connector from Luke @ Lindsay for ~$20, or spend ~2 hours driving to/from the junkyard this weekend to go find one for free. Hmmm...
[* - I say "inexplicably high", but maybe the sample I drew today to send off to Blackstone will tell me that the engine is eating itself. In the meantime, I've got an event next weekend, so I guess I'll just have to go pound on it some more.
]
07-29-2017, 10:55 AM
#1695
Added my $240 chinasetter headers.

The good. They are cheap.
The better they drop in!
Had to trim a slight bit off each collector to slide the clamps all the way back. That's it otherwise. I didn't even have to loosen up the steering shaft.
The bad. As with any long tube you loose a bit of clearance.
I am dropping it at the fab shop next week to Shorten the long tubes a bit. For 99% of users it won't matter. For me I'm that guy who lives in a country that absolutely loves speed bumps.
I will install my cats then take another video to see if the sound changes much. I'm sure it will be quieter.
If for some reason it doesn't play go here.
https://byronsworld.smugmug.com/2006...v2/i-rnSCFH8/A
Setup is long tubes, H pipe into stock mufflers and no cats at the taking of the video.
-Byron
Last edited by Byron; 07-29-2017 at 11:04 AM.


 07-31-2017, 10:16 AM
#1698
Teching In

Join Date: Jan 2014
Location: Lawrenceville, Ga
Posts: 46
Likes: 0
Received 0 Likes
on
0 Posts
 08-02-2017, 06:03 AM
#1699
TECH Addict
iTrader: (19)
Join Date: Aug 2007
Location: Where the Navy tells me to go
Posts: 2,408
Received 107 Likes
on
89 Posts
- Replaced the oil temp / level sensor, as it has been reading inexplicably high (*) during the last two track events (which were not particularly hot events). When I disconnected the harness from the old sensor, the silicone/rubber seal inside stayed on the sensor. It didn't really click that I needed that seal until I went to plug the connector onto the new sensor and realized that little seal was not inside the female harness connector like it should be. Doh! I had already tossed the sensor in the trash, of course. Dug through the trash, found the sensor, but the lime green seal (which should've been pretty easy to spot) had magically teleported to an alternate dimension. Fock! I probably wouldn't worry too much about it if it was somewhere up high in the engine bay, but when it's down there on the side of the oil pan, presumably subjected to more road spray, I'd really like to have that properly sealed.
I probably wouldn't worry too much about it if it was somewhere up high in the engine bay, but when it's down there on the side of the oil pan, presumably subjected to more road spray, I'd really like to have that properly sealed.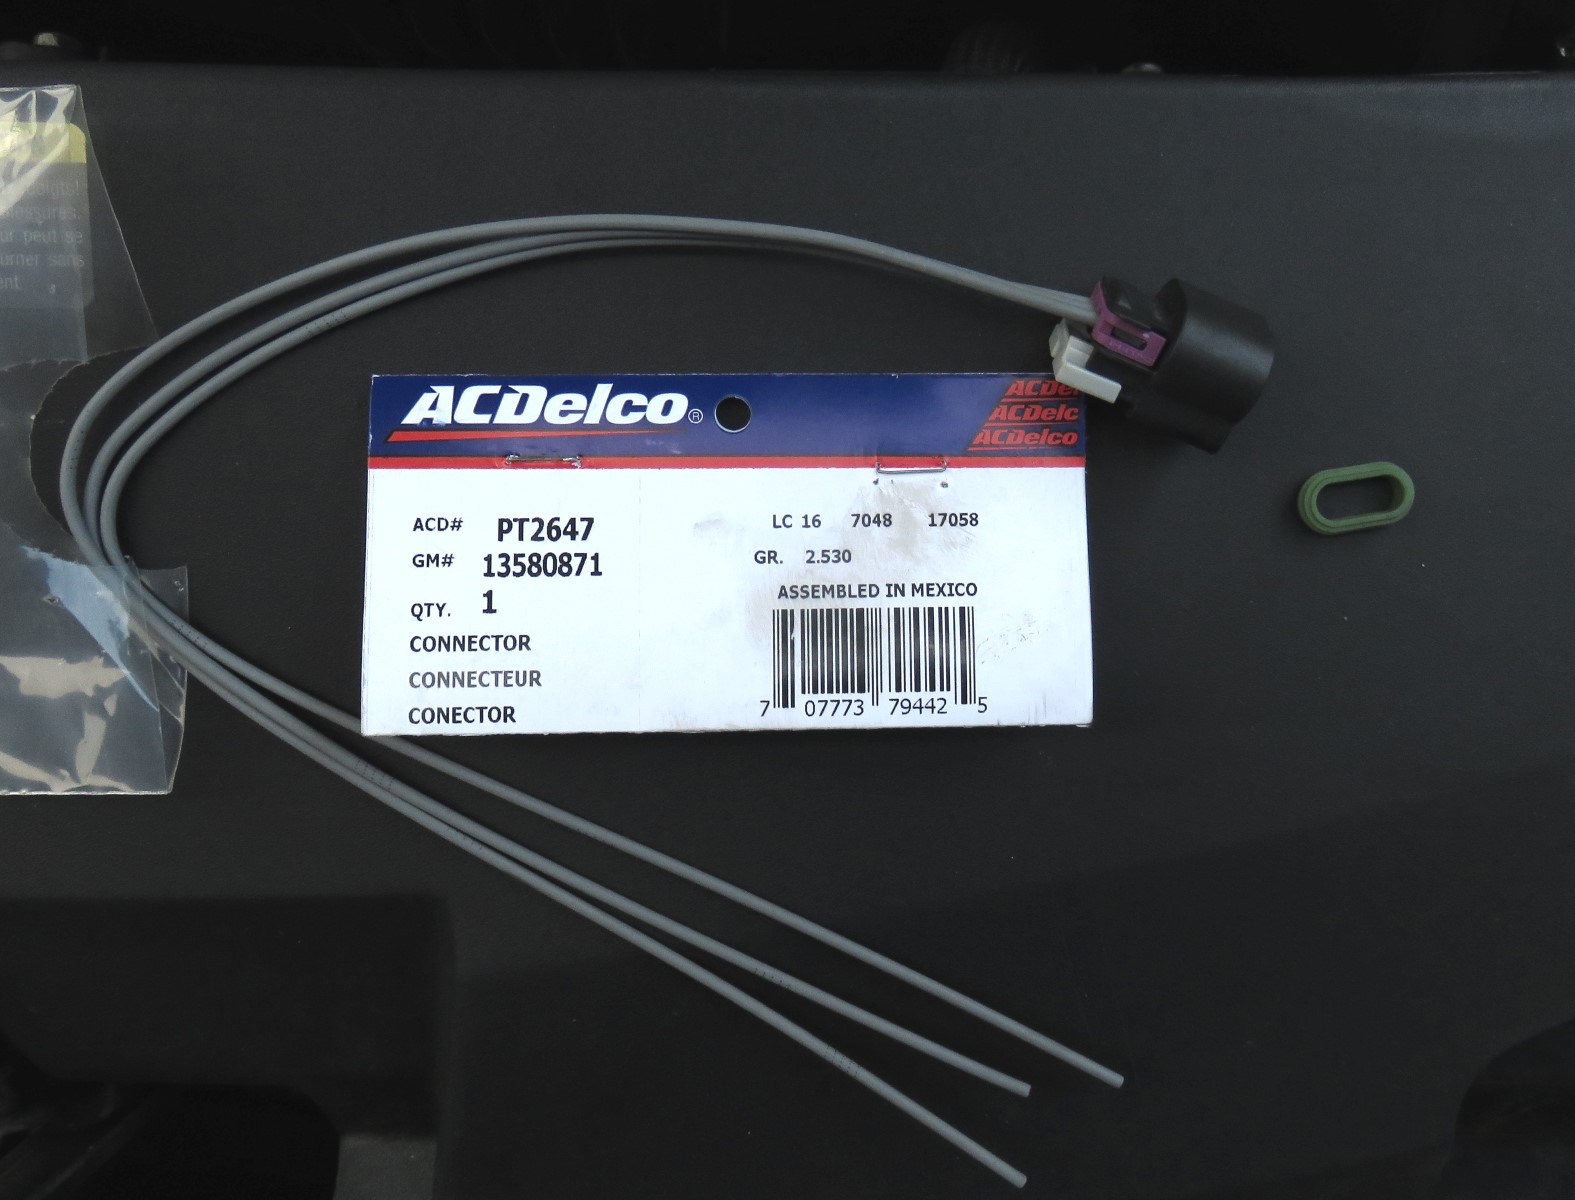
Jacked the car up and crawled underneath to put that seal in place. As I was under there I found that the wiring to the existing plug was damaged. I'm not sure if I fucked it up last weekend when I was messing with it or if it was already damaged. Perhaps it was already damaged and that's why I was getting oil temp readings that seemed too high? One wire had bare wire exposed and the other two were partially smashed/crimped.
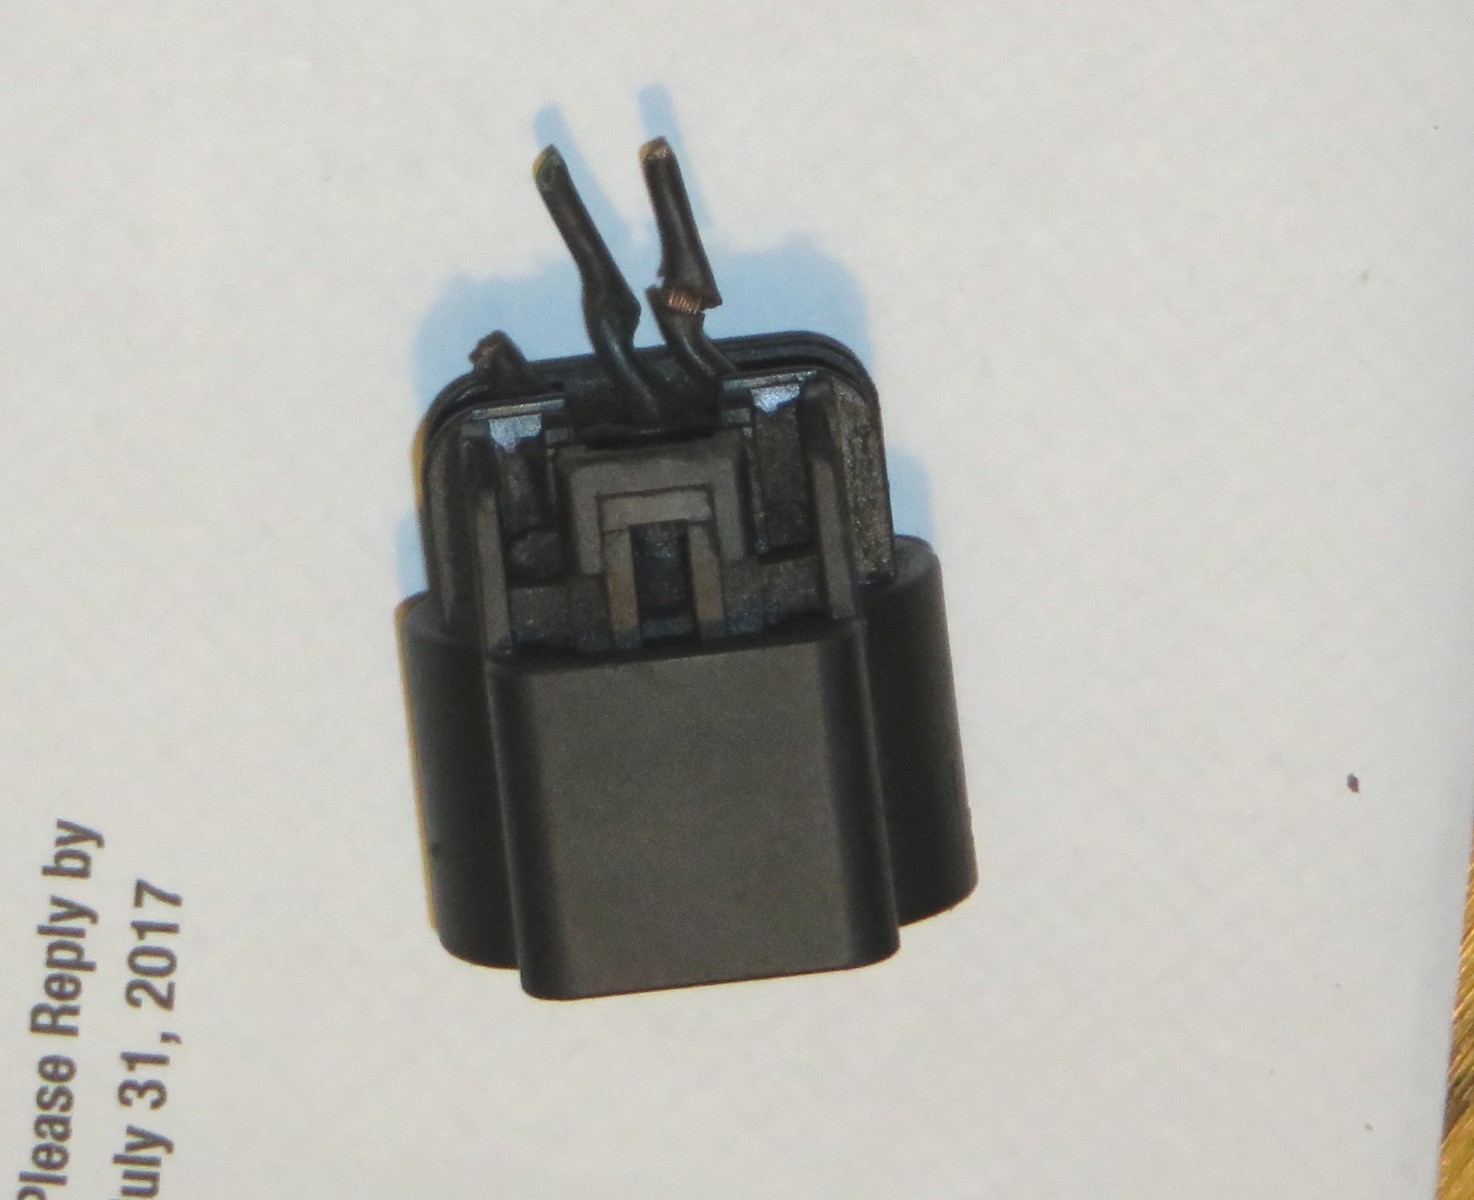
So, I cut off the old plug and spliced the new one on there.