
Kooks released new exhaust for f-body
 01-17-2011, 04:08 PM
#361
11 Second Club
Join Date: Oct 2004
Location: Camp Lejeune, NC
Posts: 332
Likes: 0
Received 0 Likes
on
0 Posts

i agree now since I went from 11.65 to 11.30 flat and i prolly could have gotten quicker if i let it cool down and made another pass, next task is to get it on the dyno to see what my increase in numbers are

 01-19-2011, 08:38 PM
#363
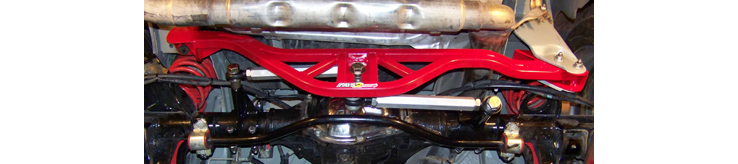
Please post some more pics of the over the axle area, between differential and exhaust, panhard bar and sway bar areas in relation to this exhaust -- I'm trying to see how well a Watts Link and Strano Adjustable Sway Bar would work with this setup...
THANKS!
THANKS!
 [/IMG]
01-20-2011, 08:16 PM
[/IMG]
01-20-2011, 08:16 PM
#365
11 Second Club
Join Date: Oct 2004
Location: Camp Lejeune, NC
Posts: 332
Likes: 0
Received 0 Likes
on
0 Posts
Ill get some more day light pics tomorrow up and over the axle from all diff angles and hope that helps out and ill also do it with a tape measure so you all can see what the exact measurements need to be up and over and clearance needs to be. Im sure as long as you have the 2 stock panhard bars removed and replaced with after market stuff it will work most likely.
01-25-2011, 03:55 PM
#366
Kooks finally put this unit on their website:
http://www.kookscustomheaders.com/show.php?pid=929
Also, I got a copy of their documentation that comes with this system -- pretty sparse. FYI, the text is copy & pasted below:
" 1998-2002 LS-1 Kooks Dual Exhaust
Installation Instructions
Thank you for your purchase, we appreciate your business.
Do not attempt this installation if proper safety equipment isn’t available to you. Seek the assistance of a professional installer. Read and understand all directions before starting any of the instruction process.
A life is highly recommended in the installation process of these components. If a vehicle lift in not accessible to you, a jack and four jack stands may be substituted. It is recommended to refer to your owner’s manual before raising and supporting any vehicle. A basic understanding of general hand tools and vehicle mechanics is also recommended/required.
Kooks LS1 Dual Exhaust requires the installation of Kooks LS1 headers, BMR drive shaft loop, Part #DSL001 and BMR drop panhard (trackbar), Part #PHR004, relocation brace. Kooks LS1 dual exhaust X-Pipe is a direct replacement for Kooks LS1 Y-Pipe.
After installing Kooks LS1 headers and removing original exhaust, proceed with the following steps on dual exhaust installation.
Install BMR drive shaft loop (Refer to BMR install instructions regarding any additional questions.)
-Remove existing support brace. (13mm bolts)
-Mark drive shaft to yoke position.
(It is recommended to reinstall drive shaft in the originally locked position.)
-Remove 7/16 bolts connecting drive shaft to the rear end yoke.
-Lover rear of drive shaft and slide BMR drive shaft loop over drive shaft,
-Re-install drive shaft and tighten bolts to factory specs.
Kooks Custom Headers – 141 Advantage Place. Statesville, NC 28677
www.kookscustomheaders.com
1of 2
Install BMR drop panhard support bar.
Refer to BMR install instructions regarding any additional questions,
-Remove original panhard bar and panhard support brace.
-Remove rear factory heat shields and replace with Kooks supplied hear wrap.
-Install BMR drop panhard support brace.
-Re-install original panhard bar or replace with adjustable aftermarket panhard bar if desired.
Install Kooks rear exhaust hangers
-Remove factory hangers and replace with Kooks factory replacement hangers.
-Also supplied are two additional hangers to be mounted off rear bumper support studs located to the inside of the each frame rail. Additional hangers are to aid in support and eliminate exhaust from sagging over time.
Install Kooks Exhaust System
*Note* Do Not tighten clamps or hangers until entire exhaust has been installed.
Align exhaust and tighten
*Note* If exhaust has clearance issues and check for proper alignment and
installation.
If additional assistance is needed, please contact Kooks Custom Headers
Toll free at 866 586 KOOK or contact your dealer.
Kooks Custom Headers – 141 Advantage Place. Statesville, NC 28677
www.kookscustomheaders.com
2 of 2
"
01-25-2011, 04:12 PM
#367
On The Tree
Join Date: Oct 2009
Location: Arizona
Posts: 135
Likes: 0
Received 0 Likes
on
0 Posts
If you really think that Corsa is even close in comparison to Magnaflow then you need to do a little more research there monkey.....
( and I am not bashing Magnaflow, its good for the price )
Nice set-up ponyeater
01-26-2011, 01:39 AM
#368
On The Tree
Join Date: Mar 2007
Location: Cincinnati
Posts: 104
Likes: 0
Received 0 Likes
on
0 Posts
Did you get that crooked left tip to straighten out? I'm having a hell of a time with mine. Been on stands for nearly 2 weeks now. I'd like to see someone install the over axle pipe without a lift. I couldn't do it.
01-26-2011, 03:09 PM
#369
11 Second Club
Join Date: Oct 2004
Location: Camp Lejeune, NC
Posts: 332
Likes: 0
Received 0 Likes
on
0 Posts
yea my left one was crooked at first but i loosed all the clamps up again and start tweekin again and got everything straight and fittin right and I also did mine on jack stands and only had it about at most a foot off the ground as you can see in my vid a few posts back.
01-26-2011, 08:44 PM
#370
Launching!
Join Date: Mar 2006
Location: Hinesville, GA
Posts: 290
Likes: 0
Received 0 Likes
on
0 Posts
Now we all know that Kooks puts out a superior product...
If you really think that Corsa is even close in comparison to Magnaflow then you need to do a little more research there monkey.....
( and I am not bashing Magnaflow, its good for the price )
Nice set-up ponyeater
If you really think that Corsa is even close in comparison to Magnaflow then you need to do a little more research there monkey.....
( and I am not bashing Magnaflow, its good for the price )
Nice set-up ponyeater

 01-31-2011, 03:01 PM
#373
11 Second Club
Join Date: Oct 2004
Location: Camp Lejeune, NC
Posts: 332
Likes: 0
Received 0 Likes
on
0 Posts
 01-31-2011, 03:04 PM
#374
11 Second Club
Join Date: Oct 2004
Location: Camp Lejeune, NC
Posts: 332
Likes: 0
Received 0 Likes
on
0 Posts
oh and I also have my complete interior ripped out so as far as comparing loudness interior wise I cant really say now but before the interior was tore out yes it was awesome

 01-31-2011, 05:00 PM
#378
Might want to phone Strano -- he already commented on a related topic:
https://ls1tech.com/forums/14415082-post41.html
https://ls1tech.com/forums/14415082-post41.html
 02-02-2011, 04:58 AM
#380
Might want to phone Strano -- he already commented on a related topic:
https://ls1tech.com/forums/14415082-post41.html
https://ls1tech.com/forums/14415082-post41.html