When you click on links to various merchants on this site and make a purchase, this can result in this site earning a commission. Affiliate programs and affiliations include, but are not limited to, the eBay Partner Network.
My '99 Z28's e-brake has always pulled up to almost a 90 degree angle and barely hold. I put new rear rotors on last week and tried to adjust it by the adjusters screws and I think they're broke. The driver side adjuster stays completely closed no matter how much you turn it, and the passenger side adjuster looks about a 1/4 open and doesn't move either. After turning them quite a bit there was no difference in the tension of the e-brake. Can the adjusters be serviced with removing the axles and backing plates from the rearend?
Yes, you can service this. You just need to take the mechanism apart and lube it.
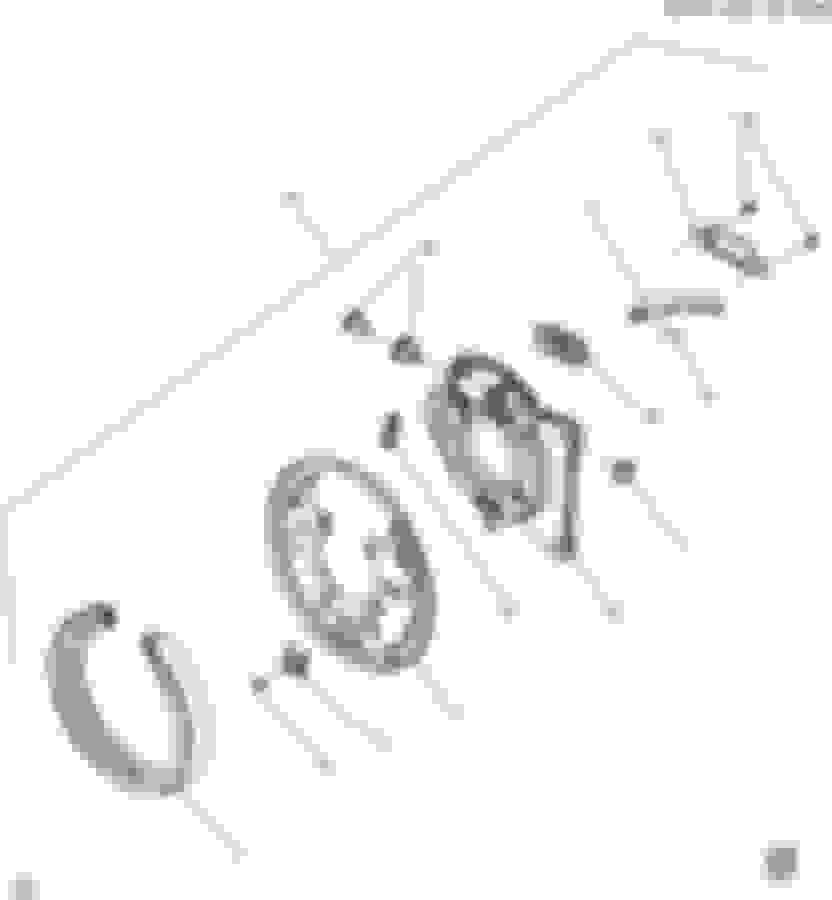
It sounds like the two pieces of #10 are seized together for you. In a normal situation, the barrel is keyed in to the backing plate and the screw moves in and out, adjusting the mechanism. If it seizes up, it might not turn or it could pop out and rotate without the screw moving in relation to the barrel.
Over 130K miles, I've had this part seize up on me once and I lubricate these parts ever time I do the rear brakes now. The pieces are brass so they won't rust together too bad, but they will be bitch to get a part. Just clean all the oil/grease off of them, use penetrating oil if you have to, and take your time. (You don't want to gall them with a pair of pliers, etc.) When you are done and put everything back together with proper brake lube, the "pin" on the clip attached to the backing plate and the prawls around the screw part will "click" as you rotate the screw and you should be able to accurately meter the adjustment: https://ls1tech.com/forums/suspensio...ing-brake.html
Some hints:
- Watch out for the pin, part #9, and don't loose it. It can easily be forgotten inside the bore of the baking plate or lost in a blob of used lube.
- Be sure to change the rubber lever boots while you are at this. It's the perfect time, while the tension is off the levers. This is the only place we know of that you can get just the proper boots: (at the moment - this is also a fair price) http://www.ebay.com/itm/1998-2002-Camaro-Firebird-Parking-Brake-Boot-Kit-2-boots-OEM-PBR-4-screws-/112106608224?vxp=mtr
Yes, you can service this. You just need to take the mechanism apart and lube it.
It sounds like the two pieces of #10 are seized together for you. In a normal situation, the barrel is keyed in to the backing plate and the screw moves in and out, adjusting the mechanism. If it seizes up, it might not turn or it could pop out and rotate without the screw moving in relation to the barrel.
Over 130K miles, I've had this part seize up on me once and I lubricate these parts ever time I do the rear brakes now. The pieces are brass so they won't rust together too bad, but they will be bitch to get a part. Just clean all the oil/grease off of them, use penetrating oil if you have to, and take your time. (You don't want to gall them with a pair of pliers, etc.) When you are done and put everything back together with proper brake lube, the "pin" on the clip attached to the backing plate and the prawls around the screw part will "click" as you rotate the screw and you should be able to accurately meter the adjustment: https://ls1tech.com/forums/suspensio...ing-brake.html
Some hints:
- Watch out for the pin, part #9, and don't loose it. It can easily be forgotten inside the bore of the baking plate or lost in a blob of used lube.
- Be sure to change the rubber lever boots while you are at this. It's the perfect time, while the tension is off the levers. This is the only place we know of that you can get just the proper boots: (at the moment - this is also a fair price) 1998 2002 Camaro Firebird Parking Brake Boot Kit 2 Boots PBR 4 Screws | eBay
I need to remove the e-brake shoe and then I can remove the adjustment mechanism? Does it just unscrew or is there a process to remove it? I ordered the lever boots last night from O'Reillys, Dorman makes them now.
I ordered the lever boots last night from O'Reillys, Dorman makes them now.
These aren't a perfect match. They are off a bit. There were several models that used similar types of mechanisms and these Dorman boots seem to me to be a generic wild card that might fit multiple models.
I need to remove the e-brake shoe and then I can remove the adjustment mechanism? Does it just unscrew or is there a process to remove it?
You need to take the brake shoe off. Once you do that, all the pieces will come out. That is easier said than done on some models...
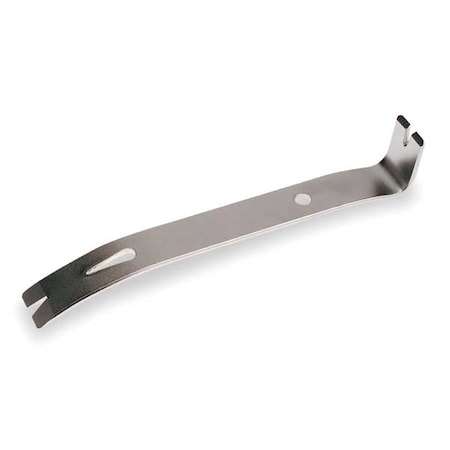
The brake shoe is held in place by a single screw and clip, #2 & #3. Some axles have a hole in them so you can put a screw driver or nut driver to this, but (like mine) many don't. I've found that the ONLY way I can get this screw out is to use a ratcheting screw driver like this:
and then use a mini pry bar like this to put pressure on the screw as I'm loosening it. (I wedge the bar between the axle flange and the head of the ratcheting screw driver.)
^ This really sucks the first time you have to do it, but its one of those things that gets really easy afterwards.
Those Dorman boots are a PITA to install, even with the whole backing plate assembly removed and on a work bench. The boots are to big to compress first off, and to small to fit flush around there mounting area they go over. I got them to work and tightened down the bracket #12 that holds them on but they are not 100% flush for a great seal…good enough for me though cleaned, painted, waterproofed greased everything, should hold up for a long time, just a PITA.
Also the Dorman boots fit on a certain way they are not symmetrical, one side of the boot is more con caved to allow for part #11 to pull back into when engaging the parking brakes.
Basically just do what wssix99 says and get the right boots. The Dormans will work but man are they a PITA to get on!
I completely missed the info and link about your rubber nipple modification.
The Dormans are no where near the proper part, but I made them work, I was in a rush at the time and had to get my backing plates to MWC to be put on the Fab 9, Jason, Kevin @ MWC said they were the nicest backing plates they had ever seen that weren't brand new ones, I put some serious time into them, wanted everything on the rear end to basically be new. I put so much waterproofing grease in them hopefully it will keep the dirt, water, out. Only time will tell how long the rubber will last.
The rubber nipple mod will be next depending how long these stay good for.
Yea, that's why I tossed the Dormans in the trash. I put them side by side with the original ones I took off for the rubber nipple mod and they were so far off, my inner-mechanic said, "No way!"
I went and ordered the proper eBay boots just in case my nipples tear and they measure up perfectly. They are the real deal.
6 Common C5 Corvette Failures and What's Involved In Repairing Them
Slideshow: From wobbling harmonic balancers to failed EBCMs, these are the issues that define long-term C5 ownership and what repairs typically involve.
Retro Modern Bandit Pontiac Trans AM Comes With Burt Reynolds' Autograph
Slideshow: A modern Camaro transformed into a retro icon, this limited-run "Bandit" build blends nostalgia with brute force in a way few revivals manage.
Top 10 Greatest Cadillac V Series Performance Models Ever, Ranked
Slideshow: Cadillac didn't just crash the high-performance luxury vehicle party, it showed up loud, supercharged, and occasionally a little unhinged...
Coachbuilt N2A Anteros Is an LS2-Powered C6 Corvette In Italian Clothes
Slideshow: A one-off sports car that looks like a vintage Italian exotic-but hides a C6 Corvette underneath-just sold for the price of a new mid-engine Corvette.