


 I like it, if you want cut the front spring 1 full coil and it will drop it enough to keep the ride height nice.


Project Budget 10 Second Camaro Thread
Thread Starter
TECH Fanatic
iTrader: (12)
Joined: Aug 2007
Posts: 1,818
Likes: 1
From: Cornfields near Pontiac, IL
Updates 10/16/09
Bought a third gen Camaro RS to daily drive/restore/modify so Ive been busy with that. Id post pictures but I want to keep this on topic. Im going to make a build thread for that as well on thirdgen.org under my old name as Camrs89.
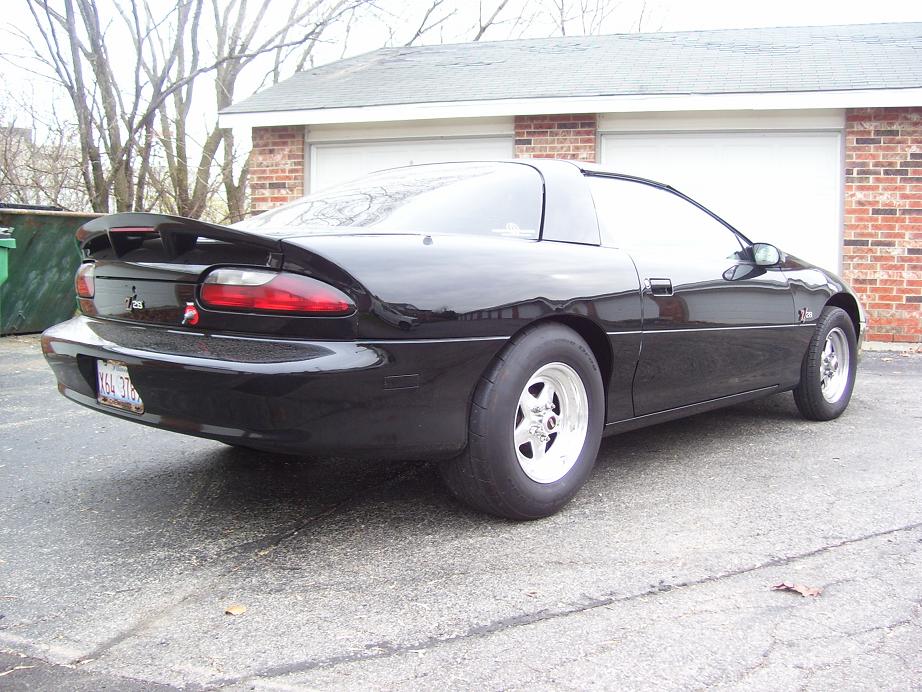
Did however drive the 94 to work the other day to put in the Eibach rear springs my friend (AM MUSCLE) gave me for my car. They dropped the right rear from 29.25 to 27.5 fender to ground height and the left rear from 29 to 28 inches. Really filled out the rear gap and seems pretty even all the way around.
The springs were really easy to install. I lifted the car up on the rack about a foot or so and jacked up the rear axle as well. Pulled the carpet back on the inside and unbolted the top of the shocks. Then I SLOWLY let the rear end drop and was able to slide the old springs out. I took the rubber bushing? and installed it on the top of the Eibach springs and slid them in making sure they were jacked the axle back up so I could bolt the shocks back on. After tightening the bolts and reinstalling the carpet, the rears were done.
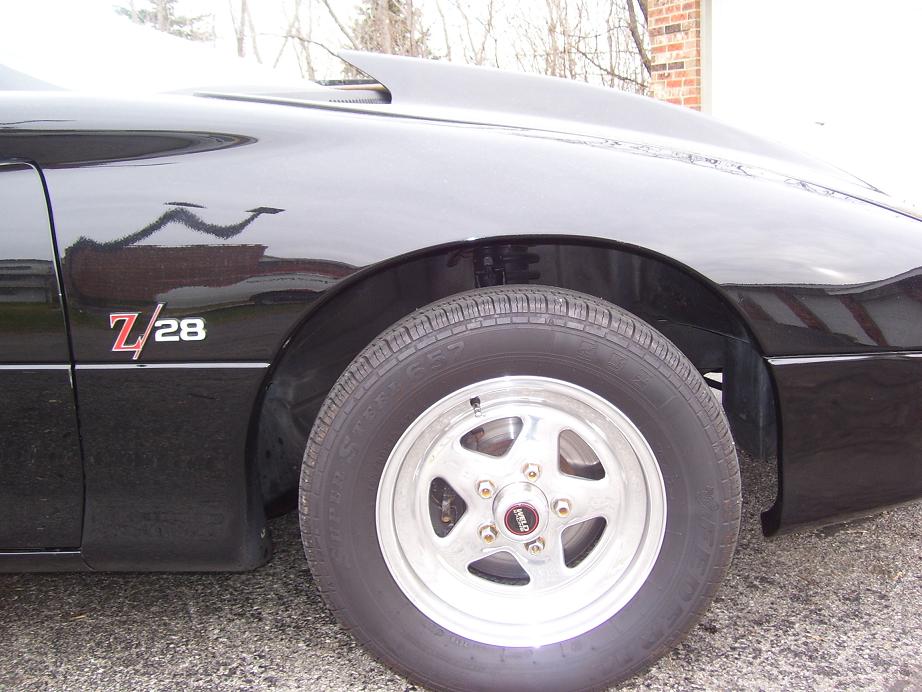
I do need to figure out what I want to do for the front. Can I cut the springs down or whats the best way? I have 4 inches of gap between the tire and the wheel. Although the car is level right now at give or take a half inch at 27.5, I would like the gap to close in a bit.
Took a couple pictures this morning since it was dark after I got home last night...
Really like the even gap all the way around. Makes the tires look more aggressive IMO

Still need to figure out the front, 4 inches of gap here...
Some full body shots...


Bought a third gen Camaro RS to daily drive/restore/modify so Ive been busy with that. Id post pictures but I want to keep this on topic. Im going to make a build thread for that as well on thirdgen.org under my old name as Camrs89.
Did however drive the 94 to work the other day to put in the Eibach rear springs my friend (AM MUSCLE) gave me for my car. They dropped the right rear from 29.25 to 27.5 fender to ground height and the left rear from 29 to 28 inches. Really filled out the rear gap and seems pretty even all the way around.
The springs were really easy to install. I lifted the car up on the rack about a foot or so and jacked up the rear axle as well. Pulled the carpet back on the inside and unbolted the top of the shocks. Then I SLOWLY let the rear end drop and was able to slide the old springs out. I took the rubber bushing? and installed it on the top of the Eibach springs and slid them in making sure they were jacked the axle back up so I could bolt the shocks back on. After tightening the bolts and reinstalling the carpet, the rears were done.
I do need to figure out what I want to do for the front. Can I cut the springs down or whats the best way? I have 4 inches of gap between the tire and the wheel. Although the car is level right now at give or take a half inch at 27.5, I would like the gap to close in a bit.
Took a couple pictures this morning since it was dark after I got home last night...
Really like the even gap all the way around. Makes the tires look more aggressive IMO
Still need to figure out the front, 4 inches of gap here...
Some full body shots...
that thing is lookin sexy Mike glad I could be of service, I just e-mailed the trans guy about the TH400 we'll have to see what he says, if I can do that instead then I'm goin for it.
hopefully i'll be gettin your same hood soon too...I just realized we're gonna have almost identical cars with different colors seeing as I just bought my weld wheels too!
hopefully i'll be gettin your same hood soon too...I just realized we're gonna have almost identical cars with different colors seeing as I just bought my weld wheels too!
Thread Starter
TECH Fanatic
iTrader: (12)
Joined: Aug 2007
Posts: 1,818
Likes: 1
From: Cornfields near Pontiac, IL
Awhile back I purchased some Competition Engineering SFC's from Summit Racing. I actually had a chance to install them this afternoon/evening at my friends house.
I bought the bolt on ones, which I was going to bolt on and then weld in to double the strength, but my friend was low on welding wire so I am going to have to pick some wire and weld them up at a later date.
Install wasnt too difficult once I found drill bits that actually worked. The instructions provided were pretty straightforward. I got the car level on 4 jackstands about a foot or so off the ground. Then they tell you to pull your door sill plates off and pull your carpet back some (which reminded me I need to POR15 the floors soon) Heres a picture of how far to pull back the carpet...

Then with a 18 mm socket on an impact on the LCA bolt and a wrench holding the nut, I zipped the drivers side loose, pulled the bolt out and slid the SFC on and reinstalled the bolt. Then I found where the front of the connector is supposed to go and you need to drill 2 holes into the floorboard. I took a Sharpie Marker and marked the two spots I needed to drill. Grabbed a 13/32nds drill bit and drilled the holes. Then you need to install the bolts through the holes and put the provided nuts on. The Competition Engineering SFC's make a little bracket on the connectors that the fuel lines run in, so you need to slide those in. After that is all done, I went to the back again and there are two more holes you will need to drill. After those holes are drilled, they give you a plate you slide in above the LCA mount and the bolts will thread into the plate for added strength. Here is a picture of the rear bolts, you can also see the plate tab that is hanging down a little bit also...

Then I did the same thing to the passenger side, except I could not get the LCA bolt out all the way. My solution to this was to notch the LCA a little to slide over the bolt. Once the bolt is tightened, it will not move anyways, so I slid the SFC on, tightened the bolt down and mounted the SFC to the front of the car as seen here...

Then I just repeated the steps I did on the drivers side and installed the back support...

After that, just lower the car back down and make sure all the bolts are tight. I drove a couple miles home and the Camaro did seem alot stiffer and less "rattley" Worth the $200 IMO.
I bought the bolt on ones, which I was going to bolt on and then weld in to double the strength, but my friend was low on welding wire so I am going to have to pick some wire and weld them up at a later date.
Install wasnt too difficult once I found drill bits that actually worked. The instructions provided were pretty straightforward. I got the car level on 4 jackstands about a foot or so off the ground. Then they tell you to pull your door sill plates off and pull your carpet back some (which reminded me I need to POR15 the floors soon) Heres a picture of how far to pull back the carpet...
Then with a 18 mm socket on an impact on the LCA bolt and a wrench holding the nut, I zipped the drivers side loose, pulled the bolt out and slid the SFC on and reinstalled the bolt. Then I found where the front of the connector is supposed to go and you need to drill 2 holes into the floorboard. I took a Sharpie Marker and marked the two spots I needed to drill. Grabbed a 13/32nds drill bit and drilled the holes. Then you need to install the bolts through the holes and put the provided nuts on. The Competition Engineering SFC's make a little bracket on the connectors that the fuel lines run in, so you need to slide those in. After that is all done, I went to the back again and there are two more holes you will need to drill. After those holes are drilled, they give you a plate you slide in above the LCA mount and the bolts will thread into the plate for added strength. Here is a picture of the rear bolts, you can also see the plate tab that is hanging down a little bit also...
Then I did the same thing to the passenger side, except I could not get the LCA bolt out all the way. My solution to this was to notch the LCA a little to slide over the bolt. Once the bolt is tightened, it will not move anyways, so I slid the SFC on, tightened the bolt down and mounted the SFC to the front of the car as seen here...
Then I just repeated the steps I did on the drivers side and installed the back support...
After that, just lower the car back down and make sure all the bolts are tight. I drove a couple miles home and the Camaro did seem alot stiffer and less "rattley" Worth the $200 IMO.
Last edited by Black94Z28; Nov 20, 2009 at 07:41 PM.
LS1 Tech Stories
The Best V8 Stories One Small Block at Time

Gas Monkey Built a 6-Wheel Ferrari Testarossa With a Corvette LT4 Engine
Verdad Gallardo
7 Most Reliable High-Performance Engines GM Has Ever Built
Verdad Gallardo
Amazing '71 Camaro Restomod Is Modern Muscle Car Under the Skin
Verdad Gallardo
6 Common C5 Corvette Failures and What's Involved In Repairing Them
Pouria Savadkouei
Retro Modern Bandit Pontiac Trans AM Comes With Burt Reynolds' Autograph
Verdad Gallardo
Top 10 Greatest Cadillac V Series Performance Models Ever, Ranked
Pouria Savadkouei
Top 10 Most Powerful Chevy Trucks Ever Made!

Hennessey's New Supercharged Silverado ZR2 Has 700 HP
Verdad Gallardo
Coachbuilt N2A Anteros Is an LS2-Powered C6 Corvette In Italian Clothes
Verdad Gallardo Thread Starter
TECH Fanatic
iTrader: (12)
Joined: Aug 2007
Posts: 1,818
Likes: 1
From: Cornfields near Pontiac, IL
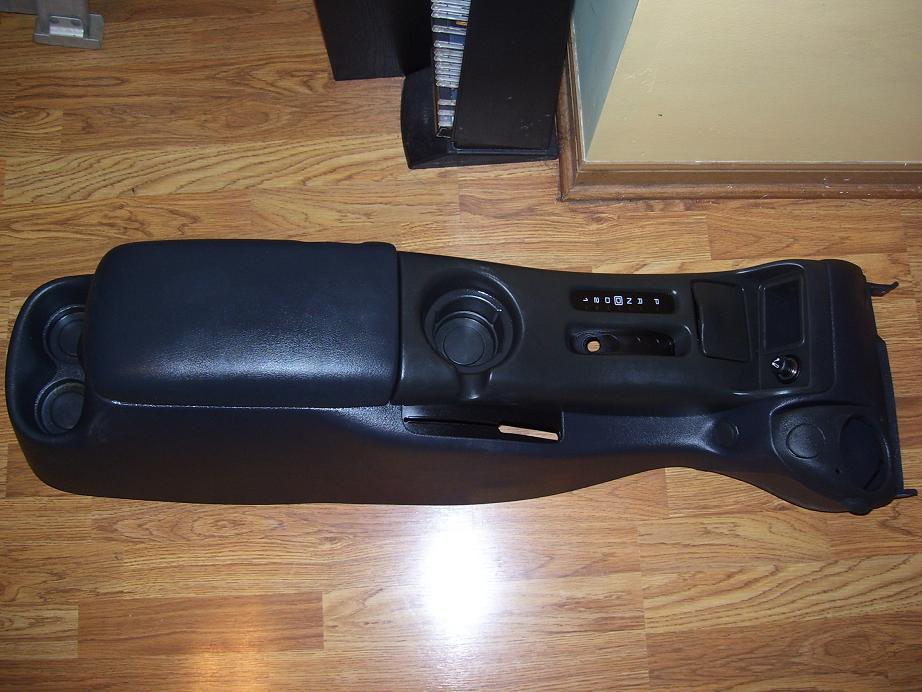
Minutes after posting my last post, my neighbor in my apartment complex sends me a text saying theres a huge box at the main enterence for me. Turns out I got my bithday gift a day early from my parents. They bought a center console from MF1274 on here and had it sent to me. Thanks again to both my parents and Mike.
This will go nice with the LS1 dash I picked up at the Pick and Pull a couple weeks. I still need a 97 gauge cluster and have a LS1 cluster I will trade if perferred? I think this will complete my interior minus having the roll cage installed. Still need someone to do it as my buddy is backed up with work.
Just snapped a couple pictures of the console after I pulled it out of the package. Looks to be in really nice shape. Just need to figure out how to make it work with my B&M ProStick.
And yes, my dog wanted to get in the picture on this one lol

So hopefully in the next couple days I can get the dash and console swapped in the Camaro. I also need to transfer my gauges to the LS1 pillers too. Ill keep you guys updated
This will go nice with the LS1 dash I picked up at the Pick and Pull a couple weeks. I still need a 97 gauge cluster and have a LS1 cluster I will trade if perferred? I think this will complete my interior minus having the roll cage installed. Still need someone to do it as my buddy is backed up with work.
Just snapped a couple pictures of the console after I pulled it out of the package. Looks to be in really nice shape. Just need to figure out how to make it work with my B&M ProStick.
And yes, my dog wanted to get in the picture on this one lol
So hopefully in the next couple days I can get the dash and console swapped in the Camaro. I also need to transfer my gauges to the LS1 pillers too. Ill keep you guys updated
Thread Starter
TECH Fanatic
iTrader: (12)
Joined: Aug 2007
Posts: 1,818
Likes: 1
From: Cornfields near Pontiac, IL
Been awhile since Ive updated the cost to build list, figure Id update it...
1994 Camaro...$3500 (Golf Mill Ford)
Summit Race Seats with leather covers (bought used) $100
Alternator Relocate/PS Delete Bracket & Belt (bought used) $75
Sheet Metal for A/C/Heat-Delete Block Off Plate (Menards) $4.60
Grant Steering Wheel...$29.95 (AutoZone)
Wheel Adapter Kit...$20.95 (AutoZone)
LS1 Lid Base...Traded for LT1 CIA
SLP Lid...$102 (Summit)
Glasstek 4 Inch Cowl...$400 (bought used)
Hooker Headers...$Free (Thanks Carri!)
EGR Block Offs...$Free (Again...Thanks Carri and Carri's Dad)
Windshild Replaced...$150
K&N Filter...$Free (Leftover from Trans Am)
ARP Extended Wheel Studs...$50 (Local Speed Shop)
DynoMax Race Magnum Mufflers...$Free (Thanks Ken!)
Dual Exhaust Pipes and Labor...$230 (Local Exhaust Shop)
Weld ProStars and Roll Bar...$1220 (Summit)
Front 165/80 Tires...$40 (Just Tires/Work Discount)
Hood Painted...$75 (Cost of Paint)
Nitto Drag Radials...$240 (Just Tires)
B&M Pro Stick...$100 (Swap Meet)
B&M Gate Plate...$13 (Summit Racing)
MSD 8.5 Wires...$Free (Thanks Ken!)
OTVC Brackets...$60 (Summit Racing)
Opti...$50 (Used)
Hood Pins...$12 (Local Speed Shop)
LS1 Dash Panel/Dash/Pillers/Guage Cluster...$100 (Pick N Pull)
LS1 Center Console...$75 (bought used)
Eibach Rear Lowering Springs...$Free (Thanks Jason!)
Comp Engineering SFC's...$179 (Summit Racing)

Black94, I just discovered this thread.
I'd like to see the actual weight of the car right now. I didn't read all of the middle pages of this thread, but just a comment: Assuming a weight down around 3200 lbs, do you realize how easy it's going to be to go 10's ! Your stock motor, well-tuned, with the proper gear, tire, and torque converter will easily do it with a 150 shot. You could also do it with a well-chosen heads/cam setup without the nitrous. But considering the miles on the motor, odds and experience say it's safer to run a 150 shot through it and keep the revs under 6000 than it would be to run N/A and spin it to the 6800-7000 that will be required for the power to run solid 10's. Personally, I'd go for the cheap nitrous route and chances are you'd get a lot of service out of the engine as it sits. 1.6 rockers and good springs are all I would do to the engine. Then, when you're bored with that or the motor goes weak, put a built motor in it.
For reference, my Impala went consistent 11.3's on stock motor and 150 shot for years at 3950 lb race weight. Just two months ago, I pulled that engine (still low mileage and perfect condition as far as I know) and put in a rebuilt stock bottom motor with a good heads/cam package and was running 11.3's N/A by the 2nd outing. 3800 lbs now (no bottle, less fuel req'd with new sumped tank, and 40 lb savings w/aluminum heads).
Good luck with it!
Thread Starter
TECH Fanatic
iTrader: (12)
Joined: Aug 2007
Posts: 1,818
Likes: 1
From: Cornfields near Pontiac, IL
Thanks bowtienut!!
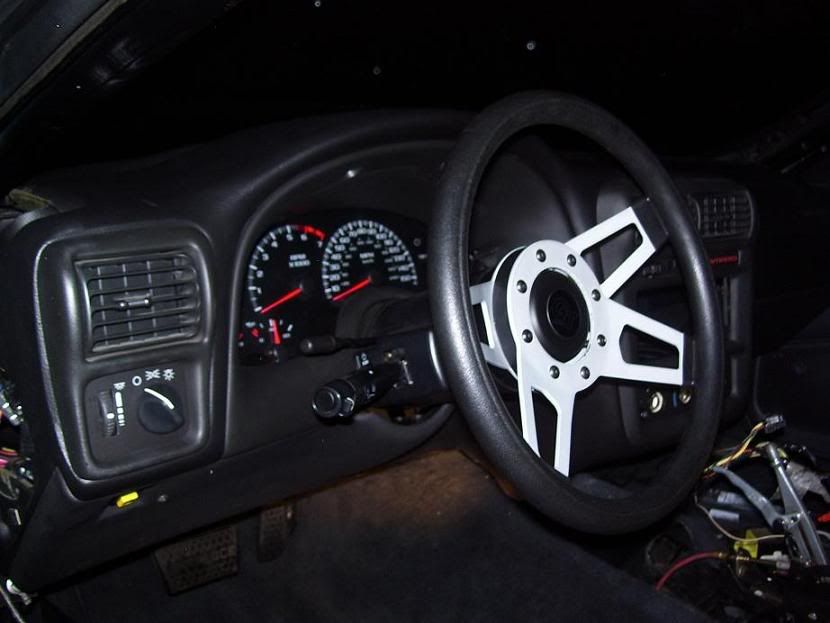
Started tearing into the LS1 Dash & Console swap the other day. Since my dash is pretty much a shell, the swap was easy. Alot of 7mm bolts and it pulls right out. Looks like I will have to rewire the hatch switch though, but no biggie. The main thing is going to be rewiring up the gauge cluster (which I still need a 97 one if anyone wants to swap for a LS1 cluster?) Otherwise everything lines up and bolts right in, no real modification needed.
Here is the dash installed minus the "guts"
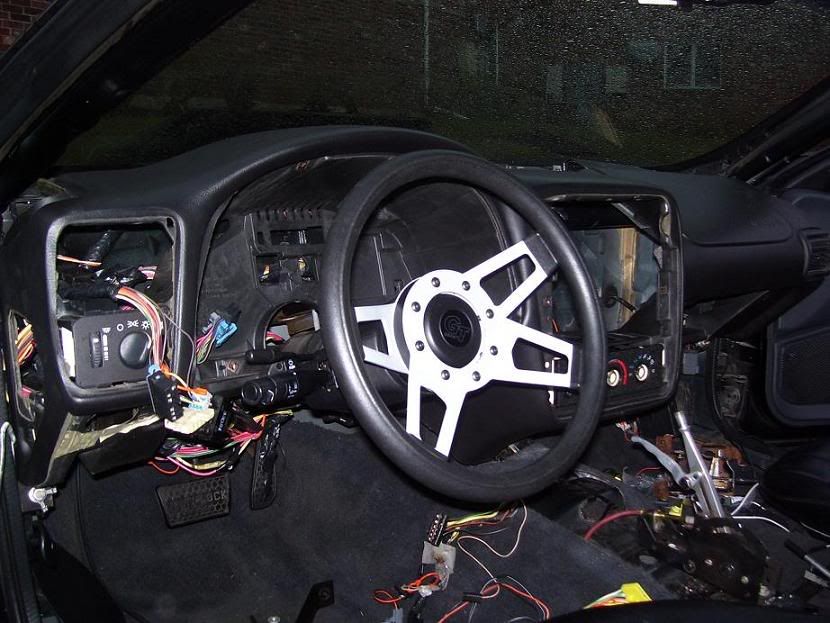
All put together. I still need the defrost button that goes above the radio, heater control ***** (lt1 ***** wont fit?) and a radio delete panel.
Due to daylight ending, I didnt get the console in. Should bolt right in, but will have to trim the console plate a little for the B&M shifter to fit just right. More on that when I get some more free time.
Started tearing into the LS1 Dash & Console swap the other day. Since my dash is pretty much a shell, the swap was easy. Alot of 7mm bolts and it pulls right out. Looks like I will have to rewire the hatch switch though, but no biggie. The main thing is going to be rewiring up the gauge cluster (which I still need a 97 one if anyone wants to swap for a LS1 cluster?) Otherwise everything lines up and bolts right in, no real modification needed.
Here is the dash installed minus the "guts"
All put together. I still need the defrost button that goes above the radio, heater control ***** (lt1 ***** wont fit?) and a radio delete panel.
Due to daylight ending, I didnt get the console in. Should bolt right in, but will have to trim the console plate a little for the B&M shifter to fit just right. More on that when I get some more free time.
Thread Starter
TECH Fanatic
iTrader: (12)
Joined: Aug 2007
Posts: 1,818
Likes: 1
From: Cornfields near Pontiac, IL
That is an LS1 cluster in the picture. Its not hooked up but just in there "for now" I guess the LS1 cluster will not work from what I have been told on the LT1 cars. Something about the fuel gauges are different from LS1 to LT1, so I need to find an 97 which is the same style but it was used in the last year of the LT1 Camaros.


Thread Starter
TECH Fanatic
iTrader: (12)
Joined: Aug 2007
Posts: 1,818
Likes: 1
From: Cornfields near Pontiac, IL
PM'd you back.
Thread Starter
TECH Fanatic
iTrader: (12)
Joined: Aug 2007
Posts: 1,818
Likes: 1
From: Cornfields near Pontiac, IL
Thanks AC!
Well its winter time and other than a few things here and there, the car will be on hold until spring. Plus I bought a 91 RS Camaro that I am doing a quick restoration and paint job to be a daily driver so I can go a little more insane on this build, so Ive been busy piecing together a front clip for that car, I do have a build thread over on Thirdgen.org if anyone wants to check it out (dont want to waste space on here, more than I already am) Here's the link
http://www.thirdgen.org/techboard/me...-rs-build.html
But I did notice its been right at a year since I started this thread and granted not everything I wanted has gotten done or still a timeslip, I feel I have accomplished ALOT in the past year and am curious to see what the next year will bring.
I am in the process of working on lowering the front of the car, installing ARP wheel studs on the front of the car, finishing the LS1 center console swap (gotta make it fit the B&M ProStick) and trying to save up for a Strange Dana rear end.