
The G-Body Swap Thread


 01-01-2011, 11:16 PM
#402
Those are some nice Headers. I'm using the BRP 1 7/8" Primary LT Headers on mine.
Not really hidden, but functional..

That is a Non-AC Box too..
That's all you get till the build thread..
What's up with the Fuel Tank thing there? I have a vent already on the Tank so will I be good?
That is a Non-AC Box too..
That's all you get till the build thread..
What's up with the Fuel Tank thing there? I have a vent already on the Tank so will I be good?
01-01-2011, 11:55 PM
#403
On The Tree
iTrader: (2)
Join Date: May 2006
Location: Byron, Illinois
Posts: 148
Likes: 0
Received 0 Likes
on
0 Posts

I've been doing quite a bit of research lately. I'm trying to figure out hooking up the factory tach. I realize that accomplishing this with a LS base ECU is simple, but I plan on running carbed with the GM LS ignition controller. While I can't find the manual for it online, I did find one the for the MSD6010 and it mentions a tach signal wire "Yellow - Tach Signal. Provides a 12 volt square wave signal." Will this run the factory tach, or will I need to pick up some kind of signal converter?
 Nice.
01-11-2011, 03:09 PM
Nice.
01-11-2011, 03:09 PM
#411
TECH Regular
iTrader: (5)

Join Date: Aug 2009
Location: Swedesboro, NJ
Posts: 425
Likes: 0
Received 0 Likes
on
0 Posts
Hi guys and girls,
I apologize if this has been covered already but I haven't seen it in my searches.
How is everyone wiring up their SES, seatbelt and high beam lights in their Monte SSs? I am assuming that the printed circuit needs to be removed especially since I am running AutoMeter gauges and the back of the housing needs to be cut to fit them. So how can I power these bulbs? Is it possible to solder a wire to the little tabs that are used to make contact with the printed circuit?
Also if anyone can take pics of how they mounted their truck DBW pedal into the car that would be great because I am currently looking for ideas to mount mine.
Car is a 87 monte ss and the engine is a 2004 5.3L with DBW.
Thanks for any help
 01-20-2011, 10:03 PM
#414
Hi guys and girls,
I apologize if this has been covered already but I haven't seen it in my searches.
How is everyone wiring up their SES, seatbelt and high beam lights in their Monte SSs? I am assuming that the printed circuit needs to be removed especially since I am running AutoMeter gauges and the back of the housing needs to be cut to fit them. So how can I power these bulbs? Is it possible to solder a wire to the little tabs that are used to make contact with the printed circuit?
Also if anyone can take pics of how they mounted their truck DBW pedal into the car that would be great because I am currently looking for ideas to mount mine.
Car is a 87 monte ss and the engine is a 2004 5.3L with DBW.
Thanks for any help
I apologize if this has been covered already but I haven't seen it in my searches.
How is everyone wiring up their SES, seatbelt and high beam lights in their Monte SSs? I am assuming that the printed circuit needs to be removed especially since I am running AutoMeter gauges and the back of the housing needs to be cut to fit them. So how can I power these bulbs? Is it possible to solder a wire to the little tabs that are used to make contact with the printed circuit?
Also if anyone can take pics of how they mounted their truck DBW pedal into the car that would be great because I am currently looking for ideas to mount mine.
Car is a 87 monte ss and the engine is a 2004 5.3L with DBW.
Thanks for any help
01-20-2011, 10:17 PM
#415
Anyway.. for all to see here is a 3 row champion with aluminum two fan shroud and fans that I paid a little over 500.00 for the whole shabang..
Things I liked:
1. Fit in the stock position with the Buick Fan\Rad top mount bracket.
2. Had a threaded fitting for the steam vent tube (pictured here with brass barbed fitting)
Yes I know there are other cleaner options.. This is the route I took..
3. Good craftsmanship.. Nice welds and a quality piece for the price..
4. Clean OEM look...
Things I didnt like..
1. No provisions for fan holes in the shroud... Not a big deal as the fans made for an easy template Edit: By "Holes" I meant the 4 mounting holes at each corner not the main holes open to the Rad..
2. No hardware was given to mount the fans to the shroud.. The guy that sold it to me on ebay refunded me the amount I spent at the hardware store so no biggie.. I was amazed he even offered.. I was just mentioning to him as an FYI and he responded with the offer..
3. Fans seem a little on the cheap side (Just my opinion)As I really dont know what to expect as far as the life expectancy as I dont know what the critical moving componenets are comprised of. Edit: I did try the fans out.. As for the operation.. I had no issues.. They are quiet and move the air effectively as described in flea-bay..

Shot at 2011-01-20
Last edited by 2Aspire; 01-21-2011 at 10:34 AM.
01-21-2011, 12:31 AM
#416

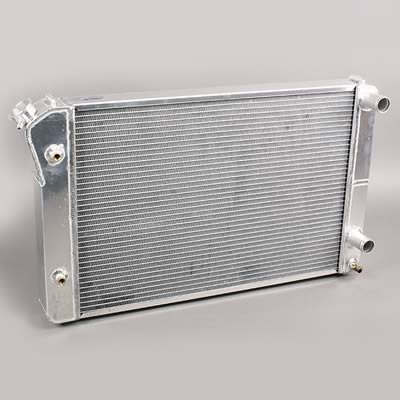
I have this radiator ordered from Summit, but if they move the ship date back one more time I'm going to cancel the order and get something else.
http://www.summitracing.com/parts/GR...8-LS/?rtype=10
01-23-2011, 09:18 AM
#418
Teching In
iTrader: (1)

Join Date: Aug 2009
Location: SE, Michigan
Posts: 23
Likes: 0
Received 0 Likes
on
0 Posts
Been waiting to complete the project before I contributed to this thread- which has, and this site, been a wealth of knowledge for pulling off the swap. Here we go. . .
Car: '84 Monte SS
Drivetrain: 5.7L LS1 and 4L60E from '01 TA w/ 52k miles. Bought from Cleveland Pick-a-part
Goal was a close-to OEM installation without cutting the car. I wanted to retain a totally stock interior appearance, too.
Radiator: Stock g-body w/ extra nipple for steam hose. G-body Cutlass top radiator retaining bracket. F-body LS1 fans w/ custom brackets for attaching to factory retaining clips. Buick Grand National A/C condenser- passenger side connection and same brackets as MCSS.
Intake: DIY parts from Silicone intakes.com. Stock MAF.
Engine swap parts: Spohn motor mounts, Kwik A/C bracket, BRP Mid-length headers, RetroLSX oil pan, NAPA G-body temp sending unit machined to fit in rear of passenger cylinder head (Vato Zone sending units deteriorated during machining process, Current performance stand-alone module for engine (chassis uses OEM fuse block). 2.5" 304 stainless exhaust w/ H-pipe and Dynomax VT mufflers. Mufflers at idle and normal RPM have factory F-body sound but roar when you spin up the engine.
Trans swap parts: Shiftworks tailhousing, built-to-spec trans cable (couldn't find adequate OEM part), custom trans cable mounting tab, Iceman x-member (not quite bolt-in application), F-body shifter modified to mount in factory G-body location and use stock MCSS shift handle. No mods were necessary to fit MCSS handle to F-body shifter. Shortened OEM MCSS driveshaft- will eventually replace with new driveshaft.
Electrical: Wait4Me performance flashed the ECM and converted the harness. I intended to do the electrical work myself until a local shop opened, Downriver Motorsports Wiring in Romulus, MI. The rates were exceptionally fair and quality of work far exceeded my expectations and abilities. The ECM is enclosed in a custom housing on the passenger toe-board beneath the carpet. The passenger loses about 2-2.5" of legroom.
I have a 34" inseam and could sit comfortably. Also had car dyno tuned. In hindsight, I paid twice for the harness and ECM flash, but it was a relatively inexpensive lesson to learn.
Fuel delivery: Buick Grand National gas tank/fuel pump/sending unit/, 'vette filter/regulator, currently have -6AN line from tank to engine but have plastic line to replace it when the weather breaks.
Fittment: RetroLSX pan is the cat's ***. Front cross-member is ~5" off the ground and the pan is tucked from harms way. ~1/8" clearance between stock steering box and alternator pulley. Pass rear spark plug is touching A/C box. I plan to clearance the box when the weather breaks. The engine-to-AC clearance is why the harness is draped over the rocker covers. BRP headers would have melted the OEM steering shaft. Jeep XJ steering shaft was too bulky, so I got it right with Borgeson hardware. Clearance is still a scant 1/8-1/4". BRP header flanges negated use of stock trans cable mounting tab.
Lessons learned: I'd not buy a harness or tune twice, and I'd opt for making my own trans x-member or just buying a G-force unit. I bought the Iceman used but never installed and didn't receive paperwork with it to know if I had the correct application or not. Unmodified fitment was like a saddle on a cow, but it worked out fine. I'm very satisfied with the end result. In hindsight I shouldn't have pussed out and cut the car. Had I gone that route it would have a T56.
Other stats: SC&C Stage 2, SPC tubular lowers and springs (all corners), SC&C frame brace, Vari-Shocks on all corners, Currie upper and lower rear arms, Baer Track 13" kit on OEM spindle, Baer Track 12" kit on rear, 18" Rushforth Fuel on Khumo Ventus tires.
Open issues: headliner repair, driveshaft replacement, purchase DIY A/C lines & charge system, wait for snow to melt and enjoy.
 01-23-2011, 04:11 PM
#420
Teching In

Join Date: Dec 2006
Location: Long Island, NY
Posts: 9
Likes: 0
Received 0 Likes
on
0 Posts
Looks great cornfed! I'm putting the finishing touches on my big block '86 GN swap and I already regret not waiting to do an LSX swap. But, I started this 3 years ago, and that's the route I picked then. Dont get me wrong, this thing sounds like an animal. I cant wait to strap it on the dyno and run it down the track. I guess when I fuel inject it, I'll feel better. I'm far from a carb guy.
Keep up the good work guys!
Keep up the good work guys!