

LS7 Fiero swap
_1.JPG)
 01-07-2009 | 09:27 PM
#342

Thread Starter
On The Tree
Joined: Mar 2008
Posts: 171
Likes: 0
Last one for today:
Originally posted by Archie:
Troy will be here tomorrow to check out his car.
There will be a bunch of pics tomorrow, so today you just get a tease.
Everything shines.......
_1.JPG)
_3.JPG)
Even the mirrors shine like mirrors
_2.JPG)
These will shine tomorrow...
_2.JPG)
Archie
Troy will be here tomorrow to check out his car.
There will be a bunch of pics tomorrow, so today you just get a tease.
Everything shines.......
Even the mirrors shine like mirrors
These will shine tomorrow...
Archie
01-08-2009 | 06:04 PM
#343
This is an crazy kick *** swap!!! Did ya just flip the intake around?
What kinda tranny will go in it to hold the power?
What kinda tranny will go in it to hold the power?
Last edited by 1999FirehawkLS1; 01-13-2009 at 08:54 PM. Reason: replaced rear end w tranny cause i remebered there is no rear end
01-08-2009 | 09:10 PM
#344

Staging Lane
Joined: Jan 2003
Posts: 54
Likes: 1
From: Chicago
Troy was here today & we took some pics & a video to show you.
_1.JPG)
_1.JPG)
_2.JPG)
_2.JPG)
.JPG)
_1.JPG)
_1.JPG)
We have a little video I just put on UTube http://www.youtube.com/watch?v=S9Szl5jpHng
Archie
We have a little video I just put on UTube http://www.youtube.com/watch?v=S9Szl5jpHng
Archie
 01-16-2009 | 01:02 PM
#348
Thread Starter
On The Tree
Joined: Mar 2008
Posts: 171
Likes: 0
update:
Originally posted by Archie:
I had intended to post up a bunch of pictures last night. However, the server that my web site & picture hosting is one was down for service so I couldn't post.
So now that everything is working again a bit of an update is in order.
Counting today, we've worked 4 days this week on finishing up details on the Perfect Union.
We got the brakes back from powdercoating. After putting the calipers back together with the pistons etc. putting them back on the car was pretty simple because they had been fitted before.
This time around though, we had to fabricate mounts for the rear "Spot" brakes & figure out routing & brackets for the hand brake cables. Everything had to clear the wide wheels so that was a lot easier said then done. there wasn't time to do this before the car went to paint.
Here are some pics.
Front....
.JPG)
_2.JPG)
_1.JPG)
Rear....
_3.JPG)
_2.JPG)
.JPG)
The finished product is going t look nice....
_2.JPG)
.JPG)
.JPG)
..........
I had intended to post up a bunch of pictures last night. However, the server that my web site & picture hosting is one was down for service so I couldn't post.
So now that everything is working again a bit of an update is in order.
Counting today, we've worked 4 days this week on finishing up details on the Perfect Union.
We got the brakes back from powdercoating. After putting the calipers back together with the pistons etc. putting them back on the car was pretty simple because they had been fitted before.
This time around though, we had to fabricate mounts for the rear "Spot" brakes & figure out routing & brackets for the hand brake cables. Everything had to clear the wide wheels so that was a lot easier said then done. there wasn't time to do this before the car went to paint.
Here are some pics.
Front....
Rear....
The finished product is going t look nice....
..........
01-16-2009 | 01:03 PM
#349
Thread Starter
On The Tree
Joined: Mar 2008
Posts: 171
Likes: 0
more:
Originally posted by Archie:
Yesterday we put the car up on the lift to aid in routing the handbrake cables. We also have to fabricate a steel frame up under the nose to protect the air dam if it scrapes on the ground. We couldn't make this frame before because we needed to have the nose mounted for the last time before fitting this stuff.
I'll post some pics of it later as we get it built.
I did take a few pics of various items when we got it on the lift.
_3.JPG)
.JPG)
_1.JPG)
_1.JPG)
_1.JPG)
_1.JPG)
_3.JPG)
_2.JPG)
_1.JPG)
_3.JPG)
Archie
Yesterday we put the car up on the lift to aid in routing the handbrake cables. We also have to fabricate a steel frame up under the nose to protect the air dam if it scrapes on the ground. We couldn't make this frame before because we needed to have the nose mounted for the last time before fitting this stuff.
I'll post some pics of it later as we get it built.
I did take a few pics of various items when we got it on the lift.
Archie


 01-18-2009 | 08:15 AM
#355


 01-20-2009 | 09:21 PM
#356
Thread Starter
On The Tree
Joined: Mar 2008
Posts: 171
Likes: 0
update: we are nearing the end of the build
Originally posted by Archie:
The last few days we've been working on several things.
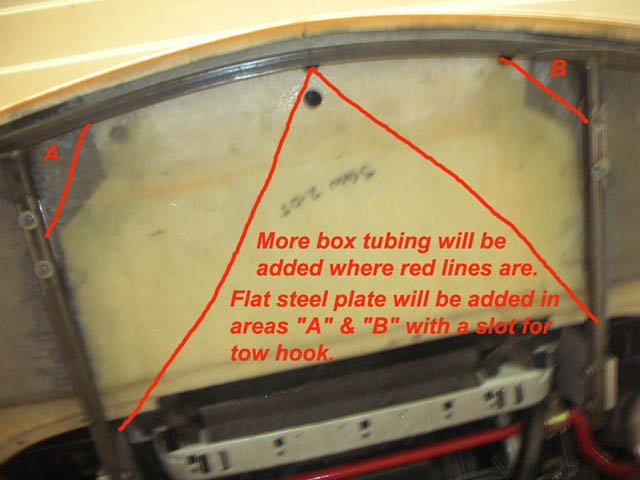
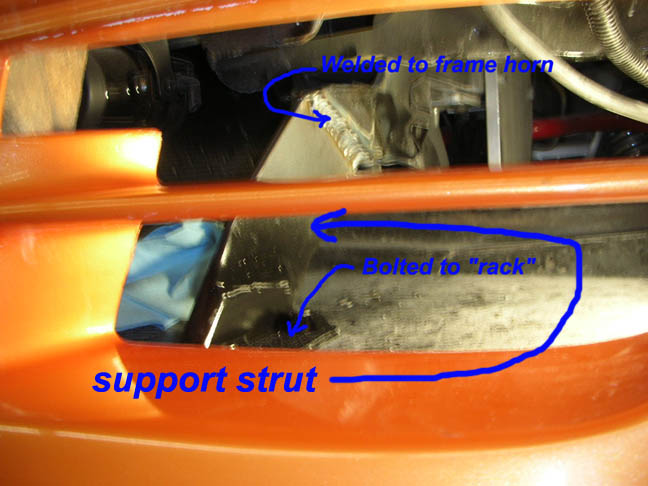
As I said, we had to fabricate a steel frame up under the nose to protect it. I'm calling that frame the "rack".
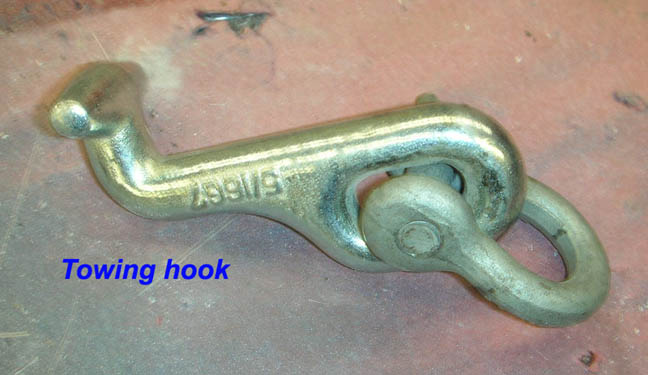
With this car, Troy wanted protection for the nose if he was to rub it while driving on uneven surfaces. We also had a challenge to find a way to pull the car onto the trailer without having the straps or cable damage the lower nose.
You'll see that we were able to address both issues with this rack.
Here are some pics from last Friday showing what we had in mind.
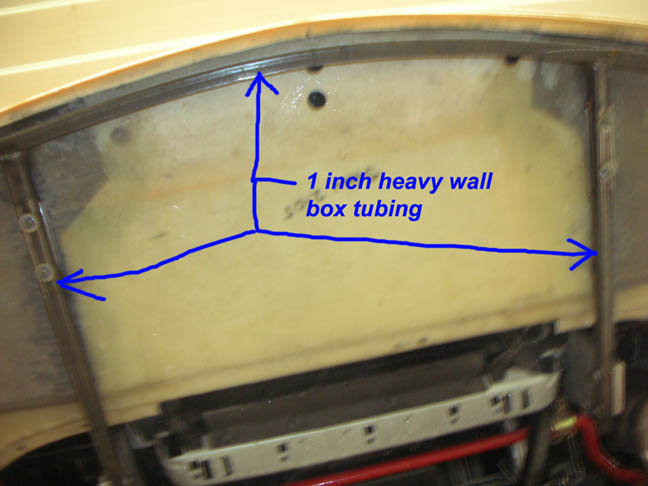
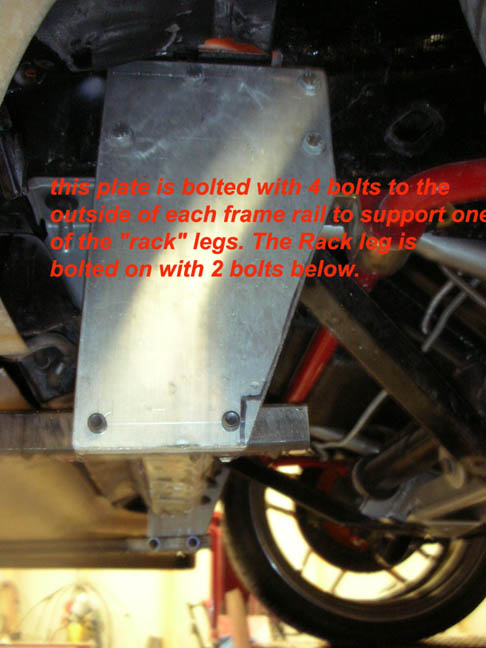
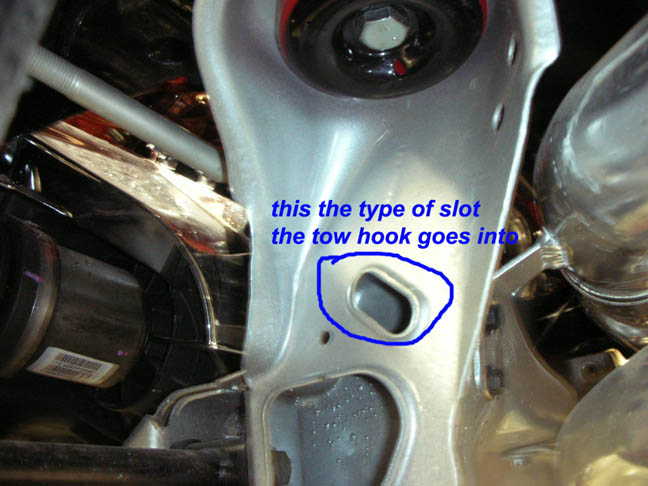
This mount has been in several pictures before. We put it in anticipating the building of this "rack"
......more to come......
The last few days we've been working on several things.
As I said, we had to fabricate a steel frame up under the nose to protect it. I'm calling that frame the "rack".
With this car, Troy wanted protection for the nose if he was to rub it while driving on uneven surfaces. We also had a challenge to find a way to pull the car onto the trailer without having the straps or cable damage the lower nose.
You'll see that we were able to address both issues with this rack.
Here are some pics from last Friday showing what we had in mind.
This mount has been in several pictures before. We put it in anticipating the building of this "rack"
......more to come......
01-20-2009 | 09:22 PM
#357
Thread Starter
On The Tree
Joined: Mar 2008
Posts: 171
Likes: 0
more:
Originally posted by Archie:
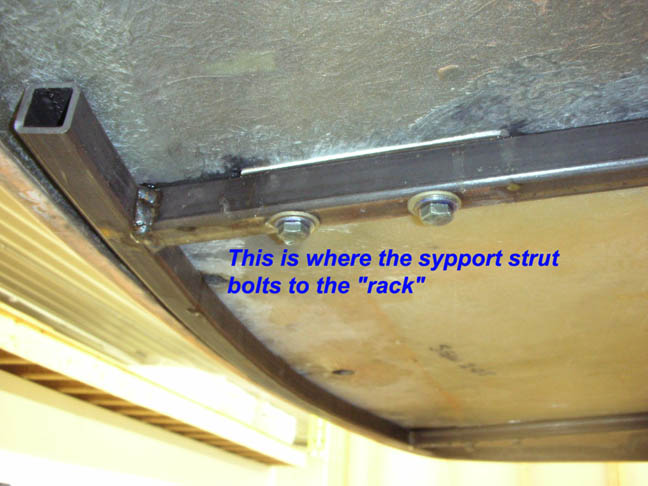
Here's some of the results from building the "rack".
.JPG)
.JPG)
This is what it will look like when finished.......
.JPG)
.JPG)
I've said before how I like to make things so that they can be serviced down the road. Up 'til now bolting in the grills, Audi lights or driving lights was being done by reaching a long arm up into the nose thru the wheel well openings. We decided it would be better to have an access hole up under the nose.
_1.JPG)
.JPG)
The new "rack" bolts on with 8 bolts. With the car up in the air, the bolts are real easy to get to. If you take out 6 bolts you can pivot the "rack" down to allow you to service items inside the nose. When the "rack" is where it's supposed to be, the air coming thru the grills is still directed towards the radiator.
_1.JPG)
.JPG)
Archie
Here's some of the results from building the "rack".
This is what it will look like when finished.......
I've said before how I like to make things so that they can be serviced down the road. Up 'til now bolting in the grills, Audi lights or driving lights was being done by reaching a long arm up into the nose thru the wheel well openings. We decided it would be better to have an access hole up under the nose.
The new "rack" bolts on with 8 bolts. With the car up in the air, the bolts are real easy to get to. If you take out 6 bolts you can pivot the "rack" down to allow you to service items inside the nose. When the "rack" is where it's supposed to be, the air coming thru the grills is still directed towards the radiator.
Archie
01-21-2009 | 11:50 PM
#358
It has yet to be determined whether the trans will hold up.
It's a G6 6 speed manual. It's rated for 300ft lbs of torque. The whole thing has been cryo treated to increase strength and a LSD has been added.
I don't think anyone has ran this much power through one so it may of may not hold up. Luckily the car is pretty light and the rear tires are low profile which reduces grip. Plus the owner is not into drag racing.
Last edited by JasonWW; 01-22-2009 at 12:03 AM.
01-22-2009 | 08:15 PM
#359
Thread Starter
On The Tree
Joined: Mar 2008
Posts: 171
Likes: 0
......
Originally posted by Archie:
I'd like to say something else.
We've gone from this ........
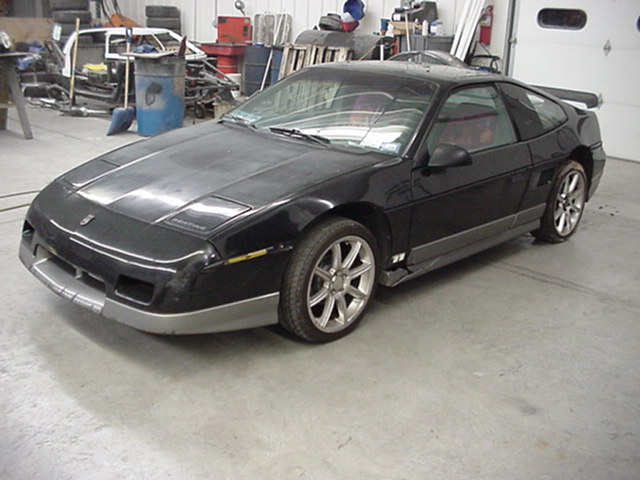
To This.......
_1.JPG)
I'd like to thank Troy for letting us participate in building his dream car.
This has been virtually a once in a lifetime opportunity to participate in the building of something special.
We still have a few minor details to finish up yet & we still have some test driving to do but for all practical purposes this car is virtually done.
This thread is not about to end, we have a lot more that will be added to this thread.
There are a million pictures yet to take, shows, test driving results & more.
In the next few days, I'll try to get some good quality pictures taken outside in the sunlight, so that you all can see how neat this one really is.
Thanks Troy,
Archie
_1.JPG)
_1.JPG)
_1.JPG)
I'd like to say something else.
We've gone from this ........
To This.......
I'd like to thank Troy for letting us participate in building his dream car.
This has been virtually a once in a lifetime opportunity to participate in the building of something special.
We still have a few minor details to finish up yet & we still have some test driving to do but for all practical purposes this car is virtually done.
This thread is not about to end, we have a lot more that will be added to this thread.
There are a million pictures yet to take, shows, test driving results & more.
In the next few days, I'll try to get some good quality pictures taken outside in the sunlight, so that you all can see how neat this one really is.
Thanks Troy,
Archie
