How to install LS6 Intake Manifold Video
TECH Addict
Joined: Jun 2002
Posts: 2,428
Likes: 0
From: Las Vegas, NV
I located the technical service bulletin for the knock sensor fix:
Here is the bulletin
Bulletin No.: 02-06-04-023A
Date: June, 2002
TECHNICAL
Subject:
Audible Spark Knock (Detonation), MIL Illuminated, DTC P0332 Set (Replace Rear Bank Knock Sensor and RTV Area Around Sensor)
Models:
1998-2002 Chevrolet Camaro, Corvette
1998-2002 Pontiac Firebird
with 5.7L Engine (VIN G - RPO LS1)
1999-2002 Chevrolet Silverado, Suburban, Tahoe
2002 Chevrolet Avalance
1999-2002 GMC Sierra, Yukon, Yukon XL
2002 Cadillac Escalade, Escalade EXT
with 4.8L, 5.3L or 6.0L Engine
(VINs V, T, Z, N, U - RPOS LR4, LM7, L59, L09, L04)
This bulletin is being revised to add Cadillac Escalade and Cadillac Escalade EXT to the Models. Please discard Corporate Bulletin Number 02-06-04-023 (Section 6 - Engine/Propulsion System).
Condition
Some customers may comment on a mild to severe engine ping (commonly referred to as spark knock), usually worse during acceleration and/or an illuminated MIL. Upon investigation, the technician may find DTC P0332 set.
Cause
This condition may be the result of corrosion of the rear bank knock sensor due to water intrusion into the sensor cavity. This condition is more apparent on vehicles in which customers frequently wash the engine compartment.
Correction
Replace the rear bank knock sensor and build a dam (wall) around the sensor using RTV to divert water away from the sensor. Use the procedure and part number listed.
1. Remove the intake manifold. Refer to the Intake Manifold Replacement procedure in the Engine Controls sub-section of the appropriate Service Manual.
2. Remove the wiring harness assembly from the knock sensor.
3. Remove the rear bank knock sensor.
4. Install the new rear bank knock sensor.
Tighten
Tighten the knock sensor to 20 N.m (15 lb ft).
5. Install the wiring harness assembly to the knock sensor.
6. Apply a bead of RTV silicone sealant approximately 9 mm (3/8 in) wide and 6 mm (1/4 in) high along the outside edge of the ridge on the engine block valley cover around the rear bank knock sensor. DO NOT form a complete circle. Leave the rear section open as shown.
7. From the underside of the intake manifold, completely remove the rear intake manifold seal (foam material).
8. Install the intake manifold. Refer to the Intake Manifold Replacement procedure in the Engine Controls sub-section of the appropriate Service Manual.
TECH Addict
Joined: Jun 2002
Posts: 2,428
Likes: 0
From: Las Vegas, NV
BTW, this TSB also applies for code PO327.
If you're just doing an intake swap, and haven't thrown the codes yet, you should do this as a preventative measure.
If you're just doing an intake swap, and haven't thrown the codes yet, you should do this as a preventative measure.
Last edited by Predator; Mar 28, 2010 at 08:19 AM.
I think this belongs in here as well.
https://ls1tech.com/forums/generatio...anifold-3.html
I hope this helps show the grinding locations or if you take a chisel to it. Good luck!
https://ls1tech.com/forums/generatio...anifold-3.html
I hope this helps show the grinding locations or if you take a chisel to it. Good luck!
I watched the video and its gonna be alot of help for when I do the intake swap. (Good Job Blueknight) I noticed instead of doing the coolant crossover pipe, the ribs were chizzled off on the ls6 intake before being installed. My question is... If im gonna use the fast 92 intake can I do that? Or do you have to buy the ls6 crossover pipe? Thanks
I watched the video and its gonna be alot of help for when I do the intake swap. (Good Job Blueknight) I noticed instead of doing the coolant crossover pipe, the ribs were chizzled off on the ls6 intake before being installed. My question is... If im gonna use the fast 92 intake can I do that? Or do you have to buy the ls6 crossover pipe? Thanks
i cant seem to get the video player to even load... I just get a blank white space where the player would be..... are these vids on youtube or anything more standard (who uses myspace anymore.... =P) I'm thinking its just a filter at work thats not letting me watch this though.
i cant seem to get the video player to even load... I just get a blank white space where the player would be..... are these vids on youtube or anything more standard (who uses myspace anymore.... =P) I'm thinking its just a filter at work thats not letting me watch this though.
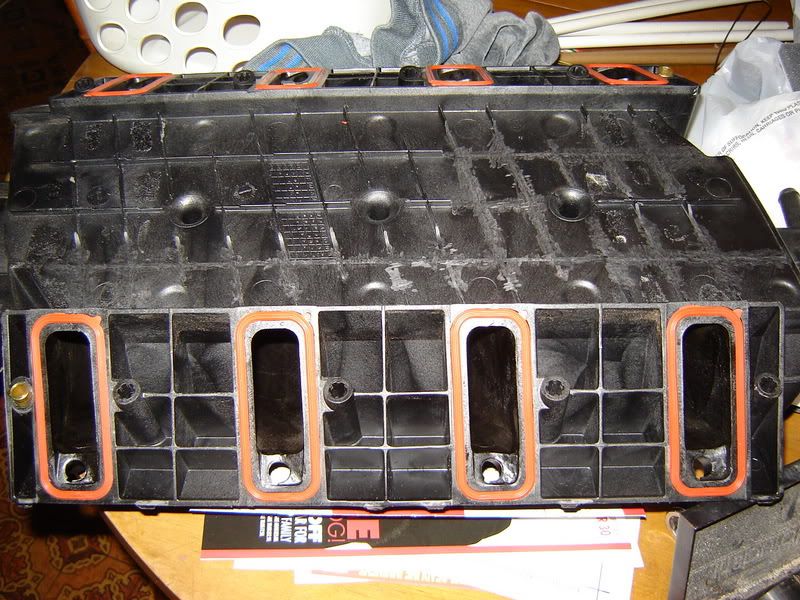
I'm a complete noob trying to replace the knock sensors, I already got the two sensors and the harness ready to install, I found this thread searching the forums, i just have to thank BlueKnight for the video, its so helpful... whats this thing I think I broke? is it the oil sending unit? where can I buy a new one at?

also what can I do to prevent this?, that can't be good for the wire

and can I reuse the gaskets or get new ones? any help and tips re instaling the manifold please anyone
also what can I do to prevent this?, that can't be good for the wire
and can I reuse the gaskets or get new ones? any help and tips re instaling the manifold please anyone
LS1 Tech Stories
The Best V8 Stories One Small Block at Time

Gas Monkey Built a 6-Wheel Ferrari Testarossa With a Corvette LT4 Engine
Verdad Gallardo
7 Most Reliable High-Performance Engines GM Has Ever Built
Verdad Gallardo
Amazing '71 Camaro Restomod Is Modern Muscle Car Under the Skin
Verdad Gallardo
6 Common C5 Corvette Failures and What's Involved In Repairing Them
Pouria Savadkouei
Retro Modern Bandit Pontiac Trans AM Comes With Burt Reynolds' Autograph
Verdad Gallardo
Top 10 Greatest Cadillac V Series Performance Models Ever, Ranked
Pouria Savadkouei
Top 10 Most Powerful Chevy Trucks Ever Made!

Hennessey's New Supercharged Silverado ZR2 Has 700 HP
Verdad Gallardo
Coachbuilt N2A Anteros Is an LS2-Powered C6 Corvette In Italian Clothes
Verdad Gallardo i was cleaning my iac just a couple days ago and i thought back to this video and went hey ive never seen my iac move so i cycled the key while it was out and my cap and spring wound up flyin out lol took me forever to find them too i had the tractor in the garage and the car was behind the garage in some tall grass
thanks for the inspiration bro lol
thanks for the inspiration bro lol

I'm a complete noob trying to replace the knock sensors, I already got the two sensors and the harness ready to install, I found this thread searching the forums, i just have to thank BlueKnight for the video, its so helpful... whats this thing I think I broke? is it the oil sending unit? where can I buy a new one at?
also what can I do to prevent this?, that can't be good for the wire
and can I reuse the gaskets or get new ones? any help and tips re instaling the manifold please anyone
also what can I do to prevent this?, that can't be good for the wire
and can I reuse the gaskets or get new ones? any help and tips re instaling the manifold please anyone
Launching!
Joined: Jun 2009
Posts: 284
Likes: 0
From: Bahrain
AWSOME material !! .... duuude can you please show the chezeling the intake's plastic stuff in a clear diagram or help post the picture you talked about in the vid ....
thanks alot !! CHEERZ MATE 100% STICKY !!
thanks alot !! CHEERZ MATE 100% STICKY !!