
My Engine Committed Suicide Yesterday
 10-04-2011, 09:51 PM
#401

I'm Afraid, mine may be going down this road too...It's knocking horribly and I just replaced the stock rockers with ones that are supposed to fit.. I know how you feel, mine just lost power and pressure one day and I was heartbroken. I'm hoping to get her running soon and strong...
this is what she sounds like after replacing the broken rocker arms
this is what she sounds like after replacing the broken rocker arms
Go troll some place else if you don't have anything constructive to say..

I have an order to complete the car which was created with money, time, and not doing the same job 2-3 times. I have the money to buy the engine parts to get it running. Hell, I could put a large cubic inch nitrous engine in, but even if I did there would be tons of issues as my 99+ PCM / Engine harness isn't finished, I would have a completely stock suspension, driveshaft, rear end, and it wouldn't last a month. I would end up at square one again with the car broken down in my garage, but have spent tons of money, time, and effort on it. Then, have to do things I should have spent money on the first time around again, without the ability to do it the easy way. I plan on driving the **** out of this car when it is finished and don't want things blowing up on me or have to baby it around. I have a car that I drive daily in the mean time that gets me from point A to point B.
--------------------------------------------------------------------------
Updates coming after this... Working on typing it now.
 10-04-2011, 10:58 PM
#402
I started yesterday with all of these great ideas on getting stuff done. With the help of LS1tech members and google searching for things on the site I'd found quite a few things I was looking for. Thanks guys  and
and  ! My plan was to install the wiring for my gauges, shift light, and work on my battery cutoff wiring.

I started off by fixing a ground wire that I had broken when removing the dash. Obviously, I didn't get all of the wires off of the dash like I thought I had. It is honestly a giant pain in the *** to get the wiring off of it.

Fixed:

With that fixed I attached it to the body as a temporary ground. I stuck the gauge cluster in the car, attached the rest of the grounds, and some other connectors.

My plan was to break out my multi meter and measure some wires to find switched 12v power sources and switched lighting sources. I had my old battery in the car which is almost dead, but holds about 35% of a charge. It is enough to get some slight testing done, but after a few days of use it will go dead. When, I went to connect the battery cables it was of course dead. I then stuck my new red top in the car so I could get all of my testing done and that's when all hell broke loose.
I had the negative connected to the battery and went to wedge my positive against the terminal. My positive has a ring end on it to connect to my cutoff switch so I have to wedge it against the terminal with the handle of the battery. As soon as I touched it to the positive post my horn honked. I thought, "Wow, that's odd. I wonder if that was just some odd one time deal? Let's try it again." - Touches cable to post again... HHHOOOONNNKKKK! I did this a few times to make sure I wasn't going crazy and every time I touched it to the post it started honking and wouldn't stop. I couldn't get it to shut off as long as I had it connected to the positive post.
I started by checking to see if something beneath the airbag was stuck or the wiring was damaged. It all checked out and as soon as I attempted to reconnect the positive cable more steady honking. I pulled the passenger head light up real quick with my impact and checked out the horn. With all of the headlight wiring and the new bracket maybe something was out of whack, but it checked out as well. I started doing some research, but couldn't figure out what it was. I sent out a couple emails and a few texts to see if anyone knew and the only person who responded told me to check the horn relay located on the driver's side under the hood. Well, if anyone remembers I relocated mine beneath the car so it was going to be a little more complicated to check it out, but I figured why not. Let's start simple before I start going insane trying to figure out if I messed something up with my conversion wiring, removing interior wiring, or something else.
The first thing on my list of things to do was pull the cover I made for the fuse area off. Which, is normally super easy... Keyword, normally. It just has one large bolt with a wing nut on one side and a self tapping screw in the frame on the other. The wing nut and bolt came off super easy, but when I went to remove the self tapping screw the head broke off leaving the rest of it threaded in my cover mount and the body, leaving them stuck together. I ended up taking a hammer and beating the crap out of the screw to get
the mount to come away from the body. Even at this point in time the end of the screw is still stuck in the body. I need to figure out something in regards to replacing it.

Once I finally got that off I tried to simply pull the fuse boxes up back throuh the hole. It most definetely was not going to happen. I had the ABS block connector, firebird headlight switches, HID wiring, passenger window motor wiring, and other things all jammed down that same hole as well. Earlier in the day I had let my friend borrow my jack so he could work on his van (77 short box - 383 / 700r4). Thinking I was only going to be working on wiring I didn't foresee any issues with this. DOT! I ended up taking the GM scissor jack out of my 95 Camaro DD, using 4 extensions on my impact, and jacking the car up with that enough to get the wheel off. (This is once I got it fixed)

* When you're planning on doing something to your car think about how it is going to potentially affect you working on your car in the future*
When I made the cut for the fuse boxes to go through I didn't make it that large. When, I added the weather stripping around the edge and all of the other wiring it just added to the problem of the hole being too small and made it next to impossible to get the fuse boxes out. With the wheel off, the rest of the wiring pulled off of the power post, and some odd sitting positions I would have been able to check the relay, but I wanted to do things the right way and fix the added problem of inadequate space. In the future I didn't want to blow a fuse and be stuck on the side of the road trying to pull the inner fender, a wheel off, and laying on my back to check for problems. After about an hour and a half of removing all removing all of the other wiring I had added, the headlight motor wiring, and trying a million ways of forcing the fuse boxes out of the hole with one hand pushing from the bottom and the other from the pushing the other box to the side one finally came out! With one out the other one was way easier and I was stoked.

* Do NOT ever cut your hole like this! *
With the boxes finally out I pulled the cover off and located the horn relay. I found that the fog light relay (I believe) is right next to it. I pulled the horn relay out, stuck the one from the fog lights in its place, and connected the positive battery cable to the post. Silence, no more honking! It was so simple, but in not knowing what to do and then having pretty much everything possible go wrong it ended up taking me around 3 hours from when it started honking to silence.
In short... If your horn ever gets stuck on check the horn relay as it may be stuck open.
I'll post today's work when I get home tomorrow. I have to get up in 5 hours.
and ! My plan was to install the wiring for my gauges, shift light, and work on my battery cutoff wiring.I started off by fixing a ground wire that I had broken when removing the dash. Obviously, I didn't get all of the wires off of the dash like I thought I had. It is honestly a giant pain in the *** to get the wiring off of it.
Fixed:
With that fixed I attached it to the body as a temporary ground. I stuck the gauge cluster in the car, attached the rest of the grounds, and some other connectors.
My plan was to break out my multi meter and measure some wires to find switched 12v power sources and switched lighting sources. I had my old battery in the car which is almost dead, but holds about 35% of a charge. It is enough to get some slight testing done, but after a few days of use it will go dead. When, I went to connect the battery cables it was of course dead. I then stuck my new red top in the car so I could get all of my testing done and that's when all hell broke loose.
I had the negative connected to the battery and went to wedge my positive against the terminal. My positive has a ring end on it to connect to my cutoff switch so I have to wedge it against the terminal with the handle of the battery. As soon as I touched it to the positive post my horn honked. I thought, "Wow, that's odd. I wonder if that was just some odd one time deal? Let's try it again." - Touches cable to post again... HHHOOOONNNKKKK! I did this a few times to make sure I wasn't going crazy and every time I touched it to the post it started honking and wouldn't stop. I couldn't get it to shut off as long as I had it connected to the positive post.
I started by checking to see if something beneath the airbag was stuck or the wiring was damaged. It all checked out and as soon as I attempted to reconnect the positive cable more steady honking. I pulled the passenger head light up real quick with my impact and checked out the horn. With all of the headlight wiring and the new bracket maybe something was out of whack, but it checked out as well. I started doing some research, but couldn't figure out what it was. I sent out a couple emails and a few texts to see if anyone knew and the only person who responded told me to check the horn relay located on the driver's side under the hood. Well, if anyone remembers I relocated mine beneath the car so it was going to be a little more complicated to check it out, but I figured why not. Let's start simple before I start going insane trying to figure out if I messed something up with my conversion wiring, removing interior wiring, or something else.
The first thing on my list of things to do was pull the cover I made for the fuse area off. Which, is normally super easy... Keyword, normally. It just has one large bolt with a wing nut on one side and a self tapping screw in the frame on the other. The wing nut and bolt came off super easy, but when I went to remove the self tapping screw the head broke off leaving the rest of it threaded in my cover mount and the body, leaving them stuck together. I ended up taking a hammer and beating the crap out of the screw to get
the mount to come away from the body. Even at this point in time the end of the screw is still stuck in the body. I need to figure out something in regards to replacing it.
Once I finally got that off I tried to simply pull the fuse boxes up back throuh the hole. It most definetely was not going to happen. I had the ABS block connector, firebird headlight switches, HID wiring, passenger window motor wiring, and other things all jammed down that same hole as well. Earlier in the day I had let my friend borrow my jack so he could work on his van (77 short box - 383 / 700r4). Thinking I was only going to be working on wiring I didn't foresee any issues with this. DOT! I ended up taking the GM scissor jack out of my 95 Camaro DD, using 4 extensions on my impact, and jacking the car up with that enough to get the wheel off. (This is once I got it fixed)
* When you're planning on doing something to your car think about how it is going to potentially affect you working on your car in the future*
When I made the cut for the fuse boxes to go through I didn't make it that large. When, I added the weather stripping around the edge and all of the other wiring it just added to the problem of the hole being too small and made it next to impossible to get the fuse boxes out. With the wheel off, the rest of the wiring pulled off of the power post, and some odd sitting positions I would have been able to check the relay, but I wanted to do things the right way and fix the added problem of inadequate space. In the future I didn't want to blow a fuse and be stuck on the side of the road trying to pull the inner fender, a wheel off, and laying on my back to check for problems. After about an hour and a half of removing all removing all of the other wiring I had added, the headlight motor wiring, and trying a million ways of forcing the fuse boxes out of the hole with one hand pushing from the bottom and the other from the pushing the other box to the side one finally came out! With one out the other one was way easier and I was stoked.
* Do NOT ever cut your hole like this! *
With the boxes finally out I pulled the cover off and located the horn relay. I found that the fog light relay (I believe) is right next to it. I pulled the horn relay out, stuck the one from the fog lights in its place, and connected the positive battery cable to the post. Silence, no more honking! It was so simple, but in not knowing what to do and then having pretty much everything possible go wrong it ended up taking me around 3 hours from when it started honking to silence.
In short... If your horn ever gets stuck on check the horn relay as it may be stuck open.
I'll post today's work when I get home tomorrow. I have to get up in 5 hours.
10-05-2011, 02:14 AM
#403
Staging Lane

Join Date: Aug 2011
Location: Atlanta, GA
Posts: 67
Likes: 0
Received 0 Likes
on
0 Posts
@Beaflag - the oil was low and the light was on..I had to drive it home/to autozone for oil which is on my way.. did a oil change and rocker arm install because one was broken..now its got an incosistant flapping/tapping noise. around the valves.
 10-05-2011, 06:40 PM
#405
In the time that you've been planning to rebuild your car, I've wrecked 2 cams, toss 2 rods, gone gen 4 ls3 and forged, got a house, gone thru 2 girlfriends, almost done a degree too...
I think you need to get some priorities straight and establish yourself first instead of constantly getting/selling parts.
I think you need to get some priorities straight and establish yourself first instead of constantly getting/selling parts.
10-05-2011, 07:43 PM
#406
In the time that you've been planning to rebuild your car, I've wrecked 2 cams, toss 2 rods, gone gen 4 ls3 and forged, got a house, gone thru 2 girlfriends, almost done a degree too...
I think you need to get some priorities straight and establish yourself first instead of constantly getting/selling parts.
I think you need to get some priorities straight and establish yourself first instead of constantly getting/selling parts.
--------------------------------------------------------------------------
Monday, night I made a last ditch minute effort to make it into Advanced Discount Auto and picked up a new horn relay, some fuses, and a couple odds and ends. When I got up yesterday I went straight down to the garage, started working on the car, and trying to help my friend finish his van. My first task was fixing my previous issues with my fuse panel relocation. Here is what the previous hole looked like with the old weather stripping in it.

Cut:

Finished with some 3/16ths windshield fluid hose with a slit down the side.

I jammed all of the fuse panels back in and this is what it will looks like with everything just sitting there.

When I drilled one of the new holes for a zip tie I used a drill bit in my impact. Don't ever do this. It got twisted in the impact and was a bitch to get out.

I started doing some google searches and trying to trace some wires for mounting my gauges, shift light, conversion wiring, etc... I managed to answer a ton of my earlier questions. I'll keep this post updated as best as I can so if anyone is ever trying to find some of this information they can.
Post beneath this one.
10-05-2011, 08:14 PM
#407
I've managed to answer a few of my questions so far through doing a lot of research. I thought I would post the answers for anyone that may potentially have the same questions later on.
--------------------------------------------------------------------------
From my 9-25-11 Post: https://ls1tech.com/forums/15431962-post383.html
Questions Answered:
Question: Was this (plug on the back of the OEM Monsoon cd player) for an amp or the Bose rear large speaker that mounts on the driver's side where the spare tire area would be?
Answer: That plug is for the OEM CD changer. Even if your car is not equiped with a CD changer the wiring will still be inside of the car. It will look like this: http://i395.photobucket.com/albums/p...g/PA010010.jpg
Question: Does anyone have a pin out of that (OEM amp located in the spare tire area) plug?
Answer: https://ls1tech.com/forums/5962246-post5.html Located in this post / sticky: https://ls1tech.com/forums/stereo-el...nsoon-faq.html
Question Still Unanswered:
Question 1: In working through the harness though I did find myself questioning a couple things. The first is that I noticed this seemed very odd. I'm not sure if this is OEM or not. This plug is located just to the left of the passenger airbag in the dash. It is on the same strand of wires as the light in the glove compartment, a relay, and the light that attaches to the dash pad. What is it and why is it looped like that?
Pictures of said wiring:
http://64.19.142.13/i395.photobucket...g/P9230010.jpg
http://64.19.142.10/i395.photobucket...g/P9230011.jpg
--------------------------------------------------------------------------
From my 9-30-11 Post: https://ls1tech.com/forums/15451543-post386.html
Questions Answered:
Question: I plan on running a 10an feed line, 8an return, the fuel rails in parallel, and a boost referenced fuel pressure regulator (BRFPR). With running the rails in parallel where would be the ideal location for the Autometer fuel pressure sending unit?
Answer: Question: In installing my Raptor shift light I am supposed to tie into the RPM signal for the car. I need some help locating that one.
Answer: Full installation information: https://ls1tech.com/forums/stereo-el...-tap-into.html
Awesome link for pretty much any car: https://ls1tech.com/forums/3844437-post54.html
Question 2: How many items can I pull voltage off of the same 12V switched source? IE, can I hook up every item to the same source or as I'm guessing is there a limit of voltage you can draw from one source?
Question #7: Which wire is the switched 12v lighting source or headlight power wire for dimming purposes that you would tie into for an LC1 or Autometer gauge? Visual reference: http://64.19.142.12/i395.photobucket...g/P9290004.jpg
Answer for #2 and #7: https://ls1tech.com/forums/stereo-el...2-12v-key.html
Question 3: In installing my Autometer electric oil pressure sending unit in the OEM block off above the oil pan what sort of line and fittings do I need? I am guessing that I obviously need a 1/8th NPT fitting to plug into the piece above the oil filter, but... what else? Where are you mounting the sending unit once you have it tied into that location? Visual example: http://m.modernhemi.com/forums/showthread.php?t=1120231
Answer: For the line I'd use a 3an ish line with 1/8th NPT female fittings on both sides. I'm still not sure on mounting, but I think you could tuck it up behind the intake manifold.
--------------------------------------------------------------------------
--------------------------------------------------------------------------
From my 9-25-11 Post: https://ls1tech.com/forums/15431962-post383.html
Questions Answered:
Question: Was this (plug on the back of the OEM Monsoon cd player) for an amp or the Bose rear large speaker that mounts on the driver's side where the spare tire area would be?
Answer: That plug is for the OEM CD changer. Even if your car is not equiped with a CD changer the wiring will still be inside of the car. It will look like this: http://i395.photobucket.com/albums/p...g/PA010010.jpg
Question: Does anyone have a pin out of that (OEM amp located in the spare tire area) plug?
Answer: https://ls1tech.com/forums/5962246-post5.html Located in this post / sticky: https://ls1tech.com/forums/stereo-el...nsoon-faq.html
Question Still Unanswered:
Question 1: In working through the harness though I did find myself questioning a couple things. The first is that I noticed this seemed very odd. I'm not sure if this is OEM or not. This plug is located just to the left of the passenger airbag in the dash. It is on the same strand of wires as the light in the glove compartment, a relay, and the light that attaches to the dash pad. What is it and why is it looped like that?
Pictures of said wiring:
http://64.19.142.13/i395.photobucket...g/P9230010.jpg
http://64.19.142.10/i395.photobucket...g/P9230011.jpg
--------------------------------------------------------------------------
From my 9-30-11 Post: https://ls1tech.com/forums/15451543-post386.html
Questions Answered:
Question: I plan on running a 10an feed line, 8an return, the fuel rails in parallel, and a boost referenced fuel pressure regulator (BRFPR). With running the rails in parallel where would be the ideal location for the Autometer fuel pressure sending unit?
Answer:
The regulator goes post feed. So if you fed them both in parallel from the rear, the front of the rails would have to go to the regulator and then the bottom return goes to the tank. The sending unit will go in the fuel pressure regulator. There's an 1/8npt port on it, and that's what it's used for.
Answer: Full installation information: https://ls1tech.com/forums/stereo-el...-tap-into.html
Awesome link for pretty much any car: https://ls1tech.com/forums/3844437-post54.html
Question 2: How many items can I pull voltage off of the same 12V switched source? IE, can I hook up every item to the same source or as I'm guessing is there a limit of voltage you can draw from one source?
Question #7: Which wire is the switched 12v lighting source or headlight power wire for dimming purposes that you would tie into for an LC1 or Autometer gauge? Visual reference: http://64.19.142.12/i395.photobucket...g/P9290004.jpg
Answer for #2 and #7: https://ls1tech.com/forums/stereo-el...2-12v-key.html
This was covered a few posts down from here:
https://ls1tech.com/forums/stereo-el...ce-gauges.html
Driver's side fuse panel (interior):
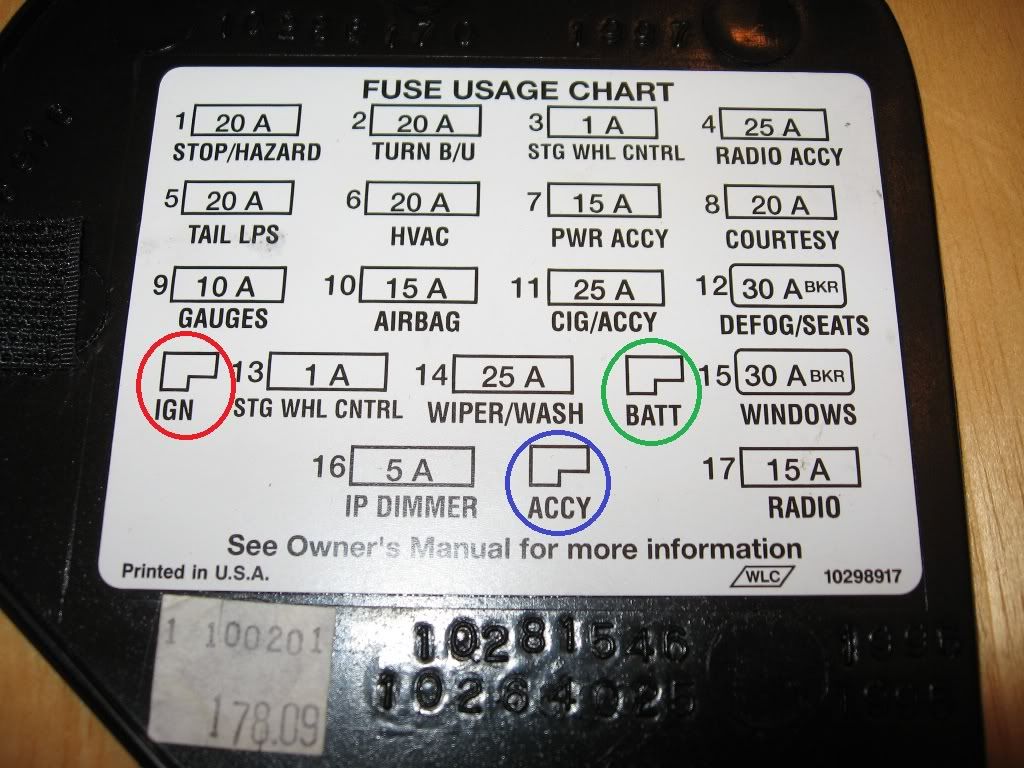
Red Circle = IGN = Switched 12V Power (has power when key is in the on position, but does not have power otherwise)
Green Circle = BATT = 12V Always Hot (has power regardless of key position)
Blue Circle = ACCY = 12V Retained Accessory Power (best example is the radio - this will energize when the car is turned on, and will stay powered even after the car is turned off, but will turn off once the door is opened)
These slots can be accessed by using a flat blade connector crimped on the end of a wire (then use the wire to power whatever you wish) - just shove the connector in the appropriate slot from the front of the panel.
https://ls1tech.com/forums/stereo-el...ce-gauges.html
Driver's side fuse panel (interior):
Red Circle = IGN = Switched 12V Power (has power when key is in the on position, but does not have power otherwise)
Green Circle = BATT = 12V Always Hot (has power regardless of key position)
Blue Circle = ACCY = 12V Retained Accessory Power (best example is the radio - this will energize when the car is turned on, and will stay powered even after the car is turned off, but will turn off once the door is opened)
These slots can be accessed by using a flat blade connector crimped on the end of a wire (then use the wire to power whatever you wish) - just shove the connector in the appropriate slot from the front of the panel.
Answer: For the line I'd use a 3an ish line with 1/8th NPT female fittings on both sides. I'm still not sure on mounting, but I think you could tuck it up behind the intake manifold.
Question 4: With EFI live and a laptop in the car how does data logging work and how many inputs can you monitor? Do items like the flashscan V2 only allow tuning and data logging as an alternative to having the laptop in the car? Has anyone tried an ELM327 interface for data logging? I found a little information here:
You can log I believe 32 PID's at one time, although the more you do, the slower and less resolution you get.. There are 4 external 5v inputs that you can use for anything, 2 temperature inputs, and two 12v switched inputs. I haven't figured out black box logging, but you supposedly select PID's, (8 or so) and you can log them onto a standard SD card for review later. You can also flash tunes from your handlheld without a laptop, or use it passthru. I use my laptop because I like to see the PID list. (small screen on unit)
Diagnostic/datalogging software?
Data Logging - Problem with hardware/software/other?
If anyone has an android phone...
Question 5: In connecting my LC1 wideband and DB gauge does this sound correct?
Think I have correct...
- The Red wire of the LC1 goes to a switched 12v switched power source with a 5 amp fuse in line.
- The Black wire will have the push button and LED connected to it leaving the single wire now with two ends.
- The Blue, White, and ends of the Black wires get soldered to a single connector which is grounded to the back of a cylinder head only.
I'll get back to you on that one.. I'll have to look at mine. I soldered all my grounds together, the stupid LC1 is VERY VERY VERY sensitive to ground offsets.
With the DB Gauge...
- The Red wire of the gauge goes to 12v switched power source.
- The Black ground wire will connect to the back of the cylinder head with the rest of the LC1's ground wires
- The White wire connects to the LC1's Brown wire
- The Yellow wire connects to the headlight power switch for dimming purposes.
Question #6: What can I do with the yellow wire of the LC1 now? It says I can program analog outputs and that it can be used as a narrow band sensor. Where would I run the yellow wire if I was to go that route?
I spliced a narrowband sensor pigtail into the yellow wire (output) IE cut a stock o2 pigtail off (the data wire) and spliced it into the yellow output of the WB02. I leave the heater wires connected, and use a hose clamp to attach the sensor to a ground (usually a header primary) That way, the car doesn't throw a code when the WBO2 is connected, the WB02 "simulates" narrowband function to the PCM.
Also, for dimming function on any gauge, bulb, etc.. just splice or add-a-fuse to Circuit 16 on the interior fuse box.
The autometer oil sending unit is a big m-f'er, but it fits as-is above the oil filter.. I just tap it into that feed above the oil filter. Drill the tap-size drill bit all the way through until you strike open ground, then tap it (checking constantly for fit) until the sending unit gets snug with some threads left. I see no reason to mount it remotely. It's much easier to run a wire, than a hose.
As far as switched 12v devices from one source, I like to use ONE. that way, if one overloads or burns up, you don't lose all of them.. I will pull from a large fuse for all the accessories I am running (spare 20A or so) and run either a small inline fuse, or a fusible link to the power in on each device. Those add-a-circuit things work well, as they protect both circuits (and don't kill the one you're piggybacking off of) but they look tacky to me. If i need a dedicated source, I'll use a rarely/never used fuse, and re-route power to my new device. (My autometer gauge is powered by the ABS fuse, since I don't use it) Voltage isn't critical, but amperage is.. Too much draw means instant fusey poppey. If there isn't a fuse (i've seen ghetto stereo installs where the power is taken from the front charging lug of the vehicle, and the FUSE was on the other end in the trunk. Yeah, that protects the stereo, but what happens when that wire chafes through the hole crudely poked in the firewall? Arc weld = fire. Remember that you want the fuse as CLOSE to the source as possible, because anything after it is protected. I've seen two vehicles burnt to the ground in junkyards because of crappy stereo installs. Pretty funny.
Last edited by Beaflag VonRathburg; 10-21-2011 at 06:36 PM.
10-06-2011, 05:11 PM
#408
Staging Lane
Join Date: Aug 2011
Location: Atlanta, GA
Posts: 67
Likes: 0
Received 0 Likes
on
0 Posts
@Beaflag, Here are my steps.. The noise sounds like it is more on the top end. I had 1 broken rocker arm, I heard GM issued a notice on this a long time ago. So rockers are new, clearance is not the issue. As far as to why the oil was low, I'm assuming it was burning off. The car doesn't drip anything. However there was no smoke like what Im used to. So changed the oil and still knocks. Ran it without valve covers still knocks. The only things I can think off are: Its the push rods, I checked to see if they were bent..IF they are, I can't tell I rolled them on a flat surface and they seemed ok. I haven't gone as in depth as to look at valves,pistons, bearings..etc
I haven't set the preload, or if I did it was unknowingly, I shall ask my father for advice on this since he has an electrical engineering degree ha, and I'm still working on my degree ha.. The motor is entirely stock, I'd guess what ever the stock is set at, nothing has been touch internally in the car for 13 years..only standard maintenance.
Tonight im going through to set the rockers correctly, I found that there is a certain procedure to installing them, so hopefully this will correct the issue, if not then its someting deeper, im guessing
10-09-2011, 12:09 AM
#409
Man, I think I've been watching this thread for too long. I understand not wanting to do it twice, but there comes a point where enjoyment of just driving the car and hearing it run is WAY more important than gauges, interior, and whatever else your doing.
Like someone else said, you don't need a 9", you don't need a built transmission etc. You may not need it, you want it yes, but your main factor slowing you down is money.
There comes a time where you got to be realistic bro, and say this **** is for the birds and just get it running. Then work on the rest of it. You will be 10x more motivated to get the rest of it done if the car ran.
Last edited by Fbodyjunkie06; 10-09-2011 at 12:10 AM. Reason: spelling
10-09-2011, 02:13 AM
#410
Teching In
This post was like a soap opera for car enthusiasts. I admire your stick-toitivness, it is an amazing story. I have one question though, you got the car, and then it committed suicide, but have you pulled the motor apart yet to see what the inside looks like??? I have seen multiple engines but I think they were all new. I will keep watching this thread as it is pretty impressive, keep up the great work!
Also, GREAT RESPONSE, HAHAHAHA, I didn't think that going through girlfriends was something to brag about??
I'm glad things have gone well for you. Things haven't been as nice for me and part of it is due to my inconsistencies, but not even close to all of it. As you may have noticed a lot of things can happen in that kind of time. People need to realize that and not judge me based on the fact my car hasn't run in a long time. It'd be like me saying you've failed as a man because you've gone through two girlfriends, and saying get your life straight, where are your priorities at?
10-13-2011, 12:18 AM
#411
^ Thanks. I haven't pulled the engine apart to see what was destroyed. Once I get around to that point I'll post some pictures. I've determined the engine hydrolocked through a tear in the vacuum line from the brake booster to the intake manifold.
-------------------------------------------------------------------------------------
I've spent most of today and part of yesterday drawing up a wiring diagram for the whole car; 3x fuel pump wiring, battery cutoff, switch panel, line lock, 2 step, COS5, valet mode, gauge, LC1, and shift light wiring, warning LEDs, and a second internal fuse box for gauges, shift light, and LC1. I'm REALLY close to saying F this with all of this stock cluster, shift light, gauge install wiring, and second fuse panel. I'm going to be making some calls tomorrow to possibly get some information on an all in one solution that should make things a lot simpler.
10-19-2011, 11:34 PM
#413
I created a new items for sale thread: https://ls1tech.com/forums/parts-cla...b-surplus.html I added quite a few items and am now selling my 93 for parts as up to this point no one has been interested in it as a whole car.
Support the build and get some nice parts at a great price.
Support the build and get some nice parts at a great price.
10-21-2011, 11:06 AM
#414
TECH Apprentice
Join Date: Sep 2010
Location: Missouri
Posts: 322
Likes: 0
Received 0 Likes
on
0 Posts
Jesus that is a long time for a car to be down. I would've just spent 1,000$ and put a new motor in right after it happened. To each their own. Good luck. Also doing this much over such a long period of time your probably gunna have more bugs than u can't count when it done. Again good luck.
10-21-2011, 05:47 PM
#415
im just wondering when you are gonna say screw it and the car is just going to end up a hacked up half done roller because you wont ever be able to finish it and will finally just forget about things in the middle of doing them because there is so much of the car missing now.
good luck to you, i just recently got my blue green chameleon formula back myself.
good luck to you, i just recently got my blue green chameleon formula back myself.
10-21-2011, 07:33 PM
#416
Jesus that is a long time for a car to be down. I would've just spent 1,000$ and put a new motor in right after it happened. To each their own. Good luck. Also doing this much over such a long period of time your probably gunna have more bugs than u can't count when it done. Again good luck.
im just wondering when you are gonna say screw it and the car is just going to end up a hacked up half done roller because you wont ever be able to finish it and will finally just forget about things in the middle of doing them because there is so much of the car missing now.
good luck to you, i just recently got my blue green chameleon formula back myself.
good luck to you, i just recently got my blue green chameleon formula back myself.
There are quite a few tasks that aren't finished; aiming headlights, final mounting of engine covers, running the wire for my battery cutoff relay, but... they'll all get done. I have everything that needs to be done to the car on a list and I modify / cross them off as they get worked on. I've avoided taking the car apart other than what I am directly working on and then when I'm finished it goes back together ie; headlights.
I'm actually on the complete opposite end of the hacked up roller spectrum as it is just a with a blown up engine that is going to be even more complete soon. I made a trip today out to a local chassis shop that does very nice work. I'm seriously impressed with the things they have in there. I talked to the owner and the guy who is going to be doing the work for my car for about an hour and a half today outlining what I'd like to have done. Everything is set and the car is going to be picked up from my house the first day I have off of work next week, which I'm not sure of at this point in time, but will find out tomorrow. The car will get towed to the shop and have installed a 10 point moly cage with dual clevis swing outs, wolfe mini tubs, and a mount installed for my battery tray. The price they gave me for the work is fantastic and I'm excited about getting some things finished. While the car is gone it will give me time to draw out the wiring diagrams for my car, order the parts I'll need to finish the interior, and clean out my garage.

I'd like to give a humongous thanks to three people; Shane aka neckspeed, Joe at Hyperaktive, and Ollie aka 67RSCamaroVette. All of whom have been a humongous help as of recent with getting things figured out.
Joe at Hyperaktive was nice enough to give me a call back and have an hour conversation with my about aftermarket EFI systems and Racepak dashes.
Ollie was nice enough to give me his number / call me back and help me out with tons of wiring issues. I have a WAY better idea now on what I'm getting into with this wiring and it doesn't seem as intimidating as before. Having someone to bounce ideas off of that has already done the things you're trying to accomplish is priceless.
Shane has gone through quite a few of the things I'm attempting to do at this point in time and put me in touch with the guys I mentioned above that run the chassis and fabrication shop.
I also modified my earlier question posts with some answers that were provided by 67RSCamaroVette: https://ls1tech.com/forums/15473976-post407.html
10-30-2011, 10:54 PM
#418
TECH Apprentice
I want to say a few things, man i hope you do get your car running one day and i hope you enjoy it. I have friends like you that change their minds often and they waste alot of money, time, and effort and have nothing tangable to show for it.
Im going to give you a bit of advise though, please use this advise wisely. Plan out your build, make sure u buy only the parts you will need, RESEARCH everything to have a good idea how to the task, if you do not have the tools/knowlegde/means to do the task then pay a professional to do it. And most importatly start 1 project and finish it to the end 100% Not to be mean but you have a habit of chancing directions and not finish it through to the end.
I worry about the engine you are building inside your house on the floor next to your washer/dryer and the heads your assembling on (what looks like your kitchen counter) You need a proper area for work and proper tools
anyway, carry-on and please finish the task at hand before moving on the the next, it will save you alot of headache
10-31-2011, 12:06 AM
#419
lol never got to finish my post cuz it was an iphone post.
The point of it was to illustrate the large amount of time that has passed since your engine died in post 1 and where you are today. For those that take time to read this thread and follow it, it should be a lesson that planning ahead to what you want saves $$$ better than jumping on every deal you find.
You need to get your head on straight for priorities and plan this out or it'll continue being a big money pit. It shouldn't be that when rainy days comes you have a big sell off of parts to fund your habit. Also it shouldn't be that you spend as much as possible whenever money comes in on parts. Just reading thru your thread, you can see a lot of lack of planning here and there and a lot of oh **** moments need $$$.
I hope this latest attempt to get up and running has a good plan fiscally and mod wise. Agreeing with the above poster.
I wonder if the next time I really go through this it'll be with my son on lessons how to plan things out right the first time.
11-01-2011, 05:34 AM
#420
The only thing keeping me coming back is the pictures and satisfying feeling i get laughing out loud at all this free internet advice.
So you did a cam swap in your moms garage, installed a lid and some shitty ebay exhaust and now you're a certified Dr. ******* phil of the car world. Woo hoo...
Tyler i know you feel like everyone deserves an explanation at why you do, what and how you do.. but seriously it's getting old man.. You're kindness is only allowing some of these idiots to **** on you more and more.. This thread deserves WAY more than a pity party..
For ***** sake some guys first post was just to let you know that in all his civic to S-10 wisdom he has all the secrets to being a successful car guru.. please old school slow, enlighten us all some more!
Last edited by KrisXpc; 11-01-2011 at 05:44 AM.